Author:
Sara Rhodes
Date Of Creation:
11 February 2021
Update Date:
1 July 2024
Content
In this wikiHow article, you will learn how to remove echoes from an audio file using the free Audacity audio editor for Windows and Mac. Sometimes conditions do not allow recording sound quality, as a result of which echo or background noise may be heard in the recording. Most audio editors, such as Adobe Audition, have similar functionality for canceling echo and background noise. This method is best when you want to edit a track that contains only voice or only one instrument. Isolating and removing background noise from tracks with multiple voices and instruments is much more difficult.
Steps
 1 Start the Audacity program. The program shortcut looks like an oscillating sound wave between two blue headphones.
 - To download Audacity, go to https://www.audacityteam.org/download and click on the download link appropriate for your operating system. After downloading, open the program installation file and follow the prompts on the screen.
 2 Open the audio file. Audacity supports most audio formats including mp3, wav, aiff, flac, ogg, and ffmpeg. To open an audio file:
 - Please select File.
- Click on Open.
- Find and select the file you want.
 3 Apply noise reduction effect. To apply this effect, highlight the audio track by pressing Ctrl+A on Windows or ⌘ Command+A on macOS. Then click on the Effects tab in the menu bar at the top and select Noise Reduction. Move the Noise Reduction (dB) slider to the right to reduce echo and background noise. Click "Listen" in the lower left corner. If the echo is removed, click OK to apply the effect.
 - This effect will lower the volume and change the pitch of the audio.
 4 Apply a signal boost effect. This effect allows you to increase the volume of your audio. In the Effects tab, find and select Signal Gain. Move the slider to the right to increase the volume. Do not turn up the volume too much, otherwise the sound will be distorted. Click Listen. When you are satisfied with the volume level, click OK to apply the effect. When editing tracks, use this effect as needed.
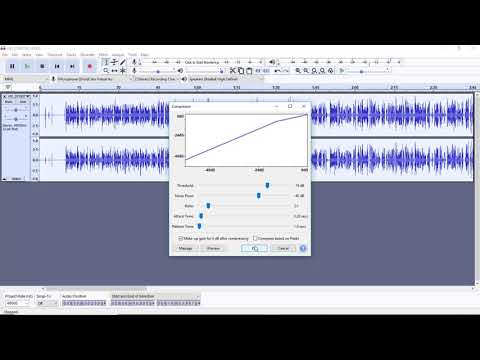
  5 Apply a compressor. The compressor allows you to reduce the distance between the lower and upper peaks of the sound wave. To apply a compressor, click on the Effects tab and then select Dynamic Range Compressor. Move the slider in the "Ratio" line so that the line on the graph drops slightly below the original position. You can also reduce parameters such as Noise Low and Threshold. Click Listen. When you're happy with the result, click OK to apply the effect. This will lower the audio volume. Use this effect as needed during editing.
  6 Apply low or high pass filters. Depending on how your audio recording sounds, it may be necessary to use a low or high pass filter. If the recording is skewed towards high frequencies, apply a low-pass filter. If the track sounds low and muffled, apply a high pass filter. Both effects are located in the Effects tab. From the Rolloff (dB per octave) drop-down menu, select how many decibels will be cut per octave. You can choose from 6 to 48 decibels. Click "Listen", and if you are satisfied with the sound, click "OK" to apply the effect.
  7 Apply a graphic equalizer. To do this, select "Equalizer" in the "Effects" tab. On the left under the graph, select Graphic next to EQ Type. Move the sliders below the equalizer to adjust the equalizer. The bars on the left are responsible for the lower frequencies, the bars on the right are for the upper ones, and those in the middle are for the middle ones. Click Listen and then OK to apply the effect.
  8 Export the audio file. If you are satisfied with the sound of the audio recording, export it so that you can listen to it later in the media player. To export an audio file:
 - Please select File in the menu bar at the top.
- Click on Export.
- Click Export as MP3.
- Click on Save.
 9 Save the project. If you plan to edit your audio file in the future, you must save the project. To save the project:
 - Please select File in the menu bar at the top.
- Click Save project.
- Click on OK in the window that appears and then Save.


