Author:
Carl Weaver
Date Of Creation:
24 February 2021
Update Date:
1 July 2024

Content
- Steps
- Part 1 of 4: Creating the Perfect Pattern
- Part 2 of 4: Preparing the fabric
- Part 3 of 4: Preparing the elastic for the edging
- Part 4 of 4: Sewing the T-shirt
- Tips
- What do you need
If you know how to use a sewing machine, you can sew a T-shirt yourself. If you've never sewed a T-shirt before, the easiest place to start is with a basic model. Start with a pattern, either made or made yourself.
Steps
Part 1 of 4: Creating the Perfect Pattern
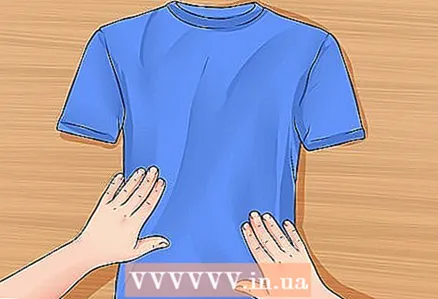 1 Find a T-shirt that fits you well. The easiest way to create a T-shirt pattern is to copy the shape of an existing T-shirt that fits well on you.
 - While this article focuses on designing and designing a pattern for just a T-shirt, you can use the same basic steps to design templates for other T-shirt styles.
 2 Fold the shirt in half. Fold the shirt vertically in half with the front facing out. Place your folded T-shirt on a large piece of paper.
 - Ideally, place the paper on heavy cardboard and then place the T-shirt on top. The cardboard will provide a hard enough copying surface. Moreover, you will need to pierce the paper with pins, which is easiest to do with a cardboard backing.
 3 Pin the pins along the outer contour of the back. Pin the pins around the perimeter of the shirt, paying particular attention to the seam at the back of the back, under the collar and the seam on the sleeve.
 - Pins that run along the shoulder seam, sides and bottom hem may not be pinned accurately as their main purpose is to hold the shirt.
- For the shoulder seam: poke through the seam and paper. The distance between the pins should not be more than 2.5 cm.
- For the back neckline: Insert the pins vertically through the seam joining the back neckline and collar. The distance between the pins should not be more than 2.5 cm.
 4 Move the outline. Pressing lightly on the pencil, copy the entire outer contour of the T-shirt.
 - Trace along the shoulder, sides, and bottom of the pinned T-shirt.
- When you're done, lift the shirt up and find the pin holes that mark the sleeve seam and the neck seam. Trace along these holes to complete the back pattern.
 5 Pin along the outer contour of the front. Transfer the folded T-shirt to a new sheet of paper and pin along the outline of the front, not the back.
 - Follow the same steps as you followed for the back of the shirt to pin the pins along the hem and sleeves of the front of the shirt.
- The neckline is usually deeper in the front than in the back. To mark it, place the pins under the front of the neckline, just below the collar. The distance between the pins should be 2.5 cm.
 6 Move the outline. Draw the outline along the front part in the same way as you outlined the outline of the back.
 - Lightly draw around the shoulder, sides, and hem with a pencil while the T-shirt is pinned in place.
- Remove the shirt and trace along the pin marks on the neck and sleeve to connect the outline of the front.
 7 Pin and circle the sleeves. Unfold the shirt. Smooth out one sleeve and pin it to a blank piece of paper. Circle along the contour.
 - As before, insert the pins straight through the connecting seam.
- Run around the top, bottom, and outer edges of the sleeve while it is still in place.
- Remove the T-shirt from the paper and trace along the pin marks to cover the outline.
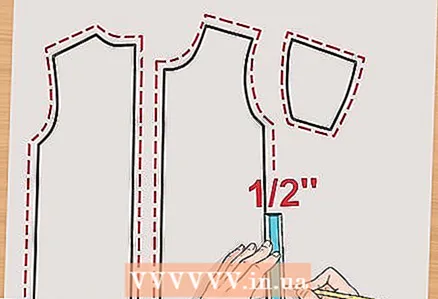 8 Add seam allowances to each part. With a tailor's tape and pencil, carefully draw another outline around the existing one on each part. This secondary contour denotes seam allowances.
 - You can choose whatever size of seam allowance you like best, but usually a 1.25 cm allowance will provide enough sewing space.
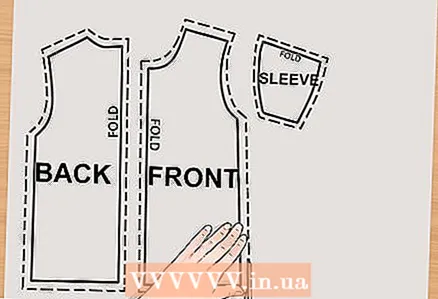
 9 Mark the details. Label each detail by location (back, front, sleeve). And also mark the fold line of each piece.
 - The fold line of the front and back is the straight, folded edge of the original T-shirt.
- Sleeve fold line - straight upper edge of the sleeve.
 10 Cut and match the details. Carefully cut out each piece along the outline. When finished, make sure all the pieces fit together.
 - When you line up the open sides of the front and back, the shoulders and armholes of the sleeves should match.
- When placing the sleeve on the armhole of the front or back part, the actual measurements (not seam allowances) must match.
Part 2 of 4: Preparing the fabric
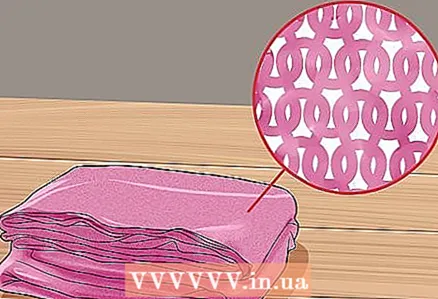 1 Find the right material. Most T-shirts are made from jersey, but you can opt for jersey that has little to no stretch to make sewing easier.
 - As a rule, it will be easiest to duplicate the cut of the original T-shirt with which you drew the pattern if you use a material similar in composition and weight.
 2 Run the fabric. Wash and dry the material as usual before doing anything else with it.
 - Pre-washing the fabric will allow the fabric to shrink and set the paint. As a result, the parts you cut and sew together will be more accurate in size.
 3 Cut out the details of the pattern. Fold the material in half and place the pattern pieces on top. Pin the pattern, circle it and cut around each piece.
 - Fold the fabric in half, right side in. And when unfolding the fabric, try to make it as flat as possible.
- Align the fold of the fabric with the fold mark on the pattern details.
- When pinning the pattern, pierce both layers of fabric. Draw a pencil around the fabric and cut without detaching the pattern.
- Once you have cut the fabric, you can remove the pins and paper parts of the pattern.
Part 3 of 4: Preparing the elastic for the edging
 1 Cut out the elastic for the collar. Measure the entire neckline of your T-shirt with a tailor's tape or tape.Subtract 10 cm from this length, then cut the elastic to that length.
 - Knitted elastic is a type of knitted fabric with vertical ribs. Technically, it is possible to use a knit without ribs for the collar, but elastic is usually preferred as it is more elastic.
- Cut the double-width elastic at the end collar.
- The vertical ribs should run parallel to the width and perpendicular to the length of the collar.
 2 Fold and iron the elastic. Fold the elastic in half lengthways and iron the fold.
 - Remember to keep the front facing out.
 3 Sew the elastic. Fold the elastic in half across. Sew the short ends of the elastic, with a 6 mm seam allowance.
 - Note that the front should still be facing outward.
Part 4 of 4: Sewing the T-shirt
 1 Pin the front and back parts together. Align the pieces with the wrong side of the fabric out. Pin only at the shoulders.
  2 Sew the shoulders. Stitch straight across the shoulder seam. Cut off the end of the thread and sew along the second shoulder seam.
 - To do this, use a standard straight stitch on your sewing machine.
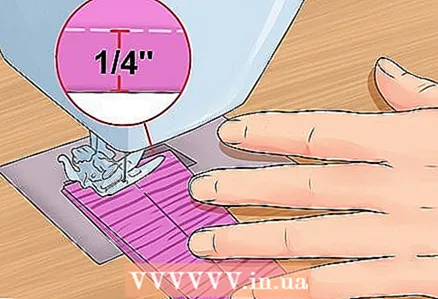
- Follow the seam allowances that you marked on the parts. If you followed the instructions in this article exactly, then the seam allowance should be 1.25 cm.
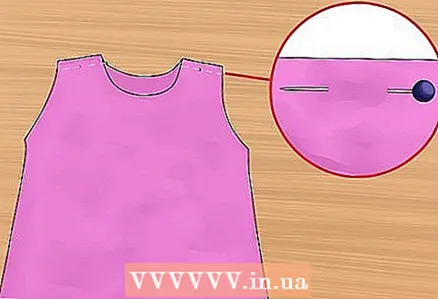
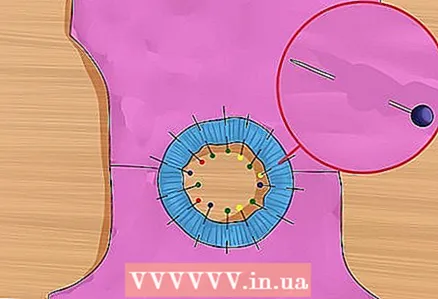 3 Pin the elastic to the neckline. Open the shirt and straighten it at the shoulder seams, right side down. Place the elastic collar over the opening of the neckline and pin.
 - Point the raw side of the collar towards the neckline so that it protrudes from the fabric of the shirt. Pin it to the middle of the back and front part.
- The collar is smaller than the opening of the neckline, so you need to carefully stretch it when pinning to the neckline. Try to stretch the elastic evenly so that the ribs are at the same distance.
 4 Sew the elastic. Sew along the raw edge of the collar with a zigzag stitch, within a 6mm seam allowance.
 - You should use a zigzag stitch, not a straight stitch. Otherwise, the thread will not be able to stretch with the collar when you put the finished garment over your head.
- While sewing, gently stretch the elastic with your hand. Maintain a slight tension so that the fabric does not wrinkle.
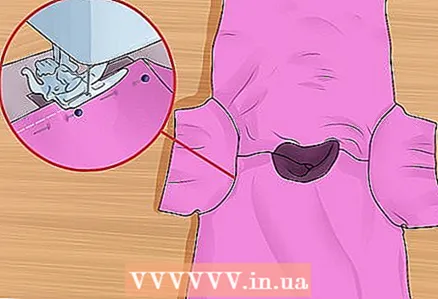
 5 Pin the sleeves into the armholes. Leave the shirt open and flat at the shoulder seams, but flip it right side up. Place the sleeves face down and pin up.
 - Position the rounded section of the sleeve against the rounded section of the armhole. Use pins to pin the pieces together in the center of both curves.
- Gradually place the pins and pin the rest of the curve to the rest of the armhole. Work on each side in turn.
- Repeat for the second sleeve.
 6 Sew on the sleeves. Stitch along both sleeves with a straight seam (right side of sleeves facing down) and join to armholes.
 - The seam allowance should match the seam allowance you marked on the original pattern. If you follow these instructions exactly, then the allowance should be 1.25 cm.
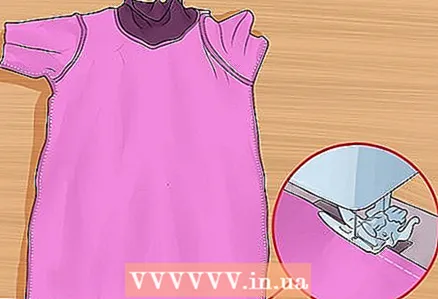
 7 Sew both sides. Fold the shirt right side in. Sew with a straight seam along the entire right side, starting from the end of the armpit seam down to the bottom edge of the T-shirt. Then repeat for the left side.
 - Pin the sleeves and side edges together, otherwise the fabric may shift while sewing.
- Sew according to the seam allowance you marked on the original pattern. For this instruction, the seam allowance should be 1.25 cm.
 8 Fold over and sew the bottom hem. The front sides should remain facing inward; fold the bottom edge to match the seam allowance. Pin or iron the fold, then sew along the edge.
 - Be sure to only stitch the hem of the hem. Do not stitch together the details of the back and front.
- Most knitted fabrics are resistant to fringe formation, so you may not need to hem the hem.Although this achieves a more accurate appearance of the product.
 9 Fold over and sew the edges of the sleeves. The front sides should look inward; fold the hem of each sleeve to match the seam allowance. Pin or iron the fold, then sew along the edge.
 - Like the bottom hem, the sleeves need to be stitched around the hole, and be careful not to sew both sides together.
- If the fabric of your choice is resistant to fringe, the sleeves do not need to be hemmed. But if you do this, they will look neater.
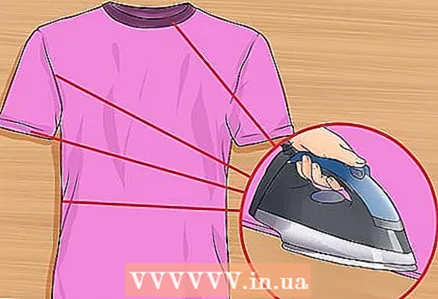 10 Iron the seams. Turn the T-shirt right side out again. Iron all seams to make them thinner.
 - It is necessary to iron the seams along the collar, as well as the shoulder and side seams. You may want to iron the hem and sleeves if you haven't done so before sewing.
 11 Try on a T-shirt. At this point, the T-shirt should be finished and ready to wear.
Tips
- If you don't want to make a pattern yourself, use ready-made patterns. You can buy them at most fabric stores (and craft stores that sell fabric). And, most likely, you will find basic T-shirt patterns among other patterns. You can also find basic sewing patterns on the Internet cheap, or even free.
What do you need
- T-shirt already made
- Pencil
- Tissue pencil
- Cardboard
- Plain paper (Plain newsprint, brown wrapping paper, and so on)
- Straight pins
- Scissors
- Scissors or circular scissors for fabric
- Knitted fabric, 1-2 m
- Knitted elastic band 0.25 m
- Sewing machine
- Sewing thread in a suitable color
- Iron
- Ironing board


