Author:
Florence Bailey
Date Of Creation:
22 March 2021
Update Date:
1 July 2024

Content
If you need to create business cards quickly and don't have a powerful graphics editor, Microsoft Word has the tools you need to create and print business cards. You can use templates to streamline the process, or you can create business cards from scratch. If you are creating cards from scratch, use the Table tool to lock in the correct size for your business cards.
Steps
Method 1 of 2: Using a Template
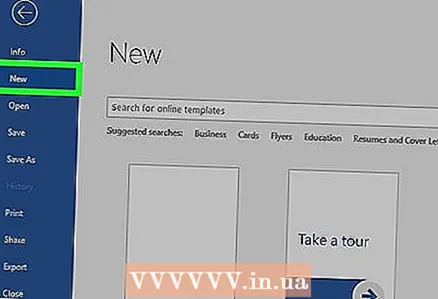 1 Click "File" - "New". You will create a new document from a business card template. This will allow you to make your business card quickly and professionally.
  2 Find business card templates. In the new window for creating a document in the search bar, enter "business card" (business card). A list of free templates that you can use to create your business cards will be displayed. There are templates for creating horizontal and vertical maps.
  3 Select the template you want to use. You can change any element of the template, including color, images, font, and layout. Choose the template that most closely matches your business card look. Click Create or Download to open the template in Word.
  4 Enter the required information on the first card. If you are using Office 2010 or later (and the template was developed in 2010 or later), the information you entered will automatically appear on all business cards on the page. Therefore, it is necessary to enter information in only one card. If the template does not support automatic information entry for all cards, you will have to manually enter data on each card.
  5 Change the format of any element of the business card. You can change the font, its size and color, and much more (do whatever you do when formatting text).
 - Since this is a business card, choose a font that is easy to read.
 6 Change the logo (if necessary). If your business card template has a logo, click on it to replace it with your logo. Resize your logo to fit within the size of your business card; make sure the logo doesn't look worse when you resize it.
  7 Review the information you entered. Make sure your business cards are free of typos or other errors. People will create a first impression of you from your business card, so don't spoil it with mistakes and typos.
 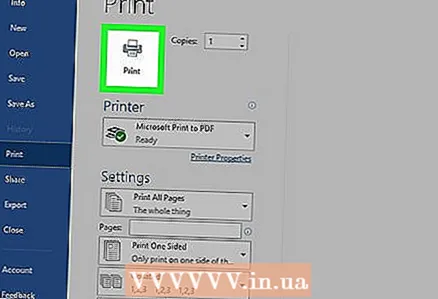 8 Print your business cards. If you are going to do this at home, you will need high quality paper. Choose white or cream-colored paper and don't forget glossy paper - although most business cards are printed on plain paper, some people prefer glossy business cards. If you are going to print a business card in a printing house, save the created template and take it to the printing house.
 - When buying paper, make sure your home printer can handle it. To do this, in the documentation for the printer or on the website of its manufacturer, find detailed information about the types of paper that your printer model works with.
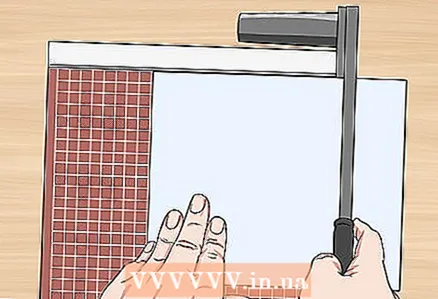 9 Use a sharp cutting tool to cut the printed business cards. As a rule, there are 10 business cards on each sheet. Do not use scissors or other tools that will prevent you from creating a straight cut line. Use a paper cutter or special paper cutter. The printers can cut your printed business cards (or you can do it yourself directly in the printers).
 - The standard size of a business card is 9x5 cm (or 5x9 cm for vertical cards).
Method 2 of 2: Create a table
 1 Create a new (blank) document. If you want to create a business card from scratch, use the "Table" tool.
 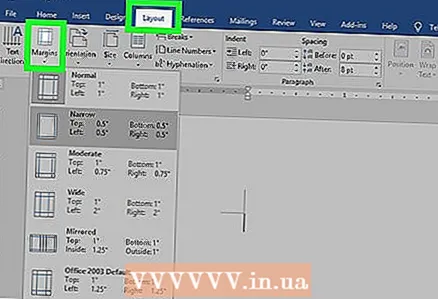 2 Click Page Layout - Margins - Narrow to reduce the size of the margins. This will allow you to properly position the business cards on the page.
  3 Click "Insert" - "Table". A tabular grid will open under the button.
 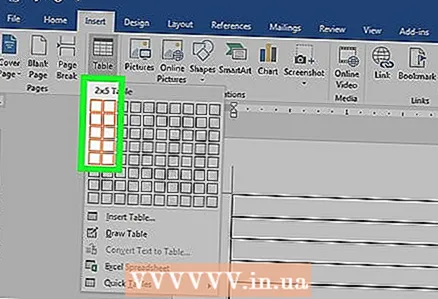 4 Create a 2x5 table. Using the grid that opens, select two cells horizontally and five cells vertically.
  5 Right click on the marker of the created table and select "Table Properties". The "Table Properties" window opens. The table marker is displayed in the upper left corner of the table when you hover over it.
 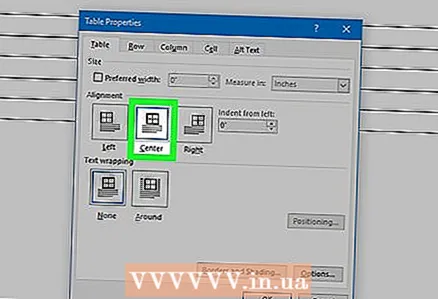 6 Set the alignment of the table to the center. This will make it easier to create business cards.
  7 Click "Row" and check the box next to "Height". Enter 5 cm, and from the drop-down menu select "Exactly".
  8 Click Column and check the box next to Width. Enter 9 cm, and from the drop-down menu select "Exactly".
  9 Review the table. You have created a table that can hold 10 business cards of the same (standard) size. If the table does not fit on one page, reduce the bottom margin of the page.
  10 Right-click on the table marker and select "AutoFit" - "Fixed Column Width". This will avoid resizing the table when you enter information in the first cell.
  11 Enter the data in the first cell. In doing so, you can use any Word formatting tools. You can insert text boxes and images, change the font, its size and color, and so on.
  12 Check if the information you entered is correct. Before copying the entered information to other cells of the table, make sure that there are no errors or typos in the data, otherwise you will have to correct errors in each cell of the table.
 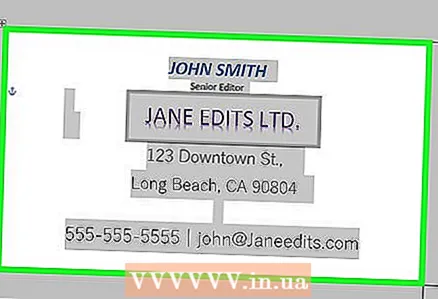 13 After checking the correctness of the information entered, select the entire cell; you can quickly do this by moving the cursor to the bottom left corner of the cell (this will turn the cursor into a diagonal arrow). Click and the contents of the cell are highlighted. Copy the contents of the cell to the clipboard.
 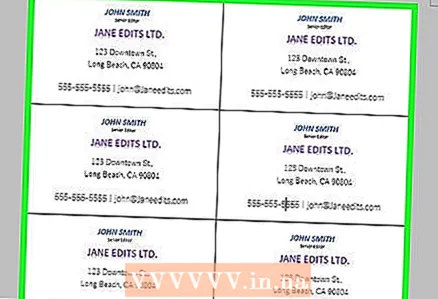 14 Place the cursor in the next cell and paste the copied information into it. To do this, click "Paste" (on the "Home" tab) or just press Ctrl + V. Repeat this process to copy the data to the remaining cells in the table.
  15 Right-click on the table marker and select Table Properties. Click Borders and Fills, and in the Border tab, select None. This will hide the table borders so they don't appear on cut cards.
  16 Print your business cards on high quality paper. When buying paper, make sure your home printer can handle it. If you are going to print a business card in a printing house, save the created table and take it to the printing house.
  17 Use a sharp cutting tool to cut the printed business cards. Do not use scissors or other tools that will prevent you from creating a straight cut line. Use a paper cutter or special paper cutter. The standard size of a business card is 9x5 cm.


