Author:
Bobbie Johnson
Date Of Creation:
6 April 2021
Update Date:
26 June 2024

Content
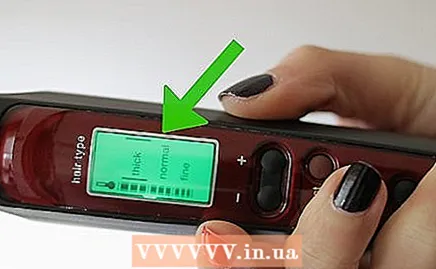
1 Dry your hair. Your hair will curl most effectively when dry. If they are wet through and through, then everything will end with the fact that you just damage them and the curling will not work. Hair may just be slightly damp. 2 Turn on the iron. You need a regular double-sided curling iron. A width of 2.5 cm is fine for this. Allow the iron to warm up completely for two minutes. If it has a regulator, then select a medium heat level for the amount of hair you need. If the temperature is too high, your hair will end up with a slightly wrinkled appearance.
  3 Part your hair into sections. Parting helps you isolate a portion of your hair. This will make the procedure much easier, especially if there is a lot of hair and it takes longer to curl. When you divide your hair into strands, you will need to secure the top of the hair so that you first get to the base of the bottom of the strands. If not, you can start with any strand. The more hair you curl, the fewer strands you will have.
  4 Place 2.5-5 cm of hair in a flat iron. You can start with 7.60-10.10 cm of hair from the bottom. If you start curling your hair from the top, the hairstyle may be too fluffy.
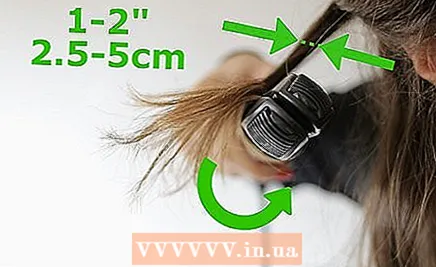
  5 Pull your hair back. After you have wrapped them on the iron, keep the hair away from your face and hold it in this position for a few seconds. 6 Now pull your hair forward. Then, either slide the flat iron down through your hair, or simply release the strand and move the flat iron 5 to 7.50 cm lower before you curl it forward in the opposite direction. 7 Continue the process down the strands of your hair. Continue to lower the straightener down the strand until you reach the base of the strand. You can leave 5 - 7.50 cm of hair untouched at the roots for a more natural, smoother look. 8 Continue the process with the remaining strands of hair. Just repeat this process on everyone else until you create waves all over your head.If your hair is held together with a barrette or ribbon, then gradually pull out large strands of hair from there until they are all underneath.
 - If you want to avoid curls sticking together, you can alternate movements as if you are making your way along the shore. This way, each strand will be curled in different directions. You also don't have to curl every strand in the same place.
- When you reach the outside of your hair, you can pin the top part of your hair that you didn't curl to the side, so if you've curled the top right strand, you can pin it in the top left corner of the side of your head so it doesn't get in the way.
 9 Examine your hair. Look from the side, place a mirror on the back of your head to see if you have curled your hair evenly everywhere. If one side is curly on the other, try making a few more waves on the side where they are missing for balance.
  10 Use hairspray on your curls. This will help keep the "beach waves" longer.
 Method 2 of 3: Simple curls
 1 Turn on the iron. You will need a simple double-sided curling iron. The 2.50 cm width is ideal for work. Give it two minutes to warm up.
 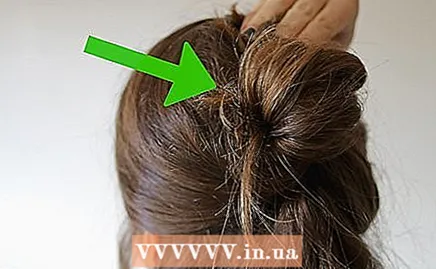 2 Divide your hair into sections. Parting helps you isolate a portion of your hair. This will make curling a lot easier, especially if there is a lot of hair and it takes longer to curl. When parting your hair, you will need to secure the top of the hair so that you get to the bottom of the bottom of the strands first. If not, you can start with any strand. The more hair you curl, the fewer strands you will have.
 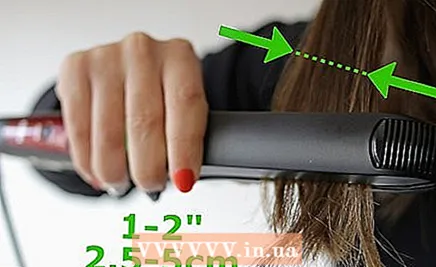 3 Place 2.50-5 cm of hair in a flat iron.
- 4 Roll the strands forward. Curl forward gently, leaving only a few centimeters at the base, and keep away from your face. Turn the iron once and pull it out. For more control, you can hold the ends of your hair with your other hand.
 5 Place the hair again in the iron about 2.50 - 5 cm. Take the next strand and twist it.
 - 6 Roll the strand back. Do the same as for curling the strands forward, except that now twist the iron in the other direction.
- 7 Continue this process until you have wrapped all your hair. Alternating curls back and forth will keep your curls from sticking together and create a light and bouncy look. This method will make your hair a little less frizzy than a pin curl.
 8 Use hairspray. By spraying your hair with hairspray, you will keep your curled locks longer.
Method 3 of 3: Curl pin
 1 Turn on the iron. You will need a simple double-sided curling iron. The 2.50 cm width is ideal for work. Give it two minutes to warm up.
 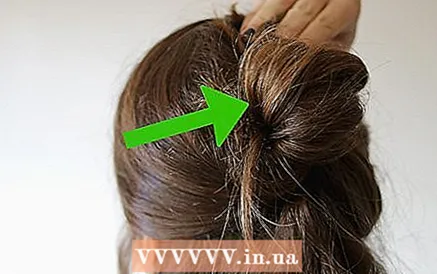 2 Divide your hair into sections. Parting helps you isolate a portion of your hair. This will make curling a lot easier, especially if there is a lot of hair and it takes longer to curl. When parting your hair, you will need to secure the top of your hair so that you get to the bottom of the bottom of the strands first. If not, you can start with any strand. The more hair you curl, the fewer strands you will have.
 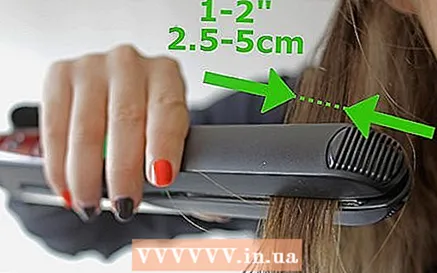 3 Take 2.50-5 cm of hair.
- 4 Wrap a strand of hair around two fingers. Simply wrap your hair around your middle and index fingers until a tight pin curl is formed.
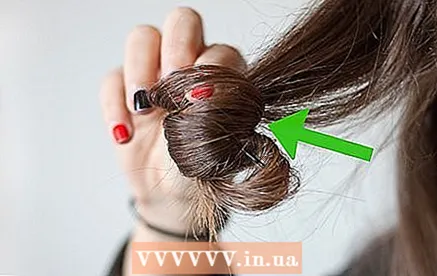 5 Lower two fingers and hold the curl pin. Release two fingers and support the curl with your other fingers.
 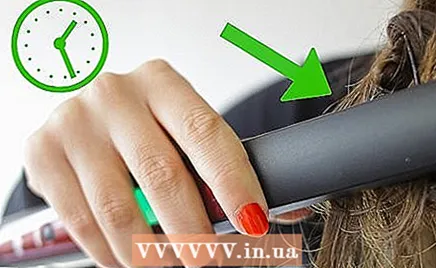 6 Place the curl in an iron and hold it there for a few seconds. Be careful when placing it in the iron, you can get burned.
 - 7 Let go of the iron. Once you let go of the curl, you will need to press down and release it for it to take shape.
 8 Continue this process with all the strands until you have created "beach waves" on all curls. This method will create a more bouncy look than your regular regular curling method.
  9 Use hairspray. This will help keep your beach waves longer.
Warnings
- Do not touch metal as you may burn yourself.
- Make sure to turn off the iron when you are finished using it.

")

