Author:
Ellen Moore
Date Of Creation:
14 January 2021
Update Date:
1 July 2024
Content
The flute, being a woodwind instrument, is very delicate and easily damaged. Like any other tool, it is very important to assemble it correctly so as not to damage the valves, head, rods. At first, the task may seem daunting, but then it will become a habit.
Steps
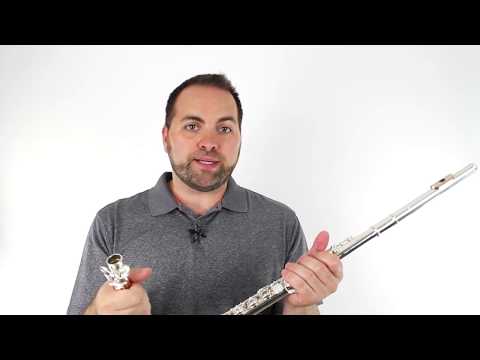
 1 Identify the parts of the flute. The longest part, with valves, is the body. The place you blow into is called the head. The short part at the end of the flute is called the knee. This is easy to remember if you imagine the flute as a wonderful silvery animal.
  2 Attach the head to the body. Carefully lift the body out of the case by the end, not by the flaps. Next, hold the body by the trunk (the smooth part without keys at one end) and, with the other hand, attach the head. Gently twist them together: the sponge on the head of the flute should be in line with the valves located on the body. Remember that rolling the body or head of the flute outward lowers the tone and inward increases it.
 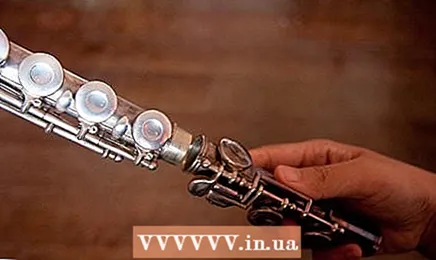 3 Attach your knee to the other end of your body. Holding the body by the barrel in one hand, use the other hand to lift the knee out of the case. Keeping your knee palm down, gently press down on the latch with your thumb. Gently insert the knee into the body, grasp the end of the knee, which is without valves, and twist to the end. The shaft line on the knee should line up with the midline of the valves on the body.Remember that the key under the little finger of your right hand is used to play most of the notes. Make sure your knee is properly aligned or your little finger may start to hurt. This alignment may look different for each player (do not align the rod on the knee with the rod on the body, this will complicate the game for you).
  4 Make small adjustments. With the guidance of a professional, adjust the position of your head, body and knee by scrolling.
  5 Tune the flute. You can do this by ear or using a digital tuner. If the tuner shows that you are turning into a sharp, then pull your head out of the body a little, if it shows flat, then deeper into the body. Now the flute is assembled!
  6 Have a good game!
 7 When you're done playing, disassemble the flute. Repeat the previous steps in reverse order, also taking care not to damage the valves. Use a cloth or brush to remove saliva and fingerprints from the flute.
Tips
- If you realize that any part of the flute is stuck, do not pull it. Gently twist and wiggle the piece until it comes out. If you fail, ask a teacher or other experienced person for help. To avoid this situation in the future, polish the joints and apply just a little bit of valve oil to the joints. However, the oil can smell unpleasant while playing (this is a little treacherous, but not everything can damage the flute).
- Ask for help from your supervisor, teacher, or just a more experienced player when you need it.
Warnings
- Do not force the assembly of the flute, do everything efficiently, otherwise you can only damage it.
- Don't let your flute come in contact with water. The pads under the keys will swell and collapse, and rust will appear in those hard-to-reach places. Replacing the pads is not cheap! If your flute gets wet, remove as much water as possible and then leave the flute unassembled in an open area so the water can evaporate easily.
- Never hold the flute by the valves during assembly. This can damage all valves and the rods that connect them. When in doubt, do not touch the valves! If you still feel that it is necessary, do it very carefully.
- When polishing, make sure to only touch metal surfaces. Overpolishing the pads can damage them.


