Author:
Florence Bailey
Date Of Creation:
28 March 2021
Update Date:
27 June 2024

Content
- Steps
- Part 1 of 4: Disposal of Waste Disposal
- Part 2 of 4: Replacing the sink drain and installing new pipes
- Part 3 of 4: Replacing the waste disposal unit with a new one
- Part 4 of 4: Troubleshooting Your Waste Disposal
- Tips
- Caveats
- You will need
Removing a waste disposal unit can be costly if you call in a plumber for the task. Doing this work with your own hands will help save money, and the process itself is quite simple. Using several tools, in just a few steps, you can independently remove the waste disposal unit, spending a minimum of money.
Steps
Part 1 of 4: Disposal of Waste Disposal
 1 Disconnect the power supply to the waste disposal unit. Disconnect power to the circuit breaker or electrical panel. Press the switch on the electrical panel that controls the electricity supply to the waste disposal unit.
 - Make sure the power is off before proceeding. To do this, try turning on the waste disposal unit.
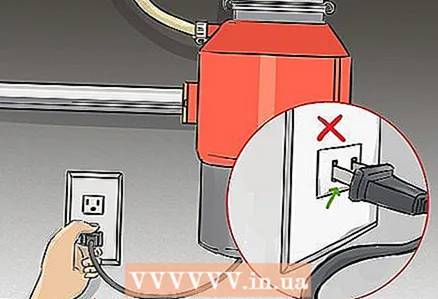
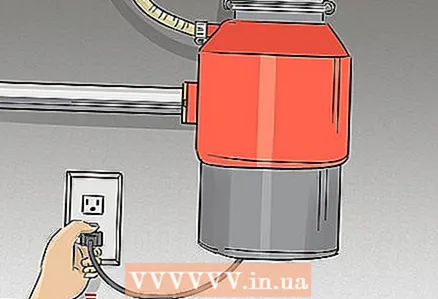 2 Unplug the waste disposal unit from the outlet. Unplug the waste disposal unit from the wall outlet. If your home has a device connected directly to a wire, you need to disconnect the wires.
 - If the unit is directly wired, use a screwdriver to remove the cover that hides the power wires from the waste disposal unit. Disconnect the wires, then remove the shield from the junction box on the wall.Unscrew the insulating caps that protect the waste disposal and house wiring connections and move the shredder wires aside. Screw the insulating caps onto the bare wires in the junction box, hide the wiring and re-fasten the shield.
- Use a voltage tester before storing the wires in the junction box to make sure there is no voltage.
 3 Loosen the clamp securing the dishwasher hose to the serrated ring and disconnect the hose. Remove the tubing from the dishwasher to the waste disposal unit. Not all waste collectors are connected to dishwashers, this procedure is performed only with models connected to dishwashers.
 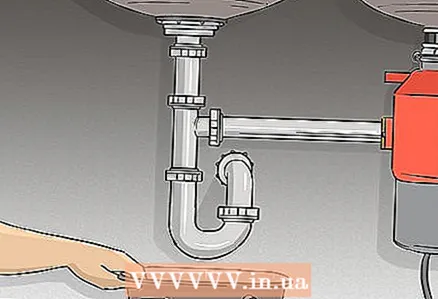 4 Place a bucket under the drain pipe. There may be residual liquid in the pipe - after the pipe is turned off, the wastewater will fall into the bucket that was placed in advance.
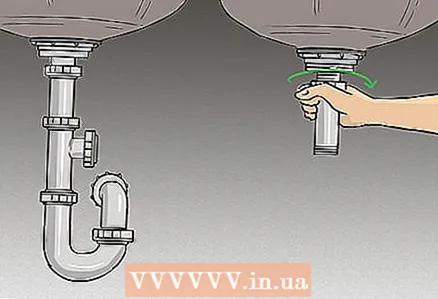
 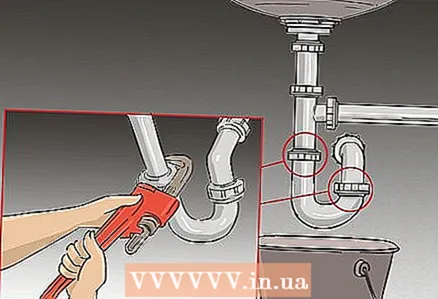 5 Using an adjustable wrench or adjustable pliers, remove the retainers from the straight siphon. It is a U-shaped pipe that is connected to a waste disposal unit and drains waste water.
 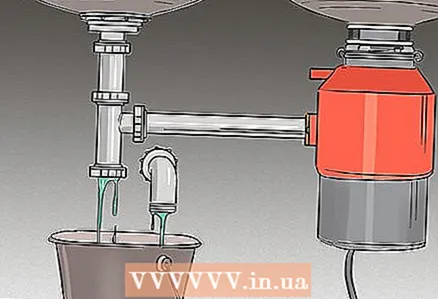 6 Let the siphon drain into the bucket. Let the water remaining in the pipe drain into the bucket.
  7 Remove the waste disposal unit. Some models need to be unscrewed from the sink drain, others are equipped with a retaining ring. To remove the retaining ring, insert a flathead screwdriver under it and pry it apart from the flange.
 - Hold the waste disposal unit underneath while removing it. Recyclers are very heavy!
- It will not be superfluous to put rags on the floor of the cabinet under the waste disposal unit as protection; if the recycler falls, the rags will protect the cabinet from damage.
 8 Remove the mounting brackets. Remove the mounting by first loosening the three mounting screws separating the top and bottom rings. Remove the ring that fits into the sink drain, then remove the sink drain, flange and seal.
 - Remove any leftover gaskets, plumbing putty, and debris from the sink drain.
- If you are replacing the heat recovery unit with a waste heat recovery unit of the same model, you can leave the mounting brackets.
Part 2 of 4: Replacing the sink drain and installing new pipes
 1 Use this method when you have removed your waste disposal unit and do not want to install a new one. With this option, you need to install a new sink drain and connect it to the drain pipe so that the waste water is directly drained from the sink into the sewer.
  2 Remove the drain flange securing nut to remove the sink drain. Using an adjustable wrench, loosen and unscrew the nut that secures the drain flange. You can then remove the sink drain from the top by pushing it in from the bottom.
 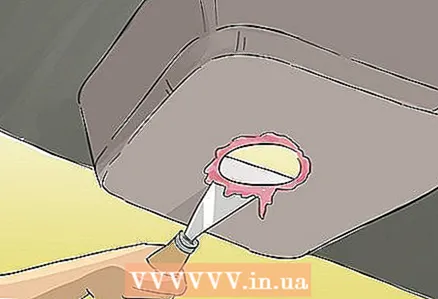 3 Remove the filler around the drain hole with a spatula. Using a putty knife, remove any remaining plumbing filler. If the putty is hard and difficult to remove, use a razor blade. After you have removed the rest of the putty, use a stiff brush to completely clean the surface and rinse it with water.
 - If the filler cannot be removed, use an alcohol-based liquid.
 4 Unroll the coil 1/8-inch (3.2 mm) thick and wrap the drain. The winding must be long enough to cover the perimeter of the drain. Place the cord on the underside of the drain and then insert the drain into the sink drain. Fasten the drain tightly and then remove any remaining plumbing filler.
  5 Attach a flat washer to the bottom of the drain. The washer is included with the purchased drain. Move to the bottom of the drain, place the washer on the threads and secure with the large nut that comes with your drain. Tighten the nut as tightly as possible using the adjustable pliers.
 - 6 It will be easier if someone holds the top of the drain at this moment so that it does not move.
- Remove excess filler after fixing the drain.
 7 Find a PVC sleeve. It will connect the drain to the pipe elbow. It must be long enough so that the coupling is flush with the pipe.Tighten the sleeve on the sink drain to protect the area.
  8 Attach the pipe elbow to the socket. Connect the pieces together to connect the sink to the pipe.
 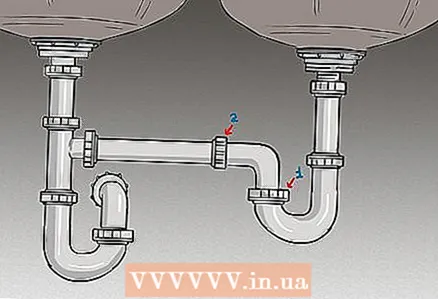 9 Connect the nipple to the elbow and sink. Use a spigot to connect the T-spigot of the sink and the elbow of the pipe. The connecting piece may need to be trimmed to adjust the length to fit your sink. To connect the parts, use the adjustable pliers, nuts and washers that came with the pipes.
Part 3 of 4: Replacing the waste disposal unit with a new one
 1 Follow this instruction if you have removed your waste disposal unit and want to replace it with a new disposal unit. If you are installing a waste disposal unit from the same manufacturer, you do not need to remove the mounting bracket from the sink drain.
  2 Install a rubber gasket on the drain flange. A rubber gasket is usually supplied with a new heat exchanger. You can simply wrap it around the flange and then place it in the drain hole.
 - If there is no rubber gasket included with the disposal unit, you will have to use a plumbing putty.
 3 Place the second rubber gasket on the sink drain flange at the bottom of it and secure with a metal ring. Another rubber pad from the kit is used on the bottom of the sink. Attach the metal support ring with the flat side up by pressing the flange from the bottom.
 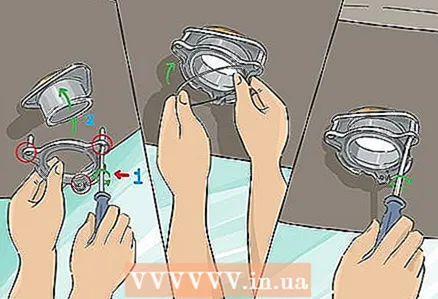 4 Install the mounting ring. First, loosely fasten the mounting ring with three screws. Then replace the support ring. Tighten the screws, making sure the mount is firm and tight.
 - The mounting bracket is now secured and prepared for the new waste disposal unit.
 5 Prepare a new waste disposal unit. Turn the waste disposer over and shake to remove anything that might get inside. Remove the board and pull out the wires from the heat exchanger. Screw the voltage compensators into place and feed the heat exchanger wires through them.
 - If you are connecting the waste heat exchanger to a dishwasher, you will have to remove the plug with a hammer and screwdriver.
 6 Connect the electrical wires. On many heat recovery models, you will need to secure the ground wire with the green heat recovery screw and then twist the white wires to the white wires and the black wires to the black wires. Secure the connection points with insulating clamps and secure the voltage compensators. Put the shield back on the heat exchanger.
  7 Lift the heat exchanger towards the mounting bracket and fix it. Lift the waste disposal unit and insert into the mounting bracket. Then turn the locking ring to catch all three guide pins. Tighten the ring as tight as possible using pliers. You should hear the pins snap into place.
  8 Connect the pipes. You will need to connect a 90 degree drain pipe to the waste heat exchanger and a sleeve to the other end of the sink. Direct siphons will need to be installed both there and there, they should be on the same level. Use straight pipes and T-pieces to connect the pipes in line and direct the flow to the main drain.
 - At first, just try to connect the pipes together without connecting them to the plumbing system.
- Connect the pipes with PVC glue, apply it both inside and outside. PVC glue will melt the material a little, ensuring a reliable weld seam.
 9 Connect the dishwasher drain. If the dishwasher drain is connected through a waste heat exchanger, the pipe must be connected to the waste heat exchanger through the hole that was hidden by the previously knocked out plug.
  10 Open the water in the sink. Turn on the tap above the sink and let the water flow for a few minutes. Make sure there are no leaks anywhere. Such verification will help to avoid many problems in the future.
  11 Turn on the power. Press the switch on the electrical panel again, which is responsible for powering the heat exchanger. If everything works fine, the installation is complete.
Part 4 of 4: Troubleshooting Your Waste Disposal
 1 If the heat recovery unit has stopped working. Check if your recycler really needs to be replaced. If the waste disposer does not hum, there may be a problem with the power supply, this can be easily checked.
 - If the heat exchanger makes a buzzing sound but does not work, it may have something stuck in it or needs to be rebooted.
 2 Make sure the waste disposal unit is plugged in. This may seem obvious, but check if the heat exchanger is connected correctly.
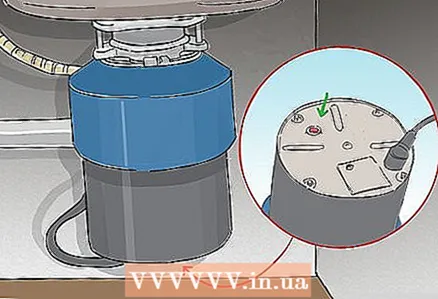
  3 Press the reset button at the bottom of the heat exchanger. This resets the device settings. The button will pop up if a reset has been made. When it returns to its place, you will hear a click.
  4 Check input voltage. Check if the toggle switch on the general electrical panel has turned off. All toggle switches on the fuse box must be on.
 - 5 Replace the input switch. If nothing else helps, then the problem is either in the switch or in the heat exchanger. Change the toggle switch to make sure they are not the problem. First, you need to disconnect the system from the general shield. Then replace the switch and reconnect the power to the service panel.
- If none of the methods solved the problem, the waste disposal unit needs to be replaced.
Tips
- If you decide to install a new waste disposal unit, take a close look at the outlet under the sink. If it is damaged or rusted, consider bringing in an electrician to replace the outlet for safety reasons.
- If you decide to install a new waste disposal unit, make sure that the selected model is designed for the same voltage and the same plumbing connections as your current waste disposal unit. If this is not the case, call a professional plumber to carry out the work, as the task will be very difficult.
- If you intend to install a new waste disposal unit, the cost of materials and tools for doing the work yourself will be about $ 100. When calling a professional plumber, the cost of the work will rise to $ 300.
Caveats
- Never put your hand into the waste disposer! It is very dangerous.
You will need
- Adjustable pipe wrench, adjustable wrench, or adjustable pliers
- Bucket
- Screwdriver
- Putty knife
- Plastic hard sponge


