Author:
Virginia Floyd
Date Of Creation:
12 August 2021
Update Date:
1 July 2024

Content
- Steps
- Part 1 of 3: Draw the solution onto a trowel
- Part 2 of 3: Apply the mortar to the brick
- Part 3 of 3: Install the next brick
- What do you need
"Lubricating" a brick is the process of applying mortar to a brick before laying it in a row. Getting the right amount of mortar per trowel is probably the hardest part of the process. Once you've learned this, applying mortar to the brick and laying it down should be easy.
Steps
Part 1 of 3: Draw the solution onto a trowel
 1 Take a trowel. Take a trowel with your leading hand. The fingers should wrap around the grip width, but the thumb should be along the grip.
 - Holding the trowel this way gives you better control of the tool. Fingers grip the handle firmly in a secure position, and the thumb set aside makes it easy to control the direction of the trowel.
- Make sure you hold the trowel firmly throughout the process.
 2 Separate a portion of the solution. Using a part of the working surface of the trowel, separate the portion of the mortar from the previously prepared mixed mortar. Drag this portion of the total volume closer to you.
 - Please note that the solution must already be prepared and transferred to your solution container. Use a fresh solution that is still moist and malleable.
- Always separate a portion from the edge of the grout. Make sure you add enough mortar to cover the length and width of the trowel's working plane, even slightly more.
- Drag the batch about 6 inches (15 cm) from the total mass if you don't want it to accidentally mix with the rest of the grout as you work.
 3 Stir the solution. Stir the separated part of the solution several times with a trowel. After several movements, the solution should acquire a homogeneous pasty consistency.
 - When the texture is correct, use a trowel to shape the portion of the solution approximately the same as the length and width of the working surface of the trowel.
 4 Move the trowel under the mortar. Slide the edge of the trowel under the batch of mortar, lifting it up on the flat surface of the trowel.
 - Putting a trowel under the grout should be easy, especially after you've stirred and inverted it a few times. If the solution is stuck and cannot be pushed with a trowel, it is probably too wet.
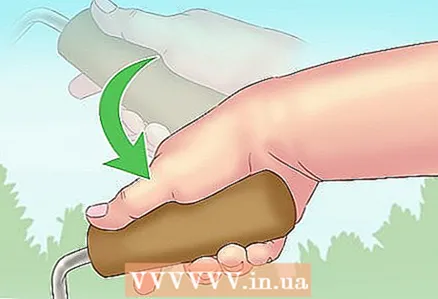 5 Shake your wrist. Hold the trowel horizontally with the side facing the mortar up. Sharply shake the wrist of the hand, in which the trowel is located, downward, abruptly interrupt the movement.
 - Hold the trowel firmly as you move your wrist. The mortar should settle slightly on the trowel when you finish moving.
- The force you apply with your wrist will cause the mortar to stick to the trowel. If done correctly, you can turn the trowel over and the mortar will stay in place. If you skip this step, the mortar will slip off as soon as you turn the trowel on its side.
- Another way to secure the mortar firmly enough to the trowel is to tap the bottom of the tool on the mortar board.This is a good option if you cannot support the wrist solution well enough.
Part 2 of 3: Apply the mortar to the brick
 1 Take the brick. Select the brick you want to grout and grab it with the hand you use less. Tilt the brick down at an angle of approximately 45 degrees.
 - The edge you are going to smear should be slightly raised.
- Note that you will only be applying mortar to one edge of the brick. It is not necessary to coat both ends with the solution.
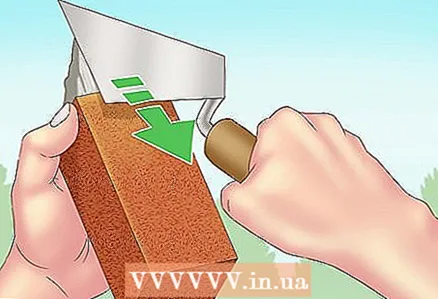 2 Apply the solution to one end. Turn the trowel over and place the mortar on one edge of the brick in a downward motion.
 - Rotate the trowel so that the grout surface is opposite and almost parallel to the end of the brick.
- Starting at the top of the brick, slide the mortar trowel down the surface, transferring the mortar from the trowel to the side of the brick.
 3 Press the solution down in the center. With the tip of a trowel, press the layer of mortar against the brick, pressing down the center of the side.
 - Run around the perimeter of the brick to remove excess mortar from the sides. Try to get the entire batch of mortar on the right side of the brick.
- If done correctly, the mortar will look like a quadrangular pyramid on the side of a brick.
- Don't worry if you think there is too much mortar on the brick. Excessive application of mortar to the brick provides a tight, reliable adhesion during the brick laying process. Excess mortar can be easily removed after laying the brick, later there will be no problems with this.
Part 3 of 3: Install the next brick
 1 Arrange the brick in the masonry. Lay the brick with mortar in the prepared mortar layer. The oiled end should be facing the brick that is already in the masonry.
 - When using patterned (jagged) or perforated bricks, the patterned or perforated side must face up during installation.
- Please note that the first brick in each row is not greased. The mortar is applied only to subsequent bricks in the row.
- Also note that a layer of mortar must be applied over the foundation or previous row of bricks. The bottom of your brick should rest on the pre-applied mortar.
- Place the brick on the cement backing with the mortar edge just behind the previous brick. Try to move the brick as close as possible without scraping the mortar off it.
 2 Press the brick to the previous one. Place your hand on the clean edge of the brick, then press it against the previous brick.
 - Press down until the mortar comes out from the oiled side of the brick. At the junction of the oiled side of the brick with the adjacent brick, mortar should appear.
- When this is done, the mortar layer should be approximately 3/8 "(9.5 mm) thick.
 3 Scrape off excess solution. Run the edge of the trowel along the bottom and sides of the brick you just installed.
 - Use excess mortar to cover the next brick. If you have prepared the correct amount of mortar to apply to the first brick, you should have enough to lubricate three standard bricks, then you will have to draw a new batch of mortar onto the trowel.
- You do not need to fix excess mortar on a trowel. The pressure exerted when removing the excess solution is sufficient to keep the solution on the trowel.
- The excess mortar that you removed after laying the last brick in the row must be applied to the seams of the subsequent bricks. Use the back and edges of the trowel to level the excess at the seams and top of the bricks in the row.
 4 Knock on the laid bricks. After installing each brick, tap the sides and top with the trowel handle to push the brick into place.
 - This will also help align the brick.
- Please note that the first brick in the row must be leveled before you apply the cement to the second brick and install it.Level each brick after laying and before laying the next bricks.
- Use a level with a sinker or similar tool to make sure each brick is flush with the previous one. You need to check both the sides and the top of the bricks.
What do you need
- Prepared solution
- Mortar board
- Bricks
- Trowel
- Level with a weight


