
Content
Refillable aluminum liquid bottles are more beneficial to the environment than drinking water or other drinks in plastic containers. However, if you are the owner of such a bottle, then you know perfectly well what a good heat conductor aluminum is. With the help of the insulator, drinks and your fingers can maintain their usual temperature longer. This is a small project, so it can be done with any leftover thread or rope from your previous work.
This article explains how to braid standard size bottles along with pictures showing the number of loops to achieve a specific result. Take advantage of what works best for you. Working with pieces of standard sizes will teach you a lot about crocheting without a pattern, in fact, you can crochet any cylindrical object using this method. The materials indicated in the demo are listed in the "Items you need" section.
Steps
 1 Measure the circumference (distance around) of your bottle. The key to braiding is the correct number of stitches for this volume.
 - Since the braid will be knitted, it will stretch slightly, so you should knit so that the braid fits snugly.
 2 Measure the loops. Tie a chain about 7-8cm, tie two more rows and a double crochet in the third loop from the hook. Crochet one stitch per stitch backwards along the row you knit.
  3 Count the number of stitches in the test piece and measure their length. Better to count in the middle to avoid miscalculations due to uneven edges. So, in 5cm (sample length) there are seven loops (number of sample loops). Measure the length of the loop using the same measurements you used to measure the circumference of the bottle.
 - 4 Calculate the usual proportion:
- number of sample loops / sample length = total number of loops / bottle circumference
- total number of loops = (number of sample loops x circumference) / sample length
- so the total number of stitches = (7 stitches x 9 "(22.8cm)) / 2" (5cm) = 31 stitches.
- For this example, round to 30 stitches for easier counting and to make the braid fit tighter. Write down this number.
- Unfasten the skein if you want to straighten the thread.
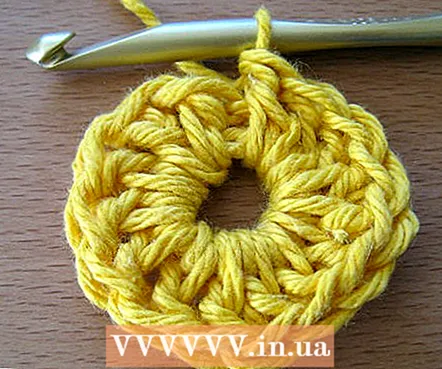
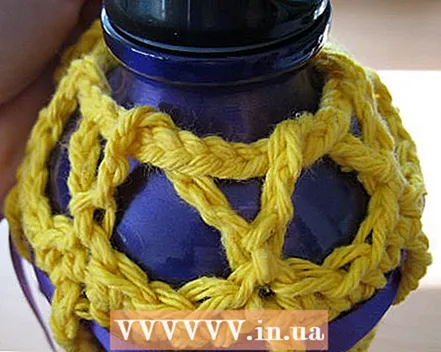
 5 Tie the round bottom of the braid (see. (hints for fleshing out details). You should get a flat disc with approximately the same parameters as the bottle, or slightly less, and with the same number of loops in the last row, as in the "total number of loops" number indicated above.
 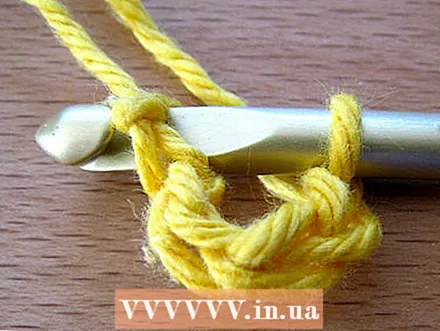 6 Tie a slip knot, tie a few stitches (4-6) and single crochet to form a ring.
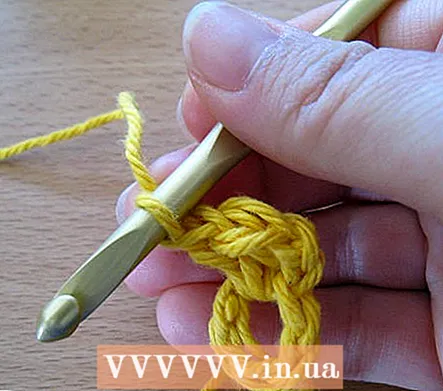
 7 Knit three stitches to start the first round (counts as the first double crochet) and crochet into this round.
- In the example shown, a total of 15 double crochet stitches are used to form a ring.
- In the example shown, a total of 15 double crochet stitches are used to form a ring.
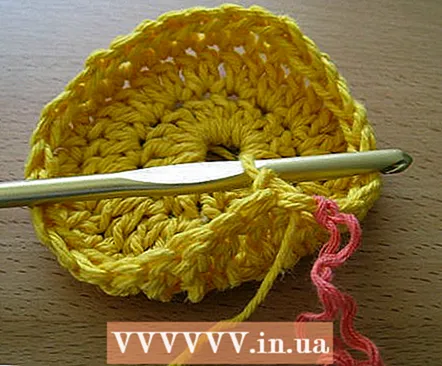
 8 Connect with a half-crochet.
 9 Knit two stitches to start the second round (counts as the first row of a double crochet). Then crochet into each stitch from the first round. In the example, we have two stitches by 2.5 cm so that 30 stitches come out, the number of the total stitches we wrote down earlier. Add an extra circle if needed to get the required diameter. See the tips below for how to do this.
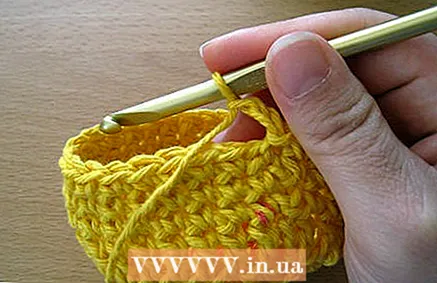
 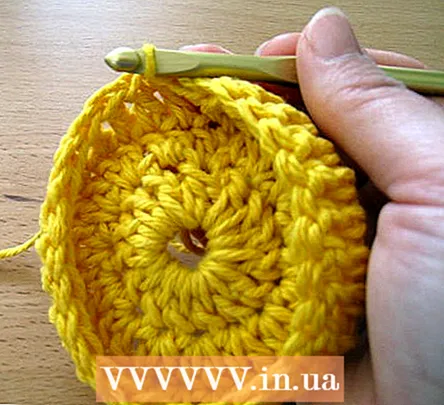 10 'Form the sides. Knit two stitches and crochet one stitch in each stitch of the previous round.
 - You can add one stitch and single crochet in this circle if you like, but crochet gives a sharper looking "edge" to the bottom of the bottle casing.
- To avoid the twisting effect (optional): at the beginning of the circle, hook the mark on the loop. Every time you approach her, connect with a half-column without a crochet and add a loop. Or simply knit a buttonhole into the next available buttonhole. This is a little more important, but still not necessary if you want to make ribbon loops.
- When knitting a loop into a loop on a round object, two things can happen. First, the paradise must either twist up or down and begin to form a cylindrical shape. Second, you must have the same number of stitches in each successive round.
 11 Try the base on the bottle when you've knitted the first few rows. If it comes out too loose, you need fewer stitches in the last row of the round base. If it comes out too tightly, you need to add several loops either to the round base, or to one of the bottom rows, knitted with a single crochet near the base. Either way, it's best to spot it right away.
 - 12 Decide if you want to make ribbon loops and how many should be. With a nice drawstring at the top, they will be more of a decorative element, but if you like, you can arrange them along the shape of the bottle.
- If you don't want to make ribbon loops, continue to tie the entire bottle in a single crochet until you reach the desired height.
- Position the tabs slightly lower than you want them to, remember that the braid will stretch with use.
- 13 Make loop loops for the ribbons. Finish the circle where you want the ears to be.
- Knit three loops.
- Knit with a double crochet in the next two stitches from the previous round (total three double crochets, including the loop).
- Knit with a double crochet into the next loop. A double crochet stitch will turn out to be too high for a crochet row, so it looks like a belt loop that sticks out if you pull it a little.

- Continue in the pattern where the three double crochets are followed by the double crochets until the end of the circle. Make one or two “ears” with only two double crochets in between to get an even number of loops and ears.

- Single crochet, knit one stitch, and continue to crochet additional circles as before.
- Knit three loops.
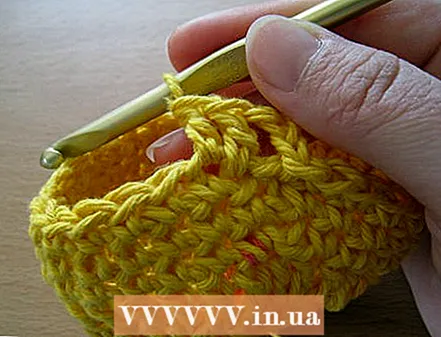
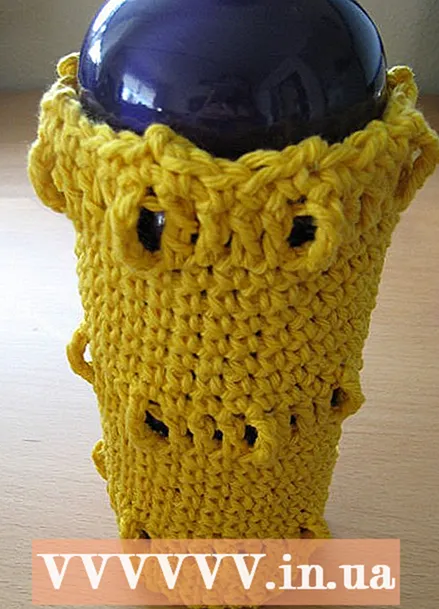 14 Continue to alternate several single crochet circles with a circle of ears until you reach the height you want.
- Finish with at least one row of a single crochet.
- Stop close to the neck of the bottle.

 15 Make loops to tie the braid. Knit six stitches (or whichever gives you the length you want). Skip three stitches (or whatever distance you want), and single crochet over the next stitch. Do it all over again.
 - 16Attach and stitch in the ends.
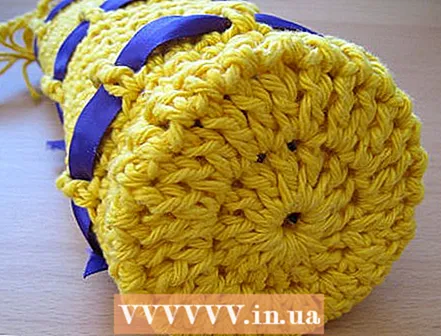
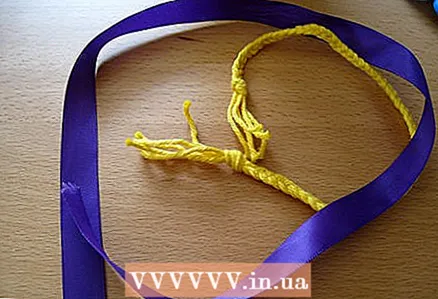 17 Add ties or laces as you see fit. Any ribbon, rope, or thread will do. This braid was used with six strands of yarn, braided tightly and tied with a regular knot at the ends to pull off the braid.
 - Use a cord that won't stretch too much to tighten the neckline.
- Pull the ribbons through the "ears" from the double crochet posts, as if you were threading the belt through your trousers. Pull gently on the “ears” to open them, if necessary. You can tie the ends with a knot or bow, tuck them in, tie them together, or just leave them hanging to create the effect you like best.

- Thread rope or braided yarn through the “ears” around the neckline and pull off the braid. Pull it off so that you can remove it again when you want to clean it.
 18 Make the handles or straps as you like and sew them to the braid or use the ready-made “ears” to attach them. You can crochet them or weave them from any yarn or rope that is left over from some previous work, or take the ribbons that you usually use, or take something old into circulation (for example, an old tie?), All for your discretion.
Tips
- If you use 100% wool, it will even be a better insulating material than cotton.
- Such work can be a good gift. Buy a bottle (they are relatively inexpensive), braid and give it to someone.The main thing to remember is which color is more pleasant to the person to whom you are preparing a gift.
- Round off the total number of loops to a multiple of four so that the location of the "ears" is even, or make the distance between the "ears" different so that they turn out evenly in the number of loops dialed.
- If you are knitting more than two rows of ears, count the rows in between to make them the same distance.
- When knitting the bottom, you need to make a flat disc, it will be about the same diameter as the bottle or slightly smaller with the same total number of loops as their number in the last row. Use any combination of single crochet and double crochet and add stitches to achieve this.
- In order for the product to lie flat, the circumference of each circle, in the loops, must correspond to its diameter. Use the formula C = π * D, where π = 3.14 ... or in the case of loops about 3. You can go from the circumference to the number of loops in the same way as you did in step 4 above (made up the proportion).
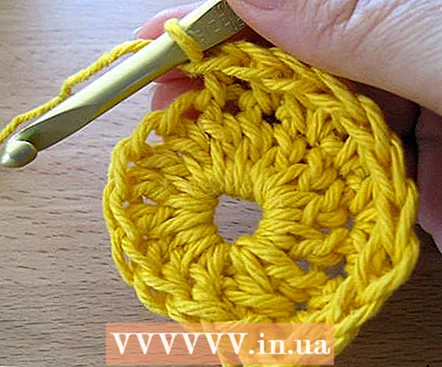 If your disc takes on the shape of a cup or cymbal, you have too few loops for the desired diameter and need to add loops. If the effect of curling the bottom is small, it will not harm anything.
 If the disc is bulging or bent into a potato chip shape, there are too many loops and you don't need to add that many. This effect is obtained by adding three loops to one, which will give 45 loops in the second round.
- Tying loop by loop on something round will give the shape of a cylinder, which is how the sides of this pattern are formed. The length of the circle of such a cylinder will be the number of loops multiplied by the length of the loop.
What do you need
 These dimensions are given as an example. Use whatever yarn, bottle and crochet hook you have and customize the sizes to suit your needs.
- Bottle: about 7.5 cm in diameter, 21 cm high to the neck.
- Hook: Size 10 or US J
- Yarn: Recycled cotton, slightly finer than standard worsted acrylic yarn. Two fist-sized skeins for braiding and a third if you will be doing webbing.
- Tape in tone or contrasting color, yarn, lace / rope, etc.
- Scissors
- Tailor's tape and / or tape measure
- Yarn needle for stitching in the ends


