Author:
William Ramirez
Date Of Creation:
19 September 2021
Update Date:
1 July 2024
Content
- Steps
- Method 1 of 3: Create a Paper Tickler File
- Method 2 of 3: Using Google Calendars
- Method 3 of 3: Using Evernote
- Tips
If you are struggling to keep your to-do list in check and thereby wasting your precious time trying to organize everything, then the "Tickler" file will help you sort everything out. Tickler divides tasks and papers into: performed daily, weekly and / or monthly. Tickler is a particularly useful tool for organizing personal bills and documents, meeting with clients and upcoming personal / business phone calls or sending emails. See Step 1 for instructions on how to create a traditional paper file or use digital services to create an electronic version.
Steps
Method 1 of 3: Create a Paper Tickler File
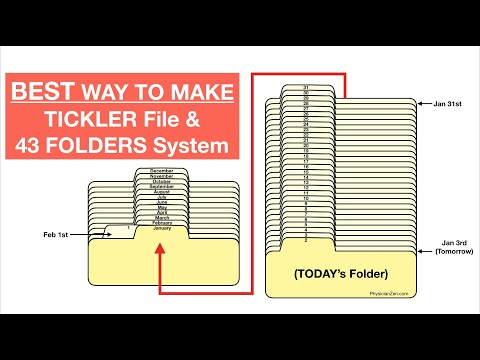
 1 Collect all your materials. You will need 12 folders as well as 31 files. Thus, you can create a folder for each month, and 31 files for each day of the current month.
 - There are many ways to create Tickler files, but this is the most common and easily tracked one.
 2 Label your folders and files. Enter the name of the month on each of the 12 folders. Then number the files from 1 to 31.
  3 Organize folders and files. Place the required number of files in the current month, starting from today. For example, if today is June 15, then files with numbers 15-31 should be placed in the June folder, and files with numbers 1-14 - in the July folder.
 - Note: June is only 30 days, but keep the 31st file until the end of the month in the same folder so that later you can easily transfer it to the next month without losing the order of things.
 4 Fill in the files. Now that we have decomposed the files, we need to fill them in. Place whatever needs to be done in the appropriate file. You can place sticky notes, bills, letters and any other notes / entries that require your attention one day.
 - Organize future cases into folders each month. When a particular month comes, you can sort the items by day.
- If one of the items on your to-do list takes several days, then place it on the file from the day you want to start. But, in no case from when you should already finish this business.
 5 Place your folder nearby. Your Tickler file will only be useful when it's easy to get hold of. It should be within arm's reach of your work area. This will allow you to grab a folder without getting up, which will significantly affect how often you view files.
  6 Use your file. At the beginning of each day, remove the to-do file for the current day from the appropriate folder and place it on your desk. As you complete each step, put them in another place for storage, or throw them away. When all points are completed, move the daily file to the end of the list for the next month.
Method 2 of 3: Using Google Calendars
 1 Open the Google calendar app. You can use it in conjunction with Gmail to create an email Tickler file that will send you daily reminders to check your to-do list for the current day. In order for you to have this opportunity, you need to create an account / account with Google.
  2 Create a new calendar. If you still want to keep your electronic Tickler file separate from the calendar, then creating a new calendar will allow you to add new items that can be easily turned on and off. This will also allow you to set various reminder settings.
 - Click on the arrow icon next to the "My Calendars" button in the left menu.
- Select "Create New Calendar".
- Name the calendar "Tickler". If necessary, add a small description to this calendar.
- Click the "Create Calendar" button when done.
- Disable your main calendar when filling out the Tickler. This will make it easy to track that the completed task is marked on the correct calendar. You can switch calendars by clicking on the colored checkbox next to the calendar name in the left menu.
 3 Create events that run throughout the day. For each point of the daily Tickler, create a new event for the current day, which will be valid for the whole day. To do this, switch to the Weekly view and look for a thin strip at the top of the calendar below the dates.
 - Click on an empty panel to open the New Event pop-up window. Then click on the "Edit Event" link to open the detailed event editor.
- Enter all the details of the new item. Add detailed descriptions to your title or any other appropriate place, including email or website addresses. You can even copy and paste excerpts from documents that you may need.
- Highlight this entry with a bold color if you want to add an extra layer of visualization.
- Delete the reminder, if any, as you will be setting up a different reminder system.
- As with the paper Tickler, make sure you enter the item on the day you should start this assignment.
 4 Get a daily work plan. Once you have entered all the tasks in the calendar, you can set up a Google calendar and receive a daily reminder in the form of an email with a brief description of all tasks for the current day. To do this, click on the gear icon in the upper right corner and select Settings.
 - Go to the Calendars tab and then click the Reminders & Notifications button to go to your Tickler calendar.
- Check the "Daily Agenda" box. You will automatically receive a list of all your to-do items for the day via Gmail at 5 a.m. every day. You can view this list as soon as you wake up.
 5 Continue filling in files day by day. As the points increase, make sure you put them on the correct date. If possible, set aside one or two days a month to check if you entered the information correctly.
 - If you find that you repeat some items too often, you can set a specific schedule for them so that they repeat automatically without re-entering them.
Method 3 of 3: Using Evernote
 1 Create twelve notebooks. Evernote is a free service that lets you create notes and sort them into notebooks. You can use Evernote's virtual filing system to create a paper-like TICKLER file. To get started, create twelve notebooks and put the name of a specific month on each of them, as well as the ordinal number of each month. Add "0" in front of the numbers for the months that have a single digit number. This will sort the months in the correct order.
 - For example, "01 January, 02 February, 03 March ... 09 September, 10 October, etc."
- To create a new notebook, click on the arrow icon next to the Notebooks heading in the left menu and click the "New Notebook ..."
 2 Fold up your notebooks. Once you've created your notebooks, start folding them. Drag the February 02 notebook over the January 01 notebook. You will be prompted to name this stack, so name it ".Tickler". "." ensures that the Tickler collection of notebooks remains at the top of the Notebook list.
  3 Create notes for each day of the month. Click on the notebook for the current month and then click on the "+ New Note" button. Title the first note "01" for the first day of the month. Repeat this process for each day of the month until you have notes for each day.
 - When you've finished creating all your notes, click the View Options button at the bottom of the window and select Title (Ascending). This will sort the list of notes so that they stay in the correct order.
 4 Fill out your notes. Now that all your notes are structured, you can start filling them in with the information you need. As with the paper Tickler file, make sure that you enter the item on the day on which you should start the task, and not on the date when the task should already be completed.
 - Add tags to help you find and sort information in the Tickler file.
 5 Add reminders. Use the alarm icon at the top of the note to set an email reminder. Once you include the Tickler file viewing in your morning routine, you will no longer need reminders.
Tips
- If you are still struggling with the daily volume of your Tickler file, create a separate Tickler file - divided into days, weeks, or months - for each group of tasks you have to complete. In the name of each file, put clear information that clearly reflects the purpose. For example, you could create one file for bills to be paid and another for people to contact.


