Author:
Joan Hall
Date Of Creation:
6 July 2021
Update Date:
1 July 2024

Content
- Steps
- Part 1 of 3: Building a Thermometer
- Part 2 of 3: Testing the Thermometer
- Part 3 of 3: Calibrating the Thermometer
- Warnings
- What do you need
Making a thermometer at home will take some time, but the procedure itself is quite simple and straightforward. Assemble the thermometer with your own hands and test it to make sure it gives the correct reading. If the thermometer is working properly, calibrate it before using it to measure temperature.
Steps
Part 1 of 3: Building a Thermometer
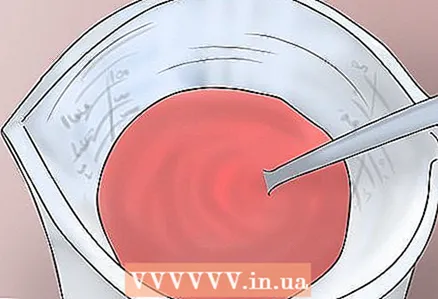 1 Prepare measuring solution. Fill the measuring container with water and rubbing alcohol in a 1: 1 ratio. For color, add 4-8 drops of food coloring to the solution and gently stir the mixture.
 - Please note that the addition of food coloring does not change the response of the solution to temperature fluctuations. The dye only contributes to the reading of the instrument, making it easier to observe the liquid column in the thermometer tube.
- You don't need to add alcohol, just use water, but a mixture of equal proportions of water and rubbing alcohol reacts more quickly to temperature changes than water.
- When determining the required volume of solution, be guided by the volume of the bottle you are using. You will need enough liquid to fill the entire bottle, plus a small amount.
 2 Pour the measuring solution into a clean bottle. Fill the bottle with the solution to the brim. Finally, you can use a dropper, adding the last drops of colored liquid until it fills the bottle to the very edges.
 - Both glass and plastic bottles can be used.
- Be careful not to overflow the solution from the bottle.
- You can create a thermometer without filling the bottle with measuring liquid to the very rim. However, in this case, the design of the device should be such that, when expanding, the solution enters the measuring tube, and does not fill the space of the bottle that remains free. However, filling the bottle to the end will allow the liquid to react more quickly to temperature changes.
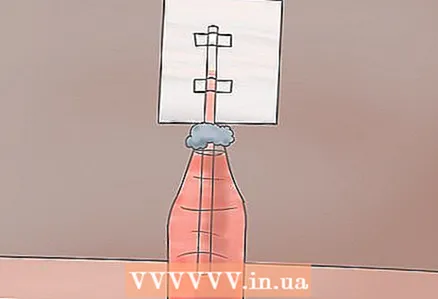
 3 Insert a thin glass or plastic tube into the neck of the bottle and fix it. Do this carefully and slowly so that the liquid does not overflow over the edges of the bottle. Leave at least 10 cm (4 inches) of tubing on top of the bottle, making sure the bottom end of the tubing does not reach the bottom of the container. Secure the tube with molding clay over the neck of the bottle.
 - The neck of the bottle should be hermetically sealed with clay. In this case, it is best if there is no air left in the bottle, that is, it will be completely filled with liquid.
- If you don't have molding clay, use melted wax or play dough.
- The hermetically sealed bottle is very important. The tight cap prevents the solution from flowing out of the bottle when heated, as a result of which all excess liquid expands into the tube.
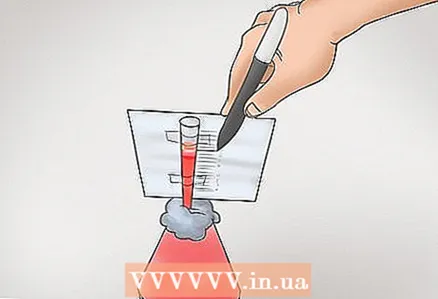
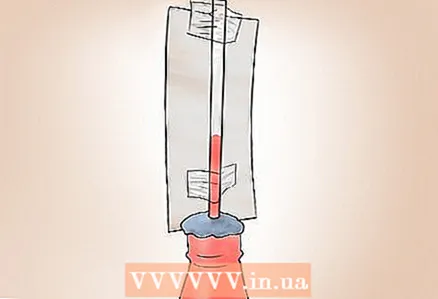 4 Attach a strip of thick white paper to the side of the tube. Place the paper on the back of the tube by attaching it with tape.
 - A paper strip is not required, but it will make it easier for you to monitor the fluid level in the tube. In addition, if you are going to calibrate your thermometer to accurately measure temperature with it, you can mark specific temperatures on the paper strip.
 5 Add measuring solution to the tube. Carefully add a few drops of solution to the top of the tube using a pipette. Allow the liquid to rise in the tube 5 cm (2 inches) above the neck of the bottle.
 - By adding a few drops of solution to the tube, you can make it easier to monitor the level as it changes as the temperature rises or falls.
 6 Add one drop of vegetable oil to the tube. Do this with great care using the pipette. And remember - just one drop.
 - The vegetable oil will not mix with the solution, remaining on its surface in the tube.
- The addition of vegetable oil will prevent evaporation of the measuring mixture. As a result, the thermometer will last much longer, giving accurate results after calibration.
 7 Examine the manufactured thermometer. After assembling the instrument, test it several times before using it for measurements to make sure that you did not make any mistakes in its manufacture.
 - Feel the bottle. Make sure no liquid leaks out.
- Examine the clay layer on the neck of the bottle and make sure it seals the container tightly.
- Check the tube and paper attached to it, making sure they are firmly attached and will not move while using the thermometer.
Part 2 of 3: Testing the Thermometer
 1 Place the thermometer in a container of ice water. Fill a small bowl with cold water and put some ice in it. Wait for the water to cool, then carefully place the thermometer bottle in this bowl. Make sure the liquid level in the thermometer tube is clearly visible.
 - When placed in cold water, the liquid level in the thermometer tube should drop.
- Matter consists of atoms and molecules in continuous motion. The energy of this movement is called kinetic energy. With a decrease in temperature, the movement of particles of matter slows down, and their kinetic energy decreases.
- When using a thermometer, the temperature, that is, the kinetic energy of the particles in the medium, is transferred to the particles of the liquid used in the device. In other words, the measuring liquid of the thermometer acquires the ambient temperature, and as a result, you can determine this temperature.
- On cooling, the particles of the measuring liquid slow down and the distance between them decreases. As a result, the solution contracts and the liquid level in the thermometer tube drops.
 2 Place the thermometer in a container of hot water. Draw hot water from the tap or heat it on the stove without boiling. Carefully immerse the thermometer in hot water while observing the liquid level in its tube.
 - Note that you should wait until the liquid in the thermometer bottle warms up to room temperature after removing the bottle from the ice water. Do not immerse it in hot water immediately after taking it out of ice cold water, as such a sharp temperature drop can cause the bottle to crack, especially if it is glass.
- When the measuring liquid heats up, it rises up in the thermometer tube.
- As already noted, when heated, particles of matter accelerate their motion. When the high temperature of the water is transferred to the measuring solution, the particles of the latter accelerate their motion, and the average distance between them increases. This leads to expansion of the liquid and a rise in its level in the thermometer tube.
 3 Test the thermometer in other environments. Test it in different temperature environments. Observe how the level of the measuring liquid in the tube drops at low temperatures and rises at high temperatures.
 - Note how much the liquid level in the thermometer tube changes when it is placed in a cold or hot environment.
- You can put a thermometer in a refrigerator, on a windowsill lit by sunlight, on a threshold of a house on a warm and cold day, a shady place in a garden, a cellar, a garage, in the attic of a house.
Part 3 of 3: Calibrating the Thermometer
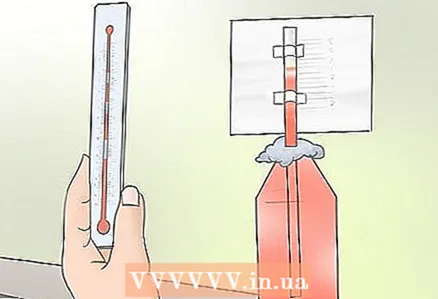 1 Take a standard thermometer. Place the thermometer you built in the room and wait until the liquid level in its tube stops changing. Bring a standard alcohol thermometer to the tube of your homemade thermometer and compare the readings.
 - Calibrating a homemade thermometer is important if you want to measure the actual temperature with it, and not just the magnitude of the temperature change. If you do not calibrate and calibrate your thermometer, then you will not be able to determine the temperature from its readings, but you will only be able to tell whether it is warmer or colder.
 2 Apply temperature labels. Using a thin, waterproof marker, mark the paper strip attached to the thermometer tube. Label them with the appropriate standard thermometer temperatures.
 - When observing the liquid level in the thermometer tube, note the upper level of the colored liquid, not the layer of vegetable oil on top of it.
 3 Repeat measurements in environments with different temperatures. After calibrating the thermometer, place it again in different temperature conditions. At each temperature measurement, wait until the liquid column stops moving in the tube. Mark each measured value on a strip of paper attached to the tube.
 - Measure as many different temperature values as possible. The more temperature values you put on the scale of your thermometer, the more accurate its readings will be during measurements.
 4 Determine the unknown temperature with a calibrated thermometer. After calibrating the thermometer and drawing up a sufficiently detailed temperature scale, place the instrument in a relatively warm or cold environment. Wait until the liquid level stops rising or falling and compare it with the mark on the scale. Using the scale marked earlier, determine the temperature of the environment in which you placed the thermometer.
 - For a more thorough adjustment of a homemade thermometer, check its readings with a standard thermometer.
- Once you've followed the steps above, your homemade thermometer is ready to use.
Warnings
- Be careful when handling rubbing alcohol. Do not get it in your eyes or inhale its vapors.
What do you need
- Tap water
- Rubbing alcohol
- Food coloring (any color)
- Liter measuring tank OR a glass with a volume of 600 ml
- Clean glass or plastic bottle 20-25 cm (8-10 inches) high
- A clean glass or plastic tube that is at least 20 cm (8 inches) long
- Pipette
- Vegetable oil
- Molding clay, wax or plasticine
- Ruler
- Thin marker
- Thick white paper
- Scotch
- Bowl of cold water
- Hot water bowl
- Standard thermometer (for calibration)


