Author:
Bobbie Johnson
Date Of Creation:
2 April 2021
Update Date:
1 July 2024
Content
1 Prepare the necessary parts of the structure and tools. Creating a hidden blade is not easy, and you will most likely have to visit a hardware store to purchase the necessary tools and parts of the future weapon. The following is a list of what you will need to craft a hidden blade:- Hidden Blade Parts:
- The standard drawer slide is 35.5 cm long. Select the flat drawer slide to become the dagger case.
- 2 release springs, 0.6 cm by 3.8 cm, working weight 3.8 kg.The springs should be thick and large.
- Phillips flat head screwdriver set, pitch # 8-32, 5cm long, with nuts.
- A key ring that you can easily put on your finger.
- Some fishing line. Cut just enough line so that you can't see it behind your hand.
- 35.5 cm aluminum sheet.
- 35.5 cm piece of cardboard box.
- Industrial type Velcro fastener.
- An old belt or piece of leather.
- The tools you will need:
- Pliers.
- Dremel.
- Drill.
- Scissors.
- Metal file.
- Some WD-40 aerosol.
 2 Disassemble the drawer rail. The guide consists of three parts. First slide the black latch under the top of the rail and remove that section, then fold back the metal bar located at the end of the bottom of the rail and slide the middle section, the one with the bearing treadmill inside.
 - You can set aside the top and bottom of the rail - you will no longer need them for your product.
- You will need additional ball bearings. Keep them in case you suddenly lose the ball bearing during operation; that's when the spare parts come in handy.
3 Remove the ball guide from the middle of the guide. This can be done by disassembling the structure or simply by removing the cover at the end of the rail. Pull out the desired part and make sure all ball bearings are in place. 4 Cut the piece to the length of your forearm. Stretch your arm forward, bend your elbow, and point your palm up. Place the piece against your forearm so that the end rests on your wrist. Calculate how many centimeters you need to cut so that the structure fits comfortably on your hand; should literally remain a few centimeters to the elbow bend. Use a dremel to cut the piece to a suitable length from the end where the cap is not present. - Do not cut off the end of the part where the cover is, or the ball bearings will fall out. You will move this part later.
- After you've trimmed the part, use a file to file off any sharp edges.
- Follow safety rules when cutting metal. Wear special glasses and work in an area suitable for such work.
5 Fold the edges of the part. Use a pair of pliers to bend the edges of the part in half where the cover is missing. This prevents the ball bearings from falling out when your structure returns to its original position. 6 Cut out the center of the part. Use a dremel to cut a rectangular piece of metal from the center of the part. Make sure you don't cut out the part where the cover will be re-installed and leave a couple of centimeters of metal in the folded part of the part. Remove the cut piece and sand the sharp edges. 7 Cut the ball guide. There should be a total of 5 holes and you need to cut each one, so you only need to make three cuts. Use a dremel to cut the ball guide at right angles. - The cut piece should contain a total of 6 ball bearings on each side.
- If your part is long and you can fit the long part with ball bearings, you can cut the part to just 4 holes. Do not cut the rail more than 3 holes; however, for the product to work correctly, only three holes are enough.
8 Drill holes in the ball guide. Use a drill to drill two holes between the slots. Make sure the holes are large enough to accommodate the screws. 9 Drill a hole in the plastic insert. Take the plastic tab you removed from the middle section of the rail earlier. Drill a hole the same size as the holes in the rail. You should be able to pin the tab to the rail when it's time to put the whole device together. Method 2 of 3: Attaching the Blade
- 1 Create a test blade. Cut the blade out of the cardboard so that it fits within the guide. The end of the "blade" must match the end of the guide. Make two holes in the cardboard blade that will line up with the holes you drilled earlier.
- 2 Cut out the metal blade. Trace the outline of the cardboard blade on the piece of metal sheet, including the two holes in the middle. Cut a blade out of a sheet of metal and drill two holes in the middle.
- 3 Cut off the screws. The screws will be too long, so you should cut about halfway using a dremel.
- 4 Attach the blade to the ball guide. Turn the ball runner upside down and place it on the table with the comb part up and the smooth part down. Place the blade on top of the ball guide so that the holes in the pieces match. Thread the screws through the holes and tighten with the nuts.
- 5 Place the ball guide back in the middle of the guide. Insert it so that the blade is directed to the bent part of the product. The ball guide must slide freely; make sure all ball bearings are in place.
- 6 Add a spring to the device and replace the black cover. Attach the spring to the second screw on the blade. Now fix the black cover with the screw, screw on the nut. These steps will help hold your invention together.
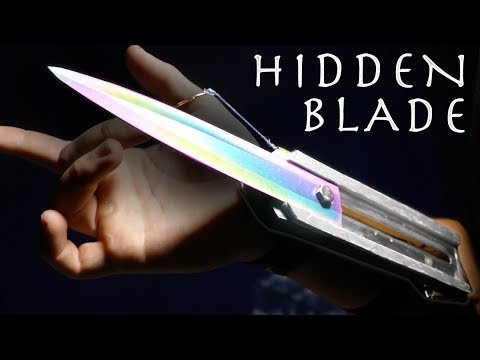
- 7 Tie in the fishing line. Place the guide on your forearm and calculate how much line you need; it is necessary to measure the length from the second screw to the middle finger. Make sure the line is long enough to wrap around your finger, keeping your fingers in a fist. Add a little more length as you will need to keep in mind that you will be wrapping the line around the key ring. Tie one end to the second screw, before that, make sure to wrap it around the nut, then the knot will be stationary; Wrap the other end around the key ring.
- Make sure you cut enough line. The line does not need to be taut, but it should not be slack either, otherwise it will not work. When the key ring is on your finger and your fingers are in a fist, the line should fit perfectly. When you straighten your arm, the blade should pop out.
- Pull the line back and forth to make sure the blade moves freely along the guide.
Method 3 of 3: Buckle the structure with straps
- 1 Attach the industrial type Velcro straps to the bottom of the rail. Cut two pieces of 3cm Velcro. Attach one to the bottom front of the rail and the other to the bottom of the back. Make sure not to attach the Velcro to the plastic part of the structure.
- 2 Make hand straps. Cut the strap into two strips, one to wrap around your forearm and the other around your wrist. Attach the Velcro to the inside of the straps so that they fit snugly around your forearm and wrist.
- 3 Attach the straps to the hidden blade. Remove the sticky part from the Velcro on the rail and attach the rail to the belt. Remember to position the blade correctly so that it points forward and not towards your body.
- 4 Put on the blade. Place the product under your forearm with the straps at the top. Place the ring on your middle finger and gather your fingers into a fist.
- Hide the blade under the oversized long-sleeved sweater.
- Make sure the blade is positioned so that it cannot damage your hand or clothing.
- 5 Extend the blade. Point your hand away from your body and straighten your arm. The ring will pull on the line, which will pull the blade forward. As soon as you release the ring, the blade will move back.
Tips
- You can use a piece of cardboard instead of a real blade.
- Even when using fake weapons that looks like present, you can get yourself into trouble. It all depends on the laws of the country in which you live.Think twice before taking such a blade with you to a public place.
Warnings
- The blade is sharp enough to injure yourself, so pull it out with caution.


