Author:
William Ramirez
Date Of Creation:
17 September 2021
Update Date:
1 July 2024

Content
- Steps
- Method 1 of 3: Onion blanks
- Method 2 of 3: Shape the bow
- Method 3 of 3: Pulling the bowstring
- Tips
- Warnings
- What do you need
The recurve bow allows you to shoot with greater range and power than other traditional bows. While it takes skill and years of practice to craft the perfect recurve bow, the following steps will get you started.
Steps
Method 1 of 3: Onion blanks
 1 Buy or find a wood branch. This is what your bow will be formed from. It should be as long as the intended length of your bow, and the wood itself should be strong, flexible and pliable.
 - Hazel, yew, lemon tree and maple are good woods for making bows.
 2 Pick up your tools. An ax, a vise, a bowstrip, a chiller board, a rasp, a blow dryer, a few screw clamps and a staple will make the process easier than using just a knife and a wide round object.
  3 Make the markup. Add a handle to the shoulders and hilt of your bow. Set the branch upright, holding it with one hand, with the other hand trim it with an ax. Make the branch as smooth as possible.
 - You can choose the shape (flat shoulders, wide or narrow shoulders) as you like. Mark the place where you want to make the handle.
 4 Check out the branch. The safest way to do this is as follows: place one end of the branch at your feet, hold the other end in your hand and pull the central part towards you (with the side that will face away from you during shooting). Do not overdo it so as not to damage the branch.
  5 Make your shoulders. Once you have the general outline of the bow by cutting the branch with an ax, you shape the shoulders. Place the hilt area marked on the branch in a vise and clamp it. Make sure the back is facing up. Take a scraper and use it to work the branch in long, longitudinal movements.Continue until the branch is as thick as your onion should be.
 - Sand any sharp edges on the branch.
- If you make the bow too thin, it can break.
Method 2 of 3: Shape the bow
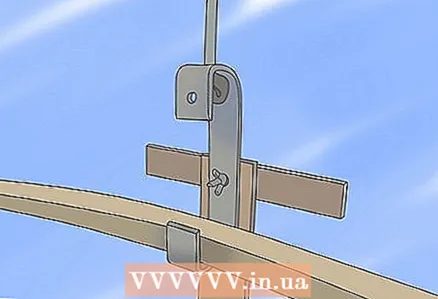
 1 Place the branch in the onion staple. Depending on how much bend you want to give your bow, you can move the bow between different pile clips.
 - For a recurve bow, you will need to create two curves for each arm, one away from the hilt and one towards the hilt.
- Use the screw clamps to secure the bow in the slipway.
- If the branch is difficult to bend, use an industrial hair dryer to heat the onion and then secure it in the slipway.
 2 Take accurate measurements. Both shoulders should be equally bent. To ensure this, make sure you fold the branch at equal distances from the handle on both sides.
  3 Wait for the bends to lock. Leave the workpiece, fixed in the slipway, for at least a few hours, and preferably overnight. During this time, the wood will get used to the new position, and the bow will be more durable and effective.
Method 3 of 3: Pulling the bowstring
 1 Cut the grooves for the string. Make grooves on the upper and lower shoulder. They are needed to hold the string in place. It is best to use a long cylindrical file for this, but you can handle it with a knife and a flat narrow file.
 - Cut grooves on the inside of the bow to maintain the integrity of the wood on the outside.
 2 Onion chilling. Chilling is what gives the bow its tension. After you have achieved the desired shape of the bow, place the prestring on it. The pre-string should be approximately twice the length of the working string. Make a loop at each end of the string and attach them to the grooves on the shoulders.
 - A parachute cord works well as a preliminary bowstring.
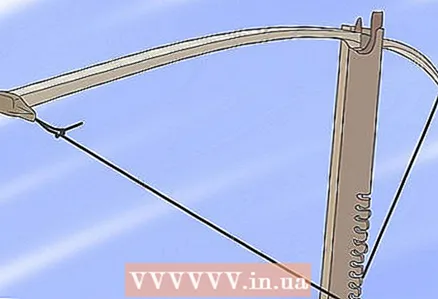
 3 Place the bow on a tillering board. Pull the prestring to one of the notches near the top of the board. Gradually and slowly pull the bowstring further, noting how much the bow bends.
 - The tilling process is time consuming and should be gradual.
- If you hear the bow start to crackle, stop and trim your shoulders a little more with a rasp.
- The chilling process can take several months, and if you are not in a rush, it will allow you to increase the tension on the bow to a good setting.
- Once the tillering process begins, you can flatten the front of the bow with a rasp.
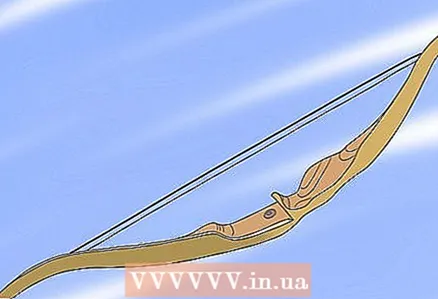
 4 Pull the string over the bow. Once the bow has reached an acceptable tension, remove it from the tiller board and remove the prestring. Attach the work string. Make loops at both ends and loop them over the grooves.
 - Nylon is a very popular bowstring material.
- While tilling, it is possible to draw the string and shoot the bow, although the bow will not work at full strength and shooting may interfere with the successful tilling process.
 5 Finish the bow. Once the tilling process is complete, you can add painting, leather inserts, or a sheeting to the surface of your bow.
Tips
- Don't be discouraged if your first try doesn't turn out to be a piece of art. Crafting flawless bows takes years of practice.
Warnings
- Do not shoot a bow in crowded places.
- Remember responsibility, do not shoot living creatures.
- Use arrows purchased from the store. Homemade arrows can stray off course and hit where they shouldn't.
What do you need
- Wood
- Parachute cord (or other thick cord)
- Vise
- Screw clamps
- Industrial dryer
- Bowstring
- Staple
- Tiller board
- Onion slipway
- Rasp
- Axe
- Long cylindrical file or knife and flat file.


