Author:
Alice Brown
Date Of Creation:
23 May 2021
Update Date:
1 July 2024

Content
- Steps
- Method 1 of 3: Designing the Model
- Method 2 of 3: Using Gelatin
- Method 3 of 3: Using Craft Materials
- Tips
In high school, in biology lessons, schoolchildren get acquainted with the structure of living cells. It is possible that you have recently learned about various types of plant and animal cells. If you want to translate your knowledge into a three-dimensional model of a living cell and its structures (or get such a homework assignment), this article will help you with this.
Steps
Method 1 of 3: Designing the Model
 1 Get familiar with the structure of living cells. If you want to create a correct 3D model of a living cell, you need to know about the main organelles (the structures that make up the cell, its “organs”), how they are located in the cell, and the differences between plant and animal cells.
 - The cell model must include various organelles, so you should learn about them. First of all, you have to imagine their shape. The colors of different cell structures, given in biology textbooks, serve to distinguish them and usually have nothing to do with reality, so when coloring the model you can give free rein to your imagination. However, you must give the organelles their proper shape.
- It is also important to know how the different structures of the cell are located in relation to each other. For example, the endoplasmic reticulum, also called the endoplasmic reticulum, is always located near the nucleus because it is involved in the production of proteins used for DNA replication. When creating a model, you need to take this into account.
- Learn about the differences between plant and animal cells. The most important of them are that plant cells are covered on the outside with a dense membrane consisting of cellulose (fiber), they contain very large vacuoles (membrane sacs that store water and enzymes), and they contain chloroplasts (structures of plant cells, converting light into useful energy).
 2 Think over the basic concept of the future model. Will your model be transparent, with components placed in a translucent medium? Or will the cell, with all its organelles, be presented in a section that allows one to judge its three-dimensional structure? Below you will find a detailed description of how to construct both types of models, but in general terms they can be described as follows:
 - The first type is a three-dimensional image of a cell; all organelles are embedded in transparent gelatin.
- When creating a model of the second type, ornamental materials are used; in such a model, the cell is presented in a section that allows you to see its internal structure.
 3 Think about what materials you need. Obviously, this will depend on what kind of model you choose.
 - It is best to use objects that are shaped like the objects being modeled - for example, something that has the shape of a ball is suitable for the cell nucleus.
- Of course, many organelles have such an irregular shape that it is difficult to find objects that exactly repeat it. In this case, use soft materials that can be shaped to the desired shape.
 4 Unleash your imagination. Maybe your 3D model of the cell will be edible? What colors will you choose for the different organelles? Get creative! Create a model in your style, while keeping in mind the shapes inherent in the main parts of the cage.
Method 2 of 3: Using Gelatin
 1 Gather the required materials. To create the elements of the cage, you will need a variety of food products and kitchen utensils. The choice is yours. Here are some materials you can use:
 - Transparent gelatin will act as the cytoplasm. If you're striving for precision, it's best to use pure, unflavored gelatin. If you want to create an edible model, choose a gelatin that is not too dark so that parts of the cage are visible in it.
- For the kernel, nucleolus, and nuclear membrane, use pitted fruits such as plums or peaches. The stone will play the role of a nucleolus, the fruit itself will become the nucleus, and the peel will turn into a nuclear membrane. If you are not going to go into such details, any ball-shaped object will do.
- Centrosomes are like spines, so depict them with a bunch of toothpicks stuck into a ball of gum or dragee.
- For the Golgi apparatus, use shreds of cardboard, waffles, crackers, thin banana slices, or accordion-bent fruit pastille (perhaps the best solution).
- Use small round candy or chocolate chips as lysosomes.
- The mitochondria are slightly oblong, so depict them with lima beans or peeled peanuts.
- For ribosomes, you need something small. Use crumbs or peppercorns.
- The granular endoplasmic reticulum is very similar to the Golgi apparatus - it also consists of flat curved plates folded together, but it has a rough surface. For this network, you can use the same materials as for the Golgi apparatus, making them coarser (for example, sprinkling them with crumbs).
- A smooth endoplasmic reticulum looks like a collection of intertwined tubes of different sizes connected to each other. Use something smooth and flexible for her. Spaghetti, gummies, and stretched toffee will do.
- Vacuoles. For the animal cage, use a few medium-ball chewing gums as vacuoles. Take slightly transparent balls of the same color - as you remember, water and enzymes are stored in vacuoles. Plant cell vacuoles are much larger. If you are looking for an accurate representation of the cellular structure, you can mold vacuoles from separate pieces of more concentrated and dense gelatin and then insert them into your model of a plant cell.
- Think of microtubules as raw spaghetti pieces or straws, depending on the size of your model.
- For chloroplasts, which are only plant cells, use peas, green pills, or half green beans. The main thing is that they are green.
 2 Find a gelatin mold. Decide what type of cell you want to reproduce and choose the appropriate shape for pouring the gelatin into. Animal cells and plant cells are shaped differently, so you will need different utensils.
 - If you are creating a plant cell model, you will need a rectangular, preferably porcelain baking dish. In this model, the dish will serve as the cell wall and membrane.
- If you are creating a model of an animal cage, you will need a round or oval baking dish, such as a saucepan. You can then use this form as a cell membrane, or you can take out the cell model and wrap it with food grade plastic wrap, which will serve as a membrane.
 3 Prepare gelatin. Follow the instructions on the packaging. It is usually necessary to bring the water to a boil and then add the gelatin to it. Pour the hot mixture gently into a saucepan or baking dish of your choice.Put it in the refrigerator and wait about an hour until it begins to thicken. Do not wait for the gelatin to harden completely... It is necessary that the gelatin hardens after you place the prepared cell organelles in it.
 - If you can't find pure gelatin, get the lightest gelatin (such as yellow or orange). You can also make your own gelatin from handy foods.
 4 Place the components of the cage. Start laying out the cage parts you prepared earlier in gelatin. They can be placed as follows:
 - Place the nucleus in the middle (unless you are recreating a plant cell).
- Place the centrosome near the nucleus.
- Place a smooth endoplasmic reticulum near the nucleus.
- Place the Golgi complex near the nucleus (put it a little further than the smooth endoplasmic reticulum).
- On the other side of the smooth endoplasmic reticulum, add the granular endoplasmic reticulum (symmetrically to the nucleus).
- Spread the rest of the ingredients in free areas. Don't place the organelles too crowded. In real cells, they float freely in the cytoplasm and can change their position over a wide range.
 5 Place the model back in the refrigerator. Wait an hour or two for the gelatin to harden completely.
  6 List all the ingredients in your cell. After placing all the organelles in gelatin, rewrite them, indicating which element of the model corresponds to a particular cellular structure (for example, "gelatin = cytoplasm", "licorice candy = granular endoplasmic reticulum", and so on). It is quite possible that in the future you will have to explain the structure of the cell and its composition to those around you using your model as an example.
Method 3 of 3: Using Craft Materials
 1 Find the materials you need. Here are just a few of the possible options:
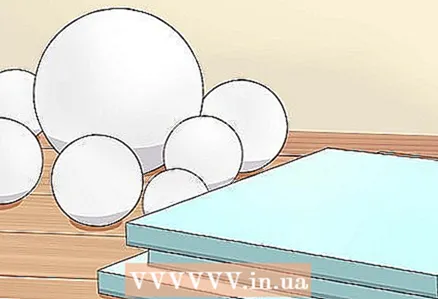
 - You can use foam as a base. Purchase a foam ball (for an animal cage) the size of a basketball or a Styrofoam cube (for a plant cage) from a craft store.
- Many cellular structures, such as the Golgi apparatus and granular endoplasmic reticulum, can be made from cardstock.
- For tubular structures, straws and small tubes can be used. Stir sticks can be used as microtubules, and flexible drinking straws can be used for smooth endoplasmic reticulum.
- Use beads of various sizes and shapes to create other cellular structures such as mitochondria and chloroplasts. Make sure they fit in size with other cellular structures.
- If you have not found suitable items for any structure, you can mold it from ornamental clay.
- The foam can be dyed to separate the cell lining from the insides. You can also paint the clay items.
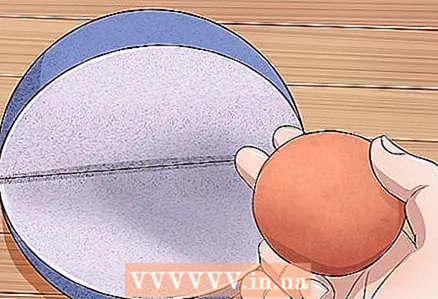
 2 Cut out 1/4 of the foam base. Measure a piece of styrofoam and mark the middle on it. Draw a line along which you want to cut the foam. Using a sharp craft knife or scalpel, cut out the fourth lobe and remove it.
 - To mark the plant cell, draw lines in the middle of the two adjacent faces of the cube and continue them to the rest of the faces until you have drawn around the entire cube.
- To mark the animal cage, draw large arcs that resemble the equator and meridians on a globe.
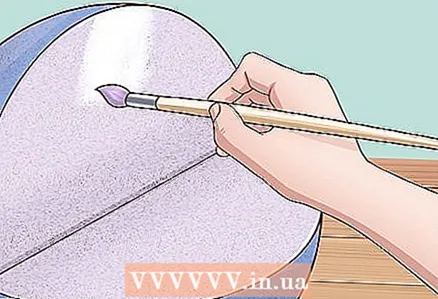 3 Color in the slice. Paint the inside of the cut to highlight the cellular structures. You can also paint the outside of the foam a different color to highlight the difference between the cell wall and cytoplasm.
  4 Prepare the cage parts. Use the craft materials listed earlier for this.
 - Some structures can be molded from clay. Give them simple shapes to make them look like real parts of a living cell.Perhaps clay should be used to make parts that have a simple shape, and more complex structures, such as a smooth endoplasmic reticulum, are better assembled from tubes and other ornamental materials.
 5 Place the pieces of the cage. Place the cooked cage parts in the foam base. You can attach them to the styrofoam with hot or regular glue, toothpicks, safety pins, paper clips, or other methods. In some cases, you may need to cut grooves in the styrofoam or press parts of the cage into it to position them properly.
 - The Golgi apparatus and granular endoplasmic reticulum can be cut out of cardstock. In this case, make indentations in the foam and insert the paper parts into them so that the paper wrinkles a little, forming the sharp folds characteristic of these structures.
 6 Make a list of all parts of the cage. After placing the cell structures, rewrite them, indicating which detail corresponds to a particular part of the cell. It is quite possible that in the future you will have to explain the structure of the cell and its composition to those around you using your model as an example.
Tips
- With the help of your parents or friends, you will be able to assemble your model faster.
- After placing the organelles in the gelatin, make sure that it is completely solidified. Leave the model in the refrigerator overnight.
- Be very careful when removing the model from the refrigerator.
- For better preservation, you can cover the foam with papier-mâché. By applying several layers of papier-mâché to the foam, you will additionally protect your model from destruction.


