Author:
Robert Simon
Date Of Creation:
16 June 2021
Update Date:
1 July 2024
Content
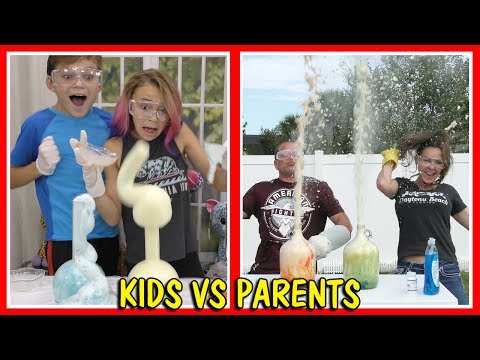
Making an “elephant toothpaste” is an easy and fun science experiment that you can do at home with your kids or with students in the lab. This is the result of a chemical reaction resulting in an enormous amount of foam. The movement of the foam looks like a toothpaste gushing out of a tube, and the foam mass is enough for an elephant to brush its teeth.
Note that concentrated hydrogen peroxide (3% higher than household hydrogen peroxide) is a powerful oxidizer. It can bleach the skin and cause burns. Don't try it without proper safety measures and the presence of an adult.
Have fun with your experiment, but make sure it's safe!
Resources
Version made at home
- 1/2 cup 20 volumetric hydrogen peroxide solution (20 volumes is 6% solution, you can find it at beauty stores or hair salons)
- 1 tablespoon dry yeast
- 3 tablespoons warm water
- Dishwashing liquid
- Food coloring
- Various bottles of all shapes
Version made in the laboratory
- Food color (optional)
- Laundry water
- Hydrogen peroxide 30% (H202)
- Saturated potassium iodide (KI) solution
- 1 liter cylinder
Steps
Part 1 of 3: Prepare the experiment

Look for available materials indoors. You do not need to purchase professional laboratory equipment to perform this interesting experiment, as most materials can be found at home. Make a list of what's available and see if you can improvise without something material. For example, if you don't have 6% hydrogen peroxide, you can use 3%.
Arrange enough time to prepare the experiment, run the experiment, and clean up. Remember that this experiment is going to be pretty messy, so tell everyone to stay and clean. You need enough time for people to participate and enjoy the experiment.
Prepare a splash area. The bubble spray experiment can be fun for all ages, but kids can get too excited to lose control. Whether you plan to experiment in the bath, the yard, use a large baking tray or plastic container, you should ease your cleaning up by providing an enclosed space.
Find the right amount of hydrogen peroxide. The amount of hydrogen peroxide determines the amount of foam produced. Even if you have 3% hydrogen peroxide in your medicine cabinet, you can also go to a beauty salon and buy 6%, as this hydrogen peroxide is not usually available at a pharmacy. Beauty stores sell 6% hydrogen peroxide as bleach. advertisement
Part 2 of 3: Performing experiments
Mix 3 tablespoons of water with yeast and let it sit. You can have your children do this. Have your child measure the yeast and mix the correct amount of warm water, then stir the lumps.
- Depending on your child's age, you can give them a spoon and a stirrer. You can also have your child wear goggles and a lab coat. Child safety goggles are available at hardware stores.
Fill the bottle with dish soap, food coloring, and a half cup of hydrogen peroxide. Make sure everyone wears safety glasses and gloves before using hydrogen peroxide. Do not let children hold hydrogen peroxide unless you think they are old enough.
- If your children are too young, you should fill the bottle with dish soap and food coloring. You can also add glitter for more fun. Remember to use glitter made of plastic, do not use metallic glitter, because hydrogen peroxide should not be used with metal.
- You can stir the mixture yourself or let your child do it if he or she is old enough. Make sure that hydrogen peroxide does not spill out.
Use a funnel to pour the yeast mixture into the bottle. Quickly back up and take out the funnel. You can allow them to pour yeast, but if the child is too young you need to make sure the child is standing far enough away so the bottle doesn't spill over. Use a low bottle with a wide bottom for stability, and choose a bottle with a narrow neck to increase test efficiency.
- The fungus present in the yeast will immediately cause the hydrogen peroxide to dissociate and release a large amount of the oxygen molecule. The oxygen molecules released are gaseous, and when the soap comes into contact, bubbles will form, while the remainder remains in the form of water. The gas will find a way out and "toothpaste" foam sprayed out of the bottle.
- Remember to mix hydrogen peroxide and yeast thoroughly for maximum effect.
Change the size and shape of the bottle. If you choose a small bottle with a narrow neck, the foam will spray harder. You can try bottles of different sizes and shapes for even more interesting effects.
- With a regular soda water bottle and 3% hydrogen peroxide, you will have a layer effect like a chocolate waterfall.
Feel the heat. Watch how the foam radiates heat. This is an exothermic reaction, so this experiment will generate heat. The heat isn't enough to cause harm, so it's okay to touch the foam and play. This foam contains only water, soap and oxygen, so it is non-toxic.
Clean up. You can clean the test area with a sponge and pour any excess liquid down the drain.If you use glitter, brush the snow needle out of the liquid to throw in the trash and dump the rest down the drain. advertisement
Part 3 of 3: Laboratory work
Wear gloves and goggles. The concentrated hydrogen peroxide used in the experiment burns the skin and eyes. It can also bleach fabrics, so choose clothes that you don't mind being damaged.
Pour 50 ml of 30% hydrogen peroxide into a 1-liter measuring cylinder. This hydrogen peroxide is stronger than household hydrogen peroxide. Take care when handling hydrogen peroxide and remember to place the cylinder in a steady position.
Add 3 drops of food coloring. Experiment with food dyes to achieve interesting effects. Create fun patterns and rich colors. To add stripes to the final product, tilt the cylinder and drip the color along the wall.
Add 40 ml of dish soap and shake to dissolve. Add a thin layer of dish soap by pouring in the solution along the wall of the tube. You can also use powder dish detergent, but be sure to dissolve it evenly in the solution.
Add potassium iodide to the solution and get back quickly! Use a spatula for potassium iodide to react chemically. You can also dissolve potassium iodide with water in a test tube before pouring it into the solution. A large amount of colored foam will rise and spill over the tube.
Check for oxygen. Bring the stick that is still reddish to the foam and watch the stick burn as oxygen is released from the rising bubble.
Clean up. Pour any excess solution down the drain with plenty of water. Make sure the sticks are completely off and no more flames remain. Close the lid, store hydrogen peroxide and potassium iodide. advertisement
Advice
- You may notice that the reaction is exothermic. This phenomenon is the result of an exothermic reaction, that is, energy.
- Use gloves when cleaning "elephant toothpaste". You can put both foam and solution down the drain.
- The hydrogen peroxide (H2O2) naturally breaks down into water and oxygen over time, but you can speed this up by adding a catalyst. Hydrogen peroxide releases a lot of oxygen at the same time when it meets soap, so millions of tiny bubbles quickly form.
Warning
- Elephant toothpaste can cause stains!
- The resulting substance is called elephant toothpaste just because of its appearance. Do not put it in your mouth or swallow.
- Foam will spill out suddenly and very quickly, especially in the lab version. Be sure to perform this test on a washable and stain-resistant surface, and do not stand near the bottle or cylinder while foaming is active.
- This test is unsafe if you do not use goggles and gloves.
What you need
- Goggles
- Gloves for single use
- Clean 480 ml plastic soda water bottle
- Small cup
- High cylinder (at least 500 ml)
- Test tube
- Food color (optional)
- Liquid soap or powder
- Hydrogen peroxide 30% (H202)
- Saturated potassium iodide (KI) solution


