Author:
Carl Weaver
Date Of Creation:
21 February 2021
Update Date:
1 July 2024

Content
- Part 2 of 3: Selecting Appropriate Landmarks and Mapping
- Part 3 of 3: Preparing the Treasure and Beginning Your Quest
- Tips
- What do you need
- Making aged paper
- Selection of suitable landmarks and mapping
- Preparing the treasure and starting the search
- If you don't have parchment paper, you can use heavy wrapping paper instead, or cut a piece from a brown grocery bag.
 2 Trim and tear the edges of the paper to make it look worn and old. Use scissors to shape the edges of the paper in a wavy shape, or tear off parts of the sheet by hand. Create an imitation that the card has been used a lot and it was rescued from a burning ship.
 - Even cutting off just one or two small semicircles on each side of the sheet will help give the paper a worn look.
3 Crumple the paper to make it tattered. Squeeze, crumple, and roll the paper into a tight ball. You can even throw the lump on the ground and step on top several times. Then, flatten the wrinkled paper again on a flat work surface. - As a result of such actions, the paper will become frayed and fragile, exactly as you can imagine an old pirate treasure map.
4 Prepare some brown watercolor paint in a cup and use it to color the paper. Take a disposable cup or plastic cup or bowl and mix about 1 cup (240 ml) of water with just enough brown watercolor paint to color the water. Take a sponge, dip it in the dissolved paint and wring it out so that it doesn't drip. Start applying the sponge to the paper. Paint the surface of the paper unevenly. You need to give it a dirty, stained look, but at the same time, you should not allow the paper to get wet so that you do not have to wait long for it to dry! - If you don't have paints at home, make a very strong tea or use cold coffee to dye the paper.
5 Light the edges of the card with a lighter or matches. Be very careful with the fire so as not to burn your fingers or accidentally burn the entire sheet of paper.Carefully slide the burning match along the edges of the paper so that they begin to blacken. Manage to move to the next area before the paper catches fire. - If you are worried about the safety of such work, take a card, place it in the kitchen sink and burn the edges there so that you can always turn on the water if something goes wrong.
- You can also paint the edges of the paper with black paint with a sponge to simulate a burnt look (if you don't want to mess around with an open fire).
Part 2 of 3: Selecting Appropriate Landmarks and Mapping
 1 Choose a location to search for treasures. You can arrange a treasure hunt from the basement of your private home to its main floor, or use the bushes and trees in your garden as reference points marked on the map. Treasure hunt can be done both at home and outdoors, depending on the space you need and the current time of year.
 - It is better not to hide the treasure in public places, since you cannot be completely sure that someone else will not find it.
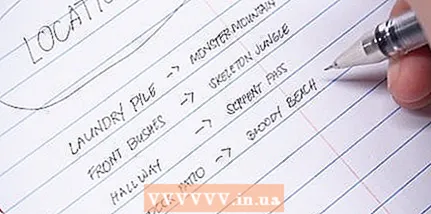 2 Complete four to five landmarks with matching four to five pirate pictures. If you decide to go on a treasure hunt at home, you can use the sofa, lamp, microwave, refrigerator as reference points and choose the corresponding pictures for them. For outdoor treasure hunting, you can use a large tree, a trampoline, a swing, a rose bush, and a large rock as landmarks. Then you will need to think about how to creatively label these items on the map. For example, a bathtub can be made a “Waterfall of Destiny”, and a large street stone can be made a “Skull Island”. Below are some other fun examples:
 - “Mountain of Monsters” - a pile of dirty laundry;
- “Skeletal Jungle” - bushes;
- "Serpentine Trail" - a corridor leading to another room;
- "Bloody Coast" - an open terrace of your home.
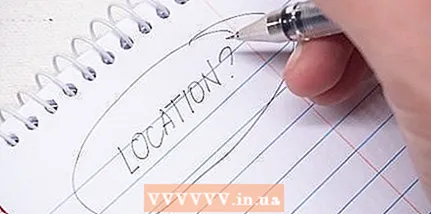
- 3 Draw a large island on the map, leaving some free space around the edges. Create a wavy coastline with several prominent overhangs. Use a blue marker or pencil to paint over the area around the island, thus delineating the ocean.
- You can also always create several additional mini-islands to denote different rooms or areas of the house. For example, you could make one home treasure hunting island and one street treasure hunt island.
- 4 Draw a compass in the corner of the map. You may not want to use a compass to give directions, but displaying it on the map will make it look more realistic. The image can be very simple, for example, a cross with the signatures of the cardinal points ("N", "S", "Z" and "B"), or you can draw a full-fledged wind rose with a compass.
- If possible, correctly orient the compass image on the map to the cardinal points so that children can use this device when searching for hidden treasures! Most smartphones now have a built-in compass so you can check directions to certain landmarks.
- 5 Map landmarks and sign them. Take markers or pencils and unleash your creativity! In addition to the previously selected landmarks, images of palms, parrots, coves and sand can be applied to the map. Depending on the age of the children who will be looking for treasures, you can sign the landmarks with their veiled pirate names and indicate hints that will help you find the appropriate place in your house, for example, for the Waterfall of Destiny, sign below in small letters that it is “there, where people swim ”.
- You can also take interesting ideas from pirate movies and include fun details from there in your map.
- 6 Use a red marker to draw a dotted line to guide the searchers on the trail. From the starting point to the ending point, draw a red dashed line on the map to show the children the path they must follow to reach the treasure. At the same time, make some meanders to make the path on the map look more realistic.
- If you don't have a red marker, you can draw a path with paint or another dark marker. The main thing is that it is clearly visible.
- 7 Place a large cross where the treasure will be hidden. Finding treasure is the best moment of the whole hunt! Place a large red X on the map at the final point of the path and draw a treasure chest next to it.
- If you are good at drawing, you can even draw a pirate holding a treasure chest next to the cross.
Part 3 of 3: Preparing the Treasure and Beginning Your Quest
- 1 To prepare for a treasure hunt, hide pirate loot items or clues at each landmark. For example, if you have Skull Island on your map, you can leave a small bag of candy or an inexpensive pirate-themed keychain by the big rock in the garden so the kids know they are on the right track.
- If you don't want to put clues on the map, you can use separate scraps of paper to jot down clues to hand out to the children as they hunt.
- 2 Hide pirate treasures in the place marked with a cross on the map.Take a shoebox or small toy chest and fill it with pirate-themed sweets and small toys. You can also try finding chocolate coins in stores that can pass for pirate doubloons, inexpensive blindfolds, small plush parrots, and miniature ships.
- If you are babysitting, make sure children are allowed to eat sweets and certain foods before including them in the treasure chest.
- If you have time to spare, you can even craft a treasure chest yourself.
- 3 Roll up the card and hide. Tie the card with twine or twine, or place it in a toilet paper or paper towel tube. Then hide the map somewhere at home as a starting point for a treasure hunt. Just make sure you can give the kids a good hint to get them on the right track to find the map!
- When you twist the card, you can additionally singe it around the edges to make it look even more realistic.
- 4 If the children are young, help them in their search. If you are arranging activities for young children, you may need to give the little ones hints or explain the map to help them figure out which direction to go. For example, you might explain to the children that a parrot next to the dotted line on the map indicates that they should look in the room where the bird painting is.
- The goal is to keep the kids happy, so don't make their treasure hunt too difficult to upset anyone! Give hints, participate in the search, you can even dress up as a pirate and include pirate expressions in your speech!
Tips
- If you are creating a treasure map solely for the treasure hunt process, you can even rip the map into pieces and hide them in different places around the house. Then the children will first need to find and fold all the pieces of the map to find out where the treasures are!
- If your treasure hunt takes place on the street, keep a close eye on the children.
- To create a special pirate atmosphere, you can ask everyone to dress up as pirates while you prepare the map.
What do you need
Making aged paper
- Parchment paper or other thick paper
- Scissors
- A bowl
- Water
- Brown or black paint
- Sponge
- Lighter or matches
Selection of suitable landmarks and mapping
- Markers or colored pencils (regular or wax)
Preparing the treasure and starting the search
- Twine or twine
- Candy or small toys as treasure
- Shoebox or small toy chest


