Author:
Mark Sanchez
Date Of Creation:
5 January 2021
Update Date:
1 July 2024

Content
Once upon a time, the bow was the main weapon of most of the peoples of the earth. The bow is the oldest fighting and hunting weapon on earth, and although modern weapons are superior in strength, a simple bow can be extremely useful for survival in nature if you have to hunt for food. In addition, you can always show off to your friends. Read on to find out how to make your own bow and arrow.
Steps
Method 1 of 2: Bow
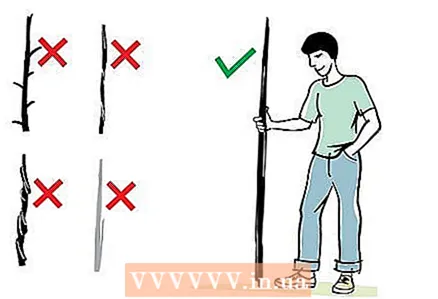 1 Choose a large onion rod. There are several things to consider when choosing a rod:
 - Find a sturdy, dry stick with no cracks. Hardwoods such as lemon, oak, yew, acacia, or teak are good choices for the twig. The rod should be about 1.8 m long and free of knots, twists and branches.
- The twig you choose should be as flexible as juniper or mulberry. You can also use bamboo or reed; the main thing is that the rod you have chosen is not too thick. You can use young bamboo, which is both strong and flexible.
- Green sticks can be used, but should be avoided as they are not as strong as dry sticks.
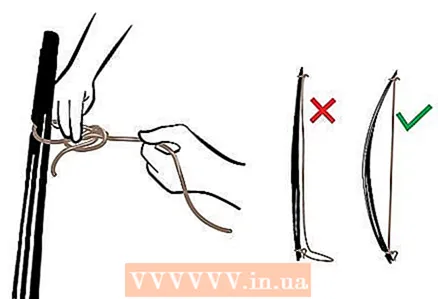
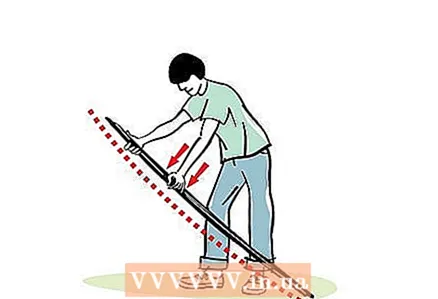 2 Find the natural curve of the stick. Each stick has its own bend, even if it is difficult to notice it. You should consider the natural curve of the stick when you start making the bow. To find a natural curve, place the stick on the ground and press it down with your hand at the top. With your other hand, press the stick to the ground in the middle. Her natural curve should now be facing you.
  3 Determine the edges of the bow and its handle. This is very important in the onion making process. To find where you will hold the bow, mark the bow 7.5 cm higher and lower from the center point of the bow. What's in the middle of these marks is where you will hold the bow.
 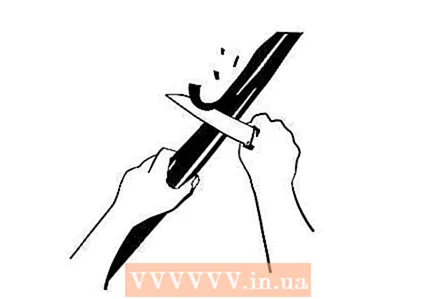 4 Shape your bow. Place the bow on your leg and support it with your hand on top. Use your other hand to push the bow to determine where your bow is more flexible.Use a knife or similar tool to remove knots and other irregularities from the center of the bow. The top and bottom of the bow should be nearly identical, so trim off excess wood if necessary. Once the bow is smooth and the top and bottom mirror each other, you can move on to the next steps.
 - The thicker and stronger bow should be exactly where you will hold it.
- Be careful when handling onions, as excessive pressure and even slight damage to the structure can lead to breakage.
 5 Make notches to attach the bowstring. Using a knife, make notches at each end of the rod. Their distance should be 2.5 to 5 centimeters from the tip. The notches should resemble a crescent moon and should be on the outside of the bow. The notches should not be too deep so as not to damage the bow, but on the other hand, deep enough to hold the string.
 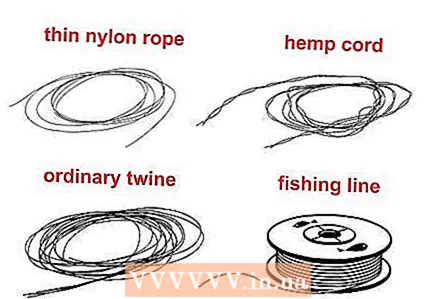 6 Select the bowstring. If you are in nature, you will have to do a lot of searching and trying a variety of materials to find the right string. Suitable bowstring materials:
 - rawhide;
- thin nylon lace;
- hemp rope;
- fishing line;
- strands of cotton or silk from caterpillars;
- ordinary twine.
 7 Pull the bowstring. Before you tie the string to the bow, you need to make a secure knot at both ends. Make sure the string is shorter than the bow so that both the bow and string are taut.
 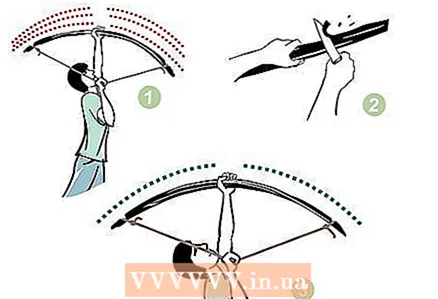 8 Draw out the bow. Hang it upside down on a tree branch or similar object so you can pull the rope down. Pull down slowly, checking the bend for evenness and correcting unevenness as necessary. You need to pull the string a distance equal to the distance between your hand and your jaw (arm fully extended from the shoulder).
Method 2 of 2: Arrows
 1 Find branches for arrows. Arrows should be made from straight, dry branches. The length of the arrow should not exceed half the length of the bow. Better yet, the length of the arrow should not exceed the bend length of the bow, since there is no point in arrows that cannot be pulled. There are several types of wood that can be used as arrows:
 - Green branches are not a bad solution for arrows, but you should give them some time to dry as the sap can ignite if you choose to dry them over a fire.
- Goldenrod is great for making arrows as it has strong and straight branches. It can be easily found in the fields.
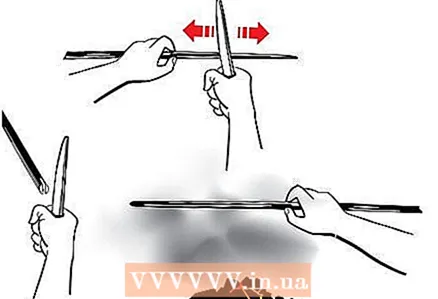 2 Shape the arrows. You will need to peel the branch until it is smooth. To straighten a branch, you can slightly heat it over coals and keep it straight while the tree cools. Make cutouts at one end of the arrow so that it can catch on to the string.
  3 Sharpen the tip of the arrow. The simplest tip is the pointed end of the arrow. You can sharpen the arrow with a knife and then lightly burn it over warm coals to stiffen the arrow (again, be careful not to burn the arrow).
  4 If possible, do arrowheads (this is an optional step). The tips can be made from metal, stone or glass. Split the tip of the arrow slightly with a hammer or stone and insert the arrowhead into it. The tip can also be secured with a string.
 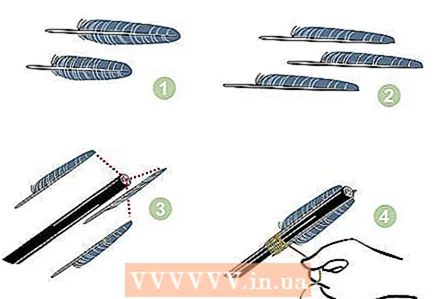 5 Make feathers for arrows (optional). Although the feathering contributes to the stability of the arrow's flight, you can do without it. Find the feathers and glue them to the back of the arrow. You can also split the back of the boom and insert the feathers into the groove, and then wrap it tightly with thread (you can use the thread from your clothes). If you use this method, you can use anything as feather.
 - The plumage acts like a rudder on a ship or small plane, as it guides the arrow through the air with greater precision.
- Feathering also improves the range of use of the arrow.
- Feathering isn't easy to do, though.If your weapon is for survival, plumage isn't that important.
Tips
- First, try making a bow from a twig. Such a bow will not be dangerous and will suit beginners.
- Learn to shoot a bow.
- Always keep the bow away from your face.
- Use smooth wood whenever possible. Rough wood can scratch your hands and damage feathers, preventing you from hitting your target.
- If you are checking the tension of the bowstring, do not let go without the arrow, otherwise there is a high probability of ruining the bow over time.
- If you are going to fish with a bow, try to aim a little lower than the fish due to the refraction of the rays in the water. When fishing, the plumage may be superfluous.
- If you fish with a bow, tie a rope to one end of the arrow so that if you hit the fish, you can pull it out.
- It is not necessary to feather the arrows when making them. You can simply cut a few shavings from your boom and leave them hanging on one side.
- To start a fire with onions, you will need to collect dry moss, dry fiber or any other tinder, find a piece of hard wood the size of your palm and a piece of soft wood (softer than your arrow). Cut a cut in a piece of soft wood about 3 centimeters deep and place the tinder over the cut. Make a small hole, no more than 10 centimeters, in the hard wood to accommodate the arrow. Wind the arrow without a point into the bowstring and place the back of the arrow in the hole in the solid wood. Be careful that the arrow does not jump out of the hole and injure you. Insert the end of the arrow into the notch of the soft wood. Begin to pull the bow back and forth in even movements. The soft wood will begin to heat up and smoke, and embers should start to appear at some point. These coals will fall into tinder. If you carefully blow on the tinder, you will create fire!
- Wrap the onion handle tightly with wet leather and let it dry. This way, you will have a stronger bow and arrows will fly away at a faster speed.
- To test your bow for strength, bend it. If you feel that it breaks, then it is not strong enough.
- You can cut a 1cm deep x 2cm high cutout on the handle so you can keep the arrows straight when you pull the string.
- To increase the power of a bow, you can make two identical bows and tie the front of one to the front of the other, so that when viewed from the side, you get the letter "X". They should be tied at the ends and the string should only be on one bow.
- It is better if the string is about one and a half meters, so as not to be mistaken with the length you need. The excess bowstring can be cut off.
- Instead of a notch (to keep the arrows straight), you can wrap the handle in deerskin. For a better grip on the bow, glue or tie it.
- Punch holes in the arrows to make them lighter.
- The bow described in this article will not live forever and is only a temporary solution. Fortunately, replacing it is easy.
Warnings
- Always wait for everyone to finish shooting before collecting arrows.
- You should take a bowstring with you when you go hiking, as it is difficult to make from natural materials.
- The more you use the bow, the more chances it will break. Change your onion every 3-5 months.
- Bow and arrow are dangerous weapons! Be careful when training with him and never aim at someone you don't want to hurt.
- The bow is not a simple weapon and it takes a lot of practice to learn how to use it. If you find yourself in a situation in which you have to hunt in order to survive, it is better to make traps.
- Be extremely careful with knives and axes.
- Keep bows and arrows out of the reach of children.
- When shaping the onion, chip only on the inside of the onion. If you chip from the outside, it is likely that the bow will break the first time you use it.
- If the arrows are too short, pulling them can injure your hands.
- Protect the hand with which you will hold the bow before shooting.When you release the bowstring, it hits the arm hard.
What do you need
- Solid rod: about 1.80 centimeters long and 12 centimeters in diameter. A good tree is yew or oak.
- Inelastic bowstring: nylon rope, sinew, fishing line and so on.
- Woodworking tools: ax, special knife, sandpaper, plow (large and small), file.
- More or less straight branches for arrows... They should be about 80 centimeters. Straighten them out with fire. You can make arrows from wood or planks. Cut square pieces 1 cm wide and use special cutters to make nearly perfect round arrows.
- Feathers for plumage... Use feathers from a bird's tail or wings. If you are using wing feathers, try not to mix left and right wing feathers. The plumage gives a good spinning arrow.
- Flint tips: metal 1–2 mm thick. Use a machine tool to cut and sharpen the tips. Plastic tips can be used.
- Steel sponge for processing green twigs.


