Author:
Mark Sanchez
Date Of Creation:
6 January 2021
Update Date:
1 July 2024
Content
- Method 2 of 2: Permanent Lava Lamp
- Tips
- Warnings
- What do you need
- Temporary lava lamp
- Permanent Lava Lamp
- This method is safe for children, it is much easier and requires less effort than making a permanent lava lamp. For small children, adults can prepare the solution.
 2 Fill the bottle with oil, water, and food coloring. Fill the bottle 1/4 full with vegetable oil, fill the rest of the quarter with water and add about 10 drops of food coloring (or just enough to make the solution relatively dark). 3 Add salt to the solution or Alka-Seltzer tablet. If using a salt shaker, shake it over the solution for about five seconds. If you want the solution to sizzle effectively, take an Alka-Seltzer tablet instead of salt, divide it into several parts and pour them into a bottle.
 - Any other effervescent tablet will do. You can, for example, buy instant vitamin C tablets at the pharmacy.
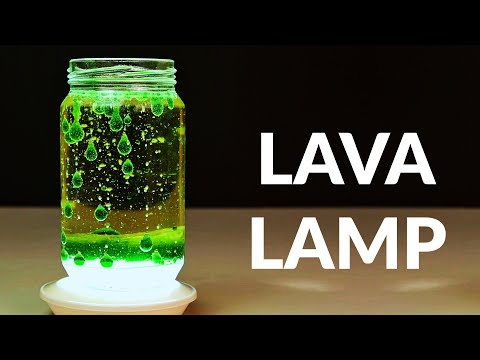
4 Screw on the bottle and shake it a couple of times (optional). Liquid droplets will appear in the oil, gradually merging together and forming, like lava flows, larger droplets. This is a pretty spectacular sight. - When more drops stop forming, add salt or another tablet to the bottle.
5 Bring a bright flashlight or other directional light to the bottom of the bottle. It will illuminate the floating drops, which will make the spectacle even more spectacular. However, do not leave the bottle on a hot surface, otherwise the plastic will melt when flooded with oil. everything around. 6 Understand how the lamp works. Oil and water never mix together into one liquid, so when shaken they slide past each other to form bubbles. A salt or a tablet can further intensify the mixing of the oil and water. Wherein: - Grains of salt sink to the bottom of the bottle, carrying oil droplets with them. Gradually the salt dissolves and the oil floats to the surface again.
- The effervescent tablet reacts with water, releasing tiny bubbles of carbon dioxide. These bubbles stick to the colored water droplets and lift them to the surface. Upon reaching it, the gas bubbles burst, and the colored drops again sink to the bottom of the bottle.
Method 2 of 2: Permanent Lava Lamp
 1 Remember - this lamp should be made under adult supervision. The alcohol and oil used in the lamp are highly flammable and care must be taken to heat them to propel the lava. If you are a child, you should not try to make a lamp yourself - show this manual to an adult and ask them for help.
 - The factory lava lamps use a proprietary blend of liquid waxes. It is impossible to achieve the same effect in a homemade lamp, but with a successful design, your "lava" will flow almost as beautifully from bottom to top and back.
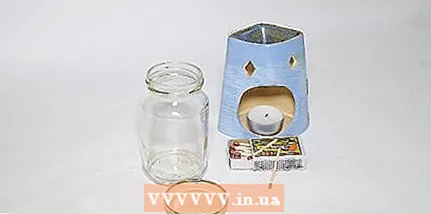
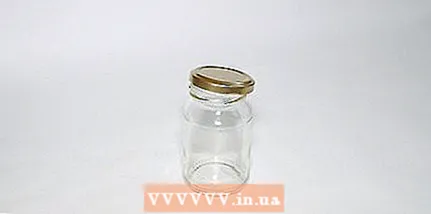 2 Take a glass container. Any clean glass container that can be closed and shaken a little will do. Glass withstands heat much better than plastic, so it is more suitable for a lava lamp.
 - 3 Pour a small cup of mineral oil or baby oil into the container. This will serve as material for the rising and falling lava bubbles. The amount of oil does not matter as it can always be topped up in the lamp.
- It is best to start with regular oil, but if you want colored lava, you can use oil paints. Be aware that over time, the colorant can separate from the oil, accumulating at the top or bottom of the container.
- 4 Add a mixture of 70% rubbing alcohol, 90% isopropyl alcohol, and water. Both types of alcohol can be purchased at the pharmacy. If the correct proportions are observed, the density of the mixture will be close to that of mineral oil. For this:
- Mix 6 parts 90% alcohol and 13 parts 70% alcohol. You can do this as follows: measure out a small cup of 90 percent alcohol, then two cups of 70 percent alcohol, and add some more 70 percent alcohol.
- Pour the alcohol into the jar and wait for the solution to settle. The oil should sink to the bottom, protruding slightly up the middle of the can. If the top of the oil looks flat, you can add some 70% alcohol, but it is not necessary to aim for precision at this stage.
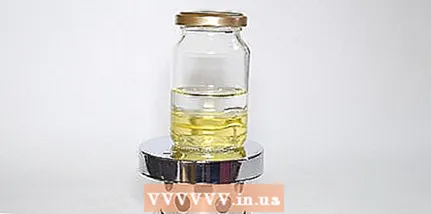 5 Place the jar on a secure, thin stand. Close the lid tightly before moving the jar. Place the jar on a stable, heat-resistant surface, such as an upside-down flowerpot. There should be enough space under the surface to accommodate a small lamp.
 - 6 Install a heat source. After you have almost equalized the density of the oil and alcohol mixture, all you need to do is add a heat source under the lava lamp. When heated, substances expand, and the oil expands slightly more than the alcohol surrounding it. As a result, the oil floats up, cools there, contracting, and again sinks to the bottom. So let's get started:
- Choose your incandescent bulb carefully. For a can of no more than 350 milliliters, use a 15-watt sewing machine light bulb. Use a 30- or 40-watt light bulb to heat a larger jar; do not use more powerful bulbs, as the glass jar may overheat and melt.
- Screw your chosen bulb into a small spotlight bulb so that it shines upward.
- For better control of the light intensity and heat generated by the light bulb, connect a rheostat to it.
- 7 Wait for the lava lamp to warm up. Some bulbs take a couple of hours to warm up, but homemade bulbs usually take less time to warm up. Every 15 minutes, touch the jar with your palm wrapped in cloth. The sides of the jar should be warm, but not scalding hot. If the jar gets too hot, immediately turn off the light bulb and replace it with a less powerful one.
- Try to gently rotate the warming jar by wrapping your hands in a cloth or wearing oven mitts.
- When going away, do not leave the light on; after several hours of operation, turn off the light bulb, letting it cool down.
- 8 Troubleshoot if necessary. If the oil does not start to rise after heating for 2 hours, turn off the light and wait for the jar to cool. When the jar has cooled to room temperature, carefully unscrew the lid and do the following:
- Add a few tablespoons of salt water to the solution to increase the density of the alcohol mixture.
- Carefully shake the lava lamp to separate the oil into smaller droplets. Do not overdo it, otherwise you will end up with thick mud instead of lava.
- If the oil has broken up into small balls, add a spoonful of turpentine or other paint thinner. The solvent is hazardous to health, so do not use if the lamp is accessible to children or pets.
Tips
- Do not fill the container to the very top!
- Cap the bottle immediately to prevent overflow.
- Try different colors!
- Do not shake the lamp too hard, otherwise all the oil will collect on top.
- You can also add sequins or small beads.
- Don't forget to experiment with different colors. Try combinations like red and orange, blue and pink, or even purple and green. There are a lot of options. Experiment until you find the combination you like. You can start by mixing the colors on paper to see what comes out of it.
Warnings
- If you use a plastic bottle to make your lamp, do not heat it up as you would with a conventional lava lamp. Also, do not let it heat up from a long stay near a light source. The hot oil in it is dangerous.
- Do not drink the contents of the lamp.
What do you need
Temporary lava lamp
- A clean plastic bottle of mineral (or any other carbonated) water and a lid
- Vegetable oil (the cheapest will do)
- Food coloring
- Salt or Alka-Seltzer tablets (or other effervescent tablets)
- Water
Permanent Lava Lamp
- 70 percent and 90 percent alcohol
- Water
- Tightly sealable container
- Mineral oil
- Oil paints (optional)
- Food coloring (optional)
- Incandescent lamp


