Author:
William Ramirez
Date Of Creation:
20 September 2021
Update Date:
1 July 2024

Content
1 Take a piece of origami paper or fold the square yourself. Origami paper is already square, but if you are using regular paper, you should make a square sheet. To do this, take a regular sheet of paper and fold its top corner to the opposite side, so that the top edge is aligned with the side edge. As a result, you will get a triangle. After that, cut off the bottom edge and unfold the triangle. So from a regular sheet of paper you should get a square.- It is necessary to bend the sheet diagonally to form a triangle. Do not fold the sheet parallel to the sides, otherwise you will end up with a rectangle.
- You can use any color of paper. Choose the color you like.
 2 Fold the sheet to form a triangle. If you haven't folded the sheet of paper yet, you will need to fold it diagonally. Grab the top left corner of the sheet and align it with the bottom right corner. Then flatten the fold diagonally and unfold the paper again. Fold the sheet in the same way along the second diagonal.
 - When you unfold the piece of paper, you will have two folds along the diagonals of the square that intersect at the center.
3 Fold the bottom edge over the middle crease. Expand the square with one of the corners towards you (while the rest of the corners will be on the left, top and right). Grab the bottom corner and bend it upward so that it aligns with the intersection of the diagonals in the center of the square. 4 Unfold the sheet and repeat the same thing twice more. After folding the first corner, turn the sheet to the next corner towards you and also bend it towards the center. Then repeat this with the third corner. As a result, you will have three folded corners, and the fourth will not be folded. Then turn the sheet over to the other side. 5 Fold the sides of the sheet inward. After flipping the paper over, place it so that the square is on the left and the top of the triangle is on the right. Then fold the bottom half of the square so that its edge is aligned with the middle fold of the sheet. Do the same for the other half. Make sure that the folded edges do not overlap. - After you fold the sheet, you will have an oblong horizontal shape with two rhombuses - a large one on the left and a much smaller one on the right.
- You may not get the left rhombus if the edges overlap. When you fold over the half of the square, be careful not to crush the attached triangles. Do not wrap these triangles - they should be left on top of the fold (this will create two triangles, one on top and one on the bottom).
Part 2 of 3: Creating the Dog's Body
- 1 Unfold the paper and fold in small triangles. Unfold the sheet with a small diamond towards you (with the larger diamond on top). On top of the large rhombus, you will see two triangles, one on the left and one on the right. These are right-angled triangles with 90-degree top angles. Open the right triangle at the top so that its top left point is aligned with the edge of the paper.
- After you open up the triangle, fold it in. In this case, the triangle should be folded so that its upper side, which was the edge of the rhombus, is aligned with the right edge of the sheet. After that, make a fold in this place.
- 2 Do the same for the second triangle. Take the top side of the left triangle and unfold it. Fold the top-right corner of the triangle to the edge of the paper and fold. In this case, the upper right side of the triangle should be aligned with the left edge of the sheet. Make a fold in this place.
- When looking at the resulting shape, you should see a straight top edge with two small protrusions on the sides. Below these protrusions there should be a large rhombus with two more noticeable protrusions on the sides. Even below are two triangles, the bases of which coincide with the edges of the paper. Finally, at the very bottom, you will see a small diamond. If you get something different, try going back a few steps and repeating your steps.
- 3 Open up the large diamond and fold it in. Grasp the right edge of the large diamond and pull up on the outside. The right half of the rhombus is a triangle with two folds, one in the middle and one on the left side. Pull the triangle up so that the left fold is on top of the diamond, not below it. Place this fold exactly where it was before, but now it should be above the sheet, not inside it.
- 4 Do the same for the second side. Grasp the fold on the left side of the diamond and pull it up. You will see the same folds, one in the middle of the triangle and one on the right side. Fold the triangle in the same way so that the right fold is above the diamond, not below it.
- After completing this step, you will be left with a shape that looks like a large rhombus, but its top will not be sharp, but concave in the form of a Latin letter V. Above the rhombus there will be two small squares, one on the right and one on the left.
- 5 Fold over the top edge. Now you need to turn the two small squares, which were mentioned in the previous step, into triangles, or an elongated trapezoid. Grasp the top edge of the sheet and fold it so that the outer edges of the squares line up with each other, resulting in one oblong, inverted trapezoid.
- 6 Flip the paper over and fold the top. Turn the piece of paper over so that the long rectangle with a triangle at the end is facing down. In this case, at the top you will have a downward pointing triangle. Expand it so that it is not facing down, but up.
- This leaves you with a long rectangle shape with a triangle pointing downward, similar to a sharpened pencil. In addition, you will see two triangles on the sides of the rectangle that resemble wings. At the top will be the triangle you just folded.
- 7 Fold the wings so that you have a rectangle. Take the outer corner of the right wing and fold it down to the base of the left delta wing. At the same time, make sure that the right wing is displaced after its top, and make a fold in the place of the bend. Then fold back the wing.
- When bending both wings, their edges should touch. As a result, you should have a rectangle.
- 8 Bend the second wing. Grab the corner of the left wing and fold it to the right. Align the edges and fold. Then fold the wing back.
Part 3 of 3: Finalizing the Dog
- 1 Bend both wings back. This time, both wings should be bent at the same time. As a result, you will have a figure that resembles the front of an airplane. Then flip the plane over to the right side so that its bottom edge rests on the surface of the table.
- 2 Fold down the plane. After positioning the plane on its right side, fold it in half along the top. As a result, the bottom edge of the plane will be at the top. Then fold the piece of paper so that the right point of the upper triangle touches the left edge. Make a fold in this place.
- 3 Turn the plane around. Other details aside, when you look at the inverted plane, you will see three triangles. Grasp the middle triangle (it should be facing up, as opposed to the other two facing down) and fold it so that the base lines up with the edge of the paper. Then turn the sheet over and do the same on the other side.
- Take the bottom right corner of the triangle and fold it towards the top of the piece of paper. You will not be able to bring it to the very top - just move it 2-3 centimeters up (depending on the size of the original sheet of paper).
- 4 Make the dog's head. Flip the sheet over so that the plane-like shape is on the right and facing up. Then grab the middle triangle of the plane and bend it so that the midpoint (height) of the triangle aligns with the top line of the plane. Flip the sheet over and do the same on the other side - align the middle of the middle triangle with the top of the plane.
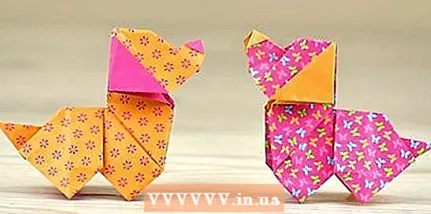 5 Enjoy the results of your work! After you have made all the necessary folds and curves, give the figure a dog-like shape. You just made the dog's head and the front end of the plane matches its nose. The paws of the animal should be located behind. Just below the head you will have folds that resemble the front legs, and in the back you will find the hind legs and tail.
Additional articles
How to make origami How to make origami "Flying bird" How to make origami a flapping bird How to make an origami balloon How to fold a paper crane How to make origami paper claws How to make origami dragon How to fold a $ 20 banknote into an image of burning twin towers How to make a booklet out of paper How to beautifully fold a note into an envelope How to fold origami "jumping frog" How to make a paper bag How to make a fan out of paper
 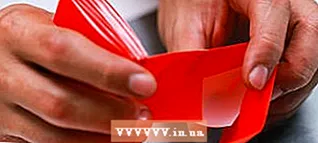 How to make an origami book


