Author:
Virginia Floyd
Date Of Creation:
14 August 2021
Update Date:
1 July 2024
Content
- Steps
- Method 1 of 5: There are three main types of homemade artificial nails: gel, acrylic, and false. The following instructions will show you how to apply each of these types.
- Method 2 of 5: Prepare your nails
- Method 3 of 5: Applying Gel Nails
- Method 4 of 5: Applying Acrylic Nails
- Method 5 of 5: Applying False Nails
- Tips
- Warnings
- What do you need
- Additional articles
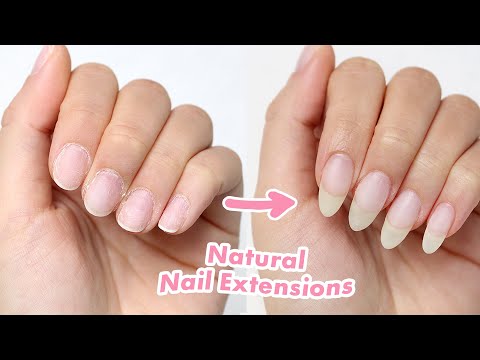
Artificial nails are a great way to give your nails an elegant look, but visiting a salon every two weeks can get expensive. Luckily, there are plenty of at-home options to save you money and, if done right, your nails will look beautiful and natural looking as a result!
There are three main types of homemade artificial nails: gel, acrylic, and false. The following instructions will show you how to apply each of these types.
Steps
Method 1 of 5: There are three main types of homemade artificial nails: gel, acrylic, and false. The following instructions will show you how to apply each of these types.
- 1 Consider the following advantages / disadvantages of each type to help you make your choice:
- Gel: They look most like real nails and can last longer than acrylic or plastic nails. A set of gel nails is usually more expensive than the others and requires UV light to dry. Price range: 30 $ -120 $
- Acrylic: Acrylic nails look more natural and last longer (about 2 to 2 weeks) than false nails.Long-term use of acrylic nails can damage your natural nail. Price range: 8 $ -10 $
- Overhead: These are the easiest nails to use at home, but only last for about one week. False nails bring the least damage to your natural nails and are easier to remove if you are not happy with your results. Price range: 5 $ -10 $
- 2 Purchase a home use nail kit of whatever type you choose. The kits vary in cost and can be purchased from pharmacies, cosmetics stores, perfume stores and online.
- Note: You should always read the instructions included with the kit, as materials differ depending on the brand you are using.
Method 2 of 5: Prepare your nails
- 1Wash your hands and rinse off all nail polish using nail polish remover and a cotton swab.
- 2Trim and file your nails.
- 3 Use a buffer to remove the glitter from your nails. This will help you apply the glue well.
- 4 Use cuticle oil and gently push the cuticles back with an orange stick. Don't pull the cuticles back too far, you shouldn't be in pain during this step.
Method 3 of 5: Applying Gel Nails
- 1 Apply the foundation included in the kit. Use a brush to apply a thin layer from cuticle to nail tip. Let the base dry well. Repeat this step for each nail.
- 2 Apply a thin, even layer of gel to each nail, from base to tip. Avoid getting the gel on the cuticle or skin. If the gel gets on your skin, immediately remove it with an orange stick.
- 3 Place the nail under UV light and leave to dry for 1-3 minutes. If you have a large enough ultraviolet light emitting area, then you can paint and dry your entire hand at once, rather than doing it with each finger individually.
- 4 Apply a second coat of gel to each nail. Be sure to apply thin, even layers of gel and cover any holes or thin areas you may have missed. Again, don't apply the gel to your cuticles or your skin.
- 5Let your nails dry under UV light for 1-3 minutes.
- 6 Apply the third and final layer of gel. Make smooth strokes to completely cover the nail.
- 7Leave your nails under UV light for 1-3 minutes.
- 8Immediately after drying, use a nail buffer to remove the shine.
- 9 Apply your chosen nail polish and let it dry naturally. Keep nail polish remover and cotton swab handy in case nail polish gets on your skin.
Method 4 of 5: Applying Acrylic Nails
- 1Remove all materials from the kit.
- 2 Use fake tips for sizing. Make sure they are wide enough to cover your natural nail. File the sides as needed so that the ends fit completely.
- 3 Decide where on your nail you want to place the artificial tip. The tip should cover about a third of your nail.
- 4 Apply glue only to the part of the nail that will cover the tip. Gently place the tip against your nail so that it matches exactly. Leave the nail for 1 minute until the glue dries.
- 5 File the tip at its base (where the tip meets the natural nail). This will help you align the tip with the surface of your nail.
- 6Apply a thin layer of foundation to your natural nail, from cuticle to artificial tip.
- 7Dip a brush or cotton swab into acrylic liquid (monomer) and then into acrylic powder, forming a gel-like consistency.
- 8 Apply the acrylic mixture to your nail, starting in the middle of the nail where your natural nail meets the artificial tip, and then spread the gel over the nail, from cuticle to tip. The idea is to "insert" an artificial tip into your nail.Repeat this step as needed until you have enough acrylic gel to cover your nail. Leave the nail to dry.
- 9 Trim and file your nail to the length you want. If you want it to look natural, then make it shorter. Most fake nails are square, which is very dramatic; rounding the edges contributes to a softer and more natural look.
- 10Repeat the same steps for each nail.
- 11 Apply your chosen nail polish. Again, for a natural look, opt for neutral colors or a French manicure.
Method 5 of 5: Applying False Nails
- 1 Choose a color. If you want a more natural look, avoid bright colors and intricate designs, which will give your nails a fake look.
- 2Remove all materials from the kit.
- 3 Check the size of the false nails before starting the procedure. Make sure they completely cover the width of your nail. If they are very wide, cut them off the sides until they completely cover the nail.
- Putting the false nails on a table visually in front of you will help you determine if they fit your nails from left to right. Thus, you can choose which false nail is more suitable for one or another of your fingers.
- 4 Apply the nail glue that comes with the kit. Cover the entire surface of your nail.
- 5 Immediately apply the artificial nail to the spot, making sure it fits completely. Hold your nails for about 1 minute until the glue dries.
- 6Repeat this step on all nails.
- 7 Trim the false nails to the length you want and file the sides for a round shape. It's best to keep them short for a more natural look. If the tips of the false nails are square, file the corners to achieve a more rounded, natural look.
Tips
- When applying plastic false nails, be sure to carry nail glue with you in case one of your nails falls off when you are out.
- You should always read the instructions in the nail kit you buy. Different kits contain different materials and instructions.
- After you finish gluing the plastic fake nails, wash your hands in cold water and anoint them with cream for extra shine and softness to your hands.
- Some gel kits contain artificial tips. If you want to apply fake tips and gel at the same time, simply glue the tips to your nails, trim and file them, then follow the steps for applying the manicure gel.
- Avoid doing things that could damage your artificial nails.
Warnings
- Be careful not to apply gel, glue, or acrylic to your cuticles and skin. If this happens, immediately remove everything with an orange stick.
- Take care when applying acrylic nails at home. Nail salons are certified for the job they do. If you do your nails incorrectly at home, it can damage your nails and cuticles.
- Gel and acrylic nails can damage your nails with prolonged use.
What do you need
- Nail polish remover
- Nail file
- Buffer for nails
- Set for artificial nails
- Orange stick (if not included in the set)
- UV light for gel manicure
- Nail polish
- Cotton buds
Additional articles
 How to completely change your appearance and become beautiful
  How to get rid of a monobrow
  How to take care of yourself
  How to make breasts smaller
  How to make lips naturally red
  How to stop pimple formation How to make aloe vera gel
  How to completely clean yourself up
  How to remove hair on the buttocks
  How to choose the color of braces
  How to make your collarbones more visible
  How to shave genitals (for men)
  How to be lower if you are high
  How to get rid of irritation after shaving in the bikini area


