Author:
Sara Rhodes
Date Of Creation:
11 February 2021
Update Date:
1 July 2024
Content
- Part 2 of 3: Using the Highlighter Stick
- Part 3 of 3: Blending and Finishing Your Makeup
- What do you need
- Look for highlighter shades that include moonbeam, ice, and crystalline.
- Avoid shades that are darker than cream and ivory. They may look unnatural on fair skin.
 2 For medium skin tones, use a peach or gold highlighter. On more tanned skin, the creamy shade and ivory may look too white. A peach and gold highlighter will create a tanned glow that complements your natural complexion. Natural shades work well as well.
 - Look for sunbeam, golden, and bronze in the shade descriptions.
 3 Choose shades of rose gold or bronze for dark and dark complexions. Stay away from colder shades as they can make dark skin look dull. Highly pigmented highlighters in the shades of Bronze, Rose Gold, and Gold will add the desired subtle healthy glow.
 - Look for highlighter shades that include the words “sunset”, “rose” and “copper”.
 4 Choose a shade with a bluish or purple undertone if you have cold skin tone. If the veins on the inside of your wrist appear blue or purple, you have a cold skin tone. Look for highlighters that have pearl blotches of bluish, lavender, and cool pinks.
 - The names of these highlighters often include lavender, ice blue and strobe.
 5 Choose a shade with a creamy or golden undertone if you have warm skin tone. If the veins on the inside of your wrist are closer to green, then you have a warm skin tone. Highlighters with cream or gold highlights will look best on you.
 - The names of these highlighters, as a rule, contain words such as: "moonstone" (moonstone), "glow" (shine) or "champagne" (champagne, pale fawn).
- Stay away from blues and lavender, which can look unnatural on warm skin.
 6 Experiment with different highlighters if you have neutral skin tone. If you are unable to tell if your veins are green or blue, you probably have a neutral skin tone. This means that both cool, icy hues and warm, golden hues are right for you.
 - Play with different shades of highlighters and pick your favorite!
- Try shades with a warm and cold undertone at the same time, such as rose gold.
Part 2 of 3: Using the Highlighter Stick
 1 Apply your favorites foundation and concealer. A highlighter stick should be used when the makeup is almost complete. Apply base and concealer as usual. Lightly powder your face with translucent powder to set your makeup.
 - You can also use the highlighter without makeup for a subtle, natural shine.
- 2 Contour makeup face, applying a darker shade under the cheekbones. The shine of the highlighter can be accentuated by lightly contouring the cheekbones. If you love contouring, do not limit yourself to the cheekbones: feel free to walk also along the nose, jawline and chin itself. If contouring isn't your thing, simply apply a foundation or powder under your cheekbones two shades darker than your skin tone.
- Blend gently along the hairline to get rid of crisp lines.
- If you like, skip the contouring step and simply apply the highlighter. This effect is called strobing.
- 3 Lightly sweep the highlighter stick along both cheekbones. Place the stick at the bottom of the cheekbone, close to the nose, just above the dark contour line you drew earlier. With light pressure, move the stick up to the hairline once. Repeat on the second side.
- The highlighter stick has a creamy consistency that is very long-lasting. Don't press hard: you can always apply more!
- A highlighter on the cheekbones will create a shine and a tan on the face.
- 4 Move the stick down along the bridge of the nose. Start at the top of your nose, near your eyebrows. Press the pencil lightly against the bridge of your nose and slide it down to the tip of your nose. This only needs to be done once.
- Applying a highlighter to this area creates a natural glow and makes your nose look thinner.
- 5 Brush the highlighter above and below the arch of your eyebrows. Place the highlighter stick under the eyebrow in the center, aligning with the pupil. Press lightly and make one stroke along the frontal bone, under the eyebrow. Stop at the tip of your eyebrow. Move the pencil to the same starting point, but this time directly above the eyebrow and drag it again.
- Repeat for the other side. You need to make two strokes for each eyebrow: one under the eyebrow and one above it.
- Applying a highlighter in these areas will add shine and a youthful complexion.
- 6 Place a dot with the highlighter stick just above the upper lip. The curve of the upper lip in the shape of a V, just below the nose, is called the Cupid's bow. Place a stick here and place one light dot to add a shine. This will give the face a shine and accentuate the upper lip.
- It will also give the upper lip a plump feeling.
- 7 Highlighter on the point at the corners of the eyes. Close your left eye and lightly touch the corner of your pencil with a pencil. You only need to put one point! Repeat with the other eye. The highlighter in the corner of the eyes brightens up the face and makes the eyes shinier.
- You can put a dot in the center of each eyelid if you want to further emphasize the eyes.
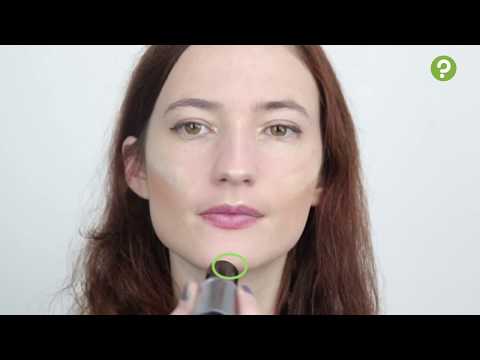
- 8 Place a dot with the stick in the center of the chin. Place the highlighter stick just below your lower lip in the center of your chin. Put a full stop with light pressure. This will accentuate your lower lip and add a moist glow to your skin.
- In this way, you can create the illusion of a plumper lower lip.
- 9 Add a highlighter above the jawline to soften the protruding chin. Draw a pencil along the jaw, just above the natural jawline. Stop slightly in front of your chin. Blend the highlighter for a correcting, softening effect.
- 10 Apply highlighter to the center of the forehead to visually lengthen the face. If you have a round or square face, apply a highlighter in the center of your forehead to visually make your face look longer and hide its width. Place a highlighter circle in the center of your forehead.
Part 3 of 3: Blending and Finishing Your Makeup
- 1 Feather only the edges of each area where you applied the highlighter to achieve a strobe effect. Essentially, the strobing technique is simply a more expressive highlight. It allows you to create a bold look that can be fun to do for an evening event. Use a makeup sponge or your fingertips to gently smooth out the edges of each line or point you left on your face with the highlighter stick.
- Remember that strobing makeup does not look as natural as when using a highlighter.
- 2 Blend the highlighter additionally for a more natural shine. If you want a soft, wet look, use a makeup sponge or fingertips to smooth out every highlighter area. Blend gently in a circular motion until you are satisfied with the amount of highlighter on your face.
- This will get rid of any clear lines.
- 3 Spray fixer spray over your face to set makeup. Close your eyes and gently spray the spray over your face. This will set your makeup in place all day. Keep your eyes closed for a few seconds to allow the spray to absorb.
- Do not use translucent powder to set makeup as it will hide the highlighter and take away some of its shine.
 4 Carry the highlighter stick in your purse to refresh your makeup throughout the day. One of the great things about the stick highlighter is that it is very user-friendly and easy to use. With a quick movement along the cheekbones and the bridge of the nose, you can restore the faded glow of the face in the middle of the day. Blend gently with your fingertips and you're done!
What do you need
- Highlighter stick
- Plain or pocket mirror
- Makeup sponge or beauty blender


