Author:
Joan Hall
Date Of Creation:
27 July 2021
Update Date:
1 July 2024

Content
1 Divide your hair into three sections. Use a flattened comb to part your hair into three equal sections. One should be on the right, one in the middle, and one on the left. Use your fingers to hold all three strands apart from each other. 2 Cross the right strand over the center strand. When braiding, hold the strands tight enough so that the finished braid does not creep later. Now you have the right strand in the center. 3 Cross the left strand over the center strand. You have completed the first row of the braid. Continue to keep the strands taut and separated from each other. 4 Continue to blend the right and left strands into the center section. Place the right strand over the center strand, then the left strand over the center strand, always keeping them taut and separated. Braid until hair runs out. 5 Secure the end of the braid with an elastic band. Secure the braid by winding a hair elastic around it so that there is a 2.5 cm end.
 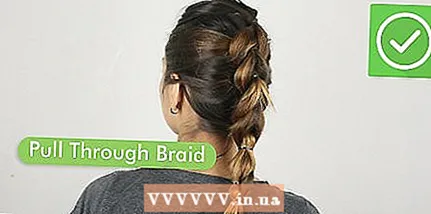 6 Try other braiding styles. Knowing the basics of classic braids, try any of these great hairstyles to showcase your skills. This may take some practice, but you will be pleased with the result.
 - Braid the dragon. Braiding starts at the top and gradually includes hair from the sides of the head, and ends with a simple braid tied with an elastic band. If done correctly, the dragon will take his hair out of his face for the whole day, and you will receive a lot of compliments.
- Spikelet. This beautiful braid looks more graceful than a regular braid as it uses smaller strands.
- Dutch braid. This is the same dragon, only braided in reverse.
- Rope braiding. It is made of two twisted strands.
Method 2 of 3: Weaving braids with ribbons or cords
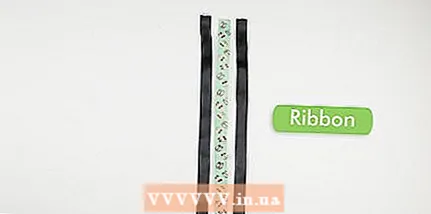 1 Cut into equal lengths. Whether you are using tape, cord, or other thin, long material, you should start with three equal lengths.
 - 2 Tie the lines together with a knot. Tie a knot about 1 cm from the end of the ribbons gathered together. For reliability, you can even tie 2 knots.
- 3 Tape the end of the tape to the table. Use clear tape to glue the ends of the ribbons sticking out of the knot to a table or other hard surface to hold them in place while weaving.
- 4 Divide the sections and keep them taut. One should be on the left, the other in the center, and the third on the right.
- 5 Cross the right line over the center line. Now the right segment has become the center one. Continue to stretch the segments.
- 6 Cross the left line over the center line. This will complete the first row of the weave.
- 7 Continue crossing the right and left line segments with the center line. Alternate overlapping the right lines with the center and then the left lines with the center, keeping them taut at all times. Weave until the sections run out.
- 8 Tie a knot at the bottom. Gather all three pieces together and tie a knot.
Method 3 of 3: Braiding flowers
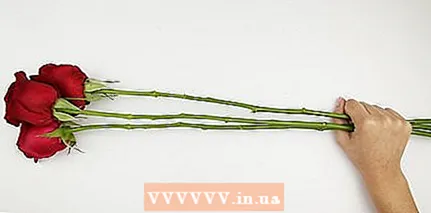 1 Take three long-stemmed flowers. Try to match stems of approximately the same length. You need flowers with strong, flexible stems like dandelions or clovers.
 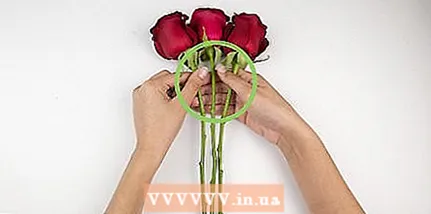 2 Keep flowers right under their heads. Flatten them lightly together in one hand so that they settle down properly.
 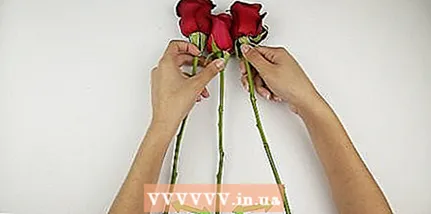 3 Divide the stems. Using your free hand, carefully separate the stems so that there are right, left and center stems.
 - 4 Cross the right stem over the center stem. Work the stems carefully. Place the right stem over the center stem so that it is now centered.
- 5 Place the left stem over the center stem. The left stem will now become the center stem.
- 6 Continue to interweave the stems in the same way. Layer right over center, then left over center. Do not pull too hard, the stem may break.
- 7 Secure the ends. When the stems run out, fix all three ends of the stems, if possible, tying a knot on them, if not, use a thread so as not to break the stems.


