Author:
Janice Evans
Date Of Creation:
4 July 2021
Update Date:
1 July 2024
Content
- Steps
- Part 1 of 4: Prepare to Record
- Part 2 of 4: Make an audio recording on Windows
- Part 3 of 4: Make an Audio Recording on Mac
- Part 4 of 4: Process the audio recording
- Tips
- Warnings
Learn how to transfer audio from a cassette recorder (deck) to a Windows or macOS computer in this article. After you connect the recorder to the microphone (or line) input of your computer using the appropriate cable, use Audacity (Windows) or QuickTime (Mac) to record audio from cassettes.
Steps
Part 1 of 4: Prepare to Record
 1 Learn the procedure for transferring a cassette recording. To record an audio tape to your computer, you must connect the cassette recorder to the microphone (or line) input of your computer, and then set your computer to record only line-level audio. This will prevent the computer from recording extraneous sounds (for example, background noise), allowing you to get a clean, high-quality tape recording.
  2 Get everything you need ready. In addition to the cassette deck and computer, you also need a cable to connect the tape deck to the line-in on the computer.
 - Almost all cassette recorders have a 3.5mm headphone jack, so you'll need to find a standard 3.5mm cable to connect it to your computer.
- Some cassette decks have unbalanced line outputs. They can be recognized by their red and white ports. For these, you will need an RCA to 3.5mm cable.
- Expensive cassette recorders may have balanced line outputs with two 3-pin XLR-F connectors or balanced 1/4 "phone jacks. For these you will need to buy an adapter that fits both the computer's 3.5mm jack and the outputs. tape recorder.
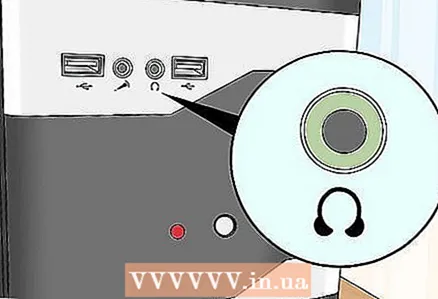 3 Locate the line-in jack on your computer. On computers with separate headphone and microphone ports, this connector is usually marked in pink. If your computer has only one 3.5mm headphone jack, then it supports both line-in and line-out.
 - On desktop computers, this slot can usually be found on the back or front of the computer.
- Laptops usually have mono input and output. Therefore, although this jack can be used to transmit sound from a tape recorder, it cannot be recorded in stereo.
 4 Connect the adapter to the computer if necessary. If you are connecting a balanced line-out cassette deck to your computer, be sure to insert the 3.5mm plug adapter into the computer's line-out jack.
 - Skip this step if you are connecting a tape recorder with a 3.5 mm jack or a tape deck with unbalanced jacks.
 5 Connect one end of the cable to the tape deck. The connection procedure will depend on the type of cassette deck:
 - 3.5mm - Connect one 3.5mm end (no matter which) of the cable to the 3.5mm line-out jack (not headphone jack) on the cassette deck.
- Unbalanced - connect the red RCA cable to the red connector and the white RCA cable to the white connector.
- Balance - Connect XLR or 1/4 "cables to the appropriate jacks on the recorder.
 6 Connect the other end of the cable to your computer. Connect the other end of the cable to the 3.5mm line-in port on your computer.
 - Line-in on computers with separate microphone and headphone ports are usually marked in pink.
- If you are using an adapter, plug the 3.5mm cable into an available connector on it.
 7 Adjust the sound level on your computer. If you want to increase (or decrease) the recording volume, go to the sound settings:
 - Windows - Open the start menu
 , enter sound, select Sound, go to the Record tab, double-click on the input of the tape recorder, go to the Levels tab, and slide the Microphone slider left or right to increase or decrease the volume. When done, click "OK" on both open windows.
 - Mac - open the Apple menu
 , click on "System Preferences", open "Sound", click on "Input", select the input of the tape recorder and move the "Volume" slider to the left or right to decrease or increase the volume.
 - Decrease the volume on your tape deck or stereo system, as too high signal levels can damage the input circuit of the computer.
- Windows - Open the start menu
 8 Make sure all cables are firmly seated in their sockets. Loose cables can degrade the quality during the recording process, so make sure the cables are securely attached to both the computer side and the tape deck. When all connections are set up, you can start recording audio from the tape recorder.
Part 2 of 4: Make an audio recording on Windows
 1 Download and install Audacity. Audacity is a free program that lets you record linear audio with a few tweaks. To install it, follow these steps:
 - Go to the following URL in your browser: https://www.audacityteam.org/download/.
- Click on Audacity for Windows.
- Click on the link to download the Audacity X.X.X installer (where X is the current version of the program).
- Double click on the downloaded installer file.
- Follow the installation instructions.
 2 Open Audacity. If Audacity doesn't open automatically, open the Start Menu , enter audacity and select Audacity at the top of the start menu.
  3 Make sure MME is selected as the audio output method. The "MME" option should be selected in the dropdown list in the upper left corner of the Audacity window. Otherwise, click on the dropdown and select MME.
  4 Click on the "Recorder" drop-down list. It's a box to the right of the microphone icon at the top of the Audacity window. A dropdown menu will appear.
  5 Select an option Microphone. The name of this option may be different, but make sure the title says "Microphone" (or something similar). Don't select the Microsoft Sound Mapper or Primary Sound Capture option.
  6 Click the "Burn" button. It's a red circle at the top of the Audacity window. Audacity will start recording.
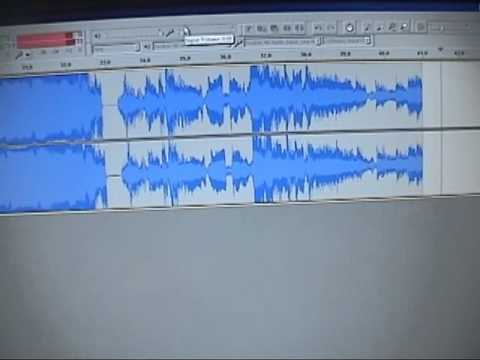
  7 Press the play button on the tape recorder. When you turn on the recorder, a sound wave should appear in the center of the Audacity window.
  8 Stop recording when done. Press the "Stop" button on the tape recorder, and then - the black "Stop" button
  at the top of the Audacity window.
  9 Save the audio recording. To create an MP3 audio file, follow these steps:
 - Click on "File" in the upper left corner of the window.
- Select "Export" from the menu that appears.
- Select "Export to MP3" from the menu that appears.
- Select a save location.
- Enter a name for the file in the File Name text box.
- Click "Save".
- When prompted for confirmation, click OK.
Part 3 of 4: Make an Audio Recording on Mac
 1 Open QuickTime. In the Dock, click the QuickTime Q icon. If it's not there, double-click the QuickTime icon in the Applications folder.
  2 Press File at the top left of the screen. A drop-down menu will appear.
  3 Press New audio recording at the top of the drop-down menu. This will switch the QuickTime window to record audio.
  4 Click on the dropdown menu icon
  on the right side of the QuickTime window. A dropdown menu will appear.
  5 Select an option Microphone from the dropdown menu. This will select the Mac line-in as the audio recording device.
 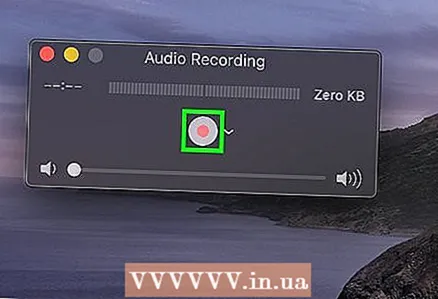 6 Click the Burn button. It's a red circle in the middle of the QuickTime window. QuickTime will start recording.
  7 Press the play button on the tape deck to make QuickTime start recording the contents of the tape.
 8 Stop recording when done. When the recording is complete, press the Stop button on the recorder and then the red Record button in the QuickTime window to stop recording. The recording will be saved as an audio file on your Mac desktop.
Part 4 of 4: Process the audio recording
 1 Write down a small part first. Before copying the entire contents of your cassette collection to your hard drive, make sure that you end up with good quality songs. Listen to the re-recorded excerpt. If you connected and configured everything correctly, then in the end you should get a fairly clean digital copy of old analog cassettes.
 - If the recording is too quiet, or there is a lot of noise in it (background noise drowns out the music), then the output signal was too weak and the program was unable to compensate for the existing noise.
- If the recording sounds like it is being played through a faulty speaker or is going through a meat grinder, then the output signal was too strong, which caused the sound to be distorted.
- To fix the above problems, change the sound settings on your computer.
 2 Edit the entry. You may not need to edit anything at all, but if you want, most recording software will help you cut out areas of silence, erase individual songs, or change the volume level. Basic editing can be done in programs such as Audacity (compatible with both Windows and macOS), while more advanced paid programs can clear the recording.
 - Before editing, we recommend that you make a backup copy of the original file so that in case of an error you can start over. If you are satisfied with the result, delete the created copy to save disk space on your computer.
 3 Normalize the sound if necessary. The resulting record can be improved by the correct application of software tools, the main among which is "normalization". Basically, it is resorted to so that the loudness peaks do not exceed 100% of the scale level (when all indicator strips light up) and do not fall below 0 dB (depending on the measurement method).
 - Most audio editors allow you to normalize your audio recording.
 4 Compress. This is not the right way to apply to all of the recordings you make, or you can make the music lifeless. The essence of compression is to maintain the level of loud sounds and increase the level of quiet ones. This way you will lose the dynamics between quiet sounds and loud sounds, but in return you will get a louder recording. Compression is not necessary for home use, but if you are burning a CD for listening in a car, it can be very useful.
 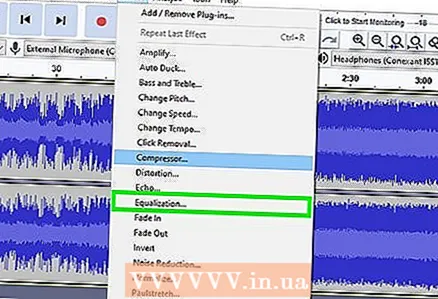 5 Use equalizer (EQ). Depending on your speakers, their settings, and the quality of the sound system itself, you may like to adjust the sound with an equalizer. Note, however, that adjusting the EQ, like applying compression, is a matter of taste. Adjusting the equalizer will allow the music to sound good on your particular system, but on another system, the recording may sound distorted.
  6 Only work with a copy. Once you get through the hassle of rewriting old tapes to your computer, back them up before making any irreversible changes (normalization, equalizer, compression, and so on).
Tips
- Audacity is also available on Mac computers.
- If you're looking for a professional audio editor to convert cassettes to audio files, Sound Forge, PolderbitS, Cubase, Garage Band, Logic Pro, and ProTools are pretty reliable (albeit paid) options.
- To do the opposite - to re-record songs from your computer to a cassette - take the same cable and plug one end of it into the tape recorder's microphone-in or line-in, and the other end into the computer's line-out, speaker or headphone jack. Start recording on the tape recorder, and then play the music on your computer. Adjust the volume level to obtain an acceptable sound quality, and then start recording at the same level.
- When processing your recording, consider using the Noise Reduction mode. It is not available in all software, but it can improve recording quality and reduce noise.
- The final result, especially for music cassettes, will depend on a number of factors, such as the quality and condition of the cassettes, cassette recorder, computer and ADC (sound card), cable used, your level of knowledge and experience with audio editing.
Warnings
- Do not throw away the cassette. Always keep the original. It will come in handy if your hard drive fails, if a defect is found in the recording, or if you manage to make a better recording on a new computer. It also guarantees the copyright of the copy just made.
- Attempting to record with a tape recorder or portable stereo system may result in lower quality recordings.
- Try not to violate copyright laws with your posts. The cassettes may be very old, but this does not mean that they are not copyrighted. Keep digital records for personal use and do not sell them for profit.
- Choose your cable responsibly. Cheap cables are often not shielded. If the cable is not shielded, fan hum and other analog noises may be superimposed on the sound.


