Author:
Ellen Moore
Date Of Creation:
17 January 2021
Update Date:
1 July 2024

Content
- Steps
- Method 1 of 4: Computer to Phone
- Method 2 of 4: Phone to Phone
- Method 3 of 4: Computer to iPhone
- Method 4 of 4: Computer to Android Phone
If you need to transfer multiple photos to your mobile phone, there are many ways to do it. The choice of method depends on the nature of the transfer: are you sending photos to your own or someone else's phone? The recipient of the photos has a smartphone (iPhone, Android, Windows Phone)? Are the images stored on your computer or on your phone? Answering these questions will help you understand how to submit images.
Steps
Method 1 of 4: Computer to Phone
 1 Open an email client or email service site on your computer to send images to your phone as an email attachment. You can also transfer images via MMS (Multimedia Messaging Service).
  2 Compose a new letter. On most smartphones, you can check email directly on the device.
  3 Attach images. To do this, click the "Attachments" button (in the new message window). Most email services will allow you to attach files with a total size of up to 20 MB (about 5 photos) to an email.
  4 Enter the recipient's email address. You can do this in different ways depending on how you send the image:
 - Standard email. Enter your email address if you're trying to transfer images to your phone, or enter another person's email address if you're sending images to someone else.
- MMS. Enter the recipient's MMS address. Read this article for details on finding another person's MMS address.
 5 Send a letter. You may have to wait a while for the image to be uploaded to the mail server and sent.
  6 Open your email or MMS message (if you sent a picture to your phone, you will receive a message in a few moments). Make sure your phone is turned on and connected to the network.
 - To receive MMS you need to activate the data exchange service.
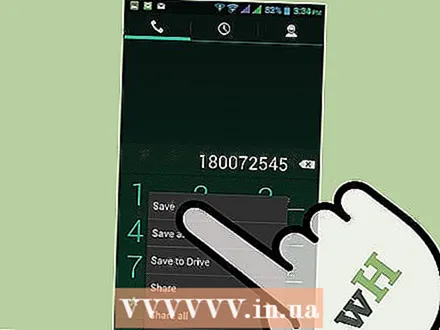 7 Save the images. This process depends on your phone model, but in most cases, press and hold an open image, or press the Menu button and select Save. Repeat this procedure for each attached image.
Method 2 of 4: Phone to Phone
 1 Open the image you want to send on your phone. To do this, use the "Photos" application.
  2 Click Submit.
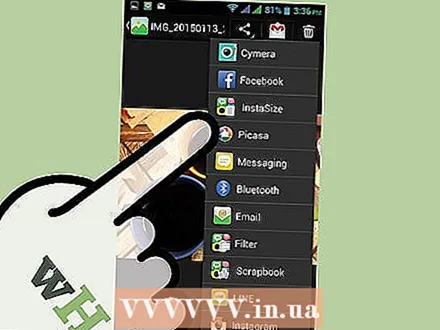 3 Choose how you want to send the image depending on the apps you have on your phone.
- Email. You will send the photo as an email attachment.
- Message. You will send the photo via MMS or iMessage (you and the recipient must have an iPhone).
- Application options. There are many options here depending on the application, for example Facebook, Hangouts, WhatsApp. Choose the option that best suits your needs.
 4 Submit an image. This may take some time if you are submitting multiple images.
Method 3 of 4: Computer to iPhone
 1 Copy all the images you want to transfer into one folder. In this folder, you can sort your photos into subfolders.
  2 Connect iPhone to computer with USB cable.
 3 Open iTunes.
 4 Select your iPhone. If you haven't connected your iPhone to your computer before, you will need to authorize the device using your Apple ID and password.
 - You will also be prompted to confirm the connection to the computer on the screen of your iPhone.
 5 With your iPhone selected, check the "Photos" option in the left menu.
 6 Check the "Sync Photos" option.
 7 Select the folder with the photos you want to transfer.
 8 Click Apply. Your photos will be synced to your iPhone and you can view them in the Photos app.
Method 4 of 4: Computer to Android Phone
 1 Do the following, depending on the operating system of your computer:
- Windows. Make sure you have Windows Media Player 10 or later. You can check for updates by clicking on "Help" - "Check for Updates".
- Mac OS X. Download the "Android File Transfer" utility. This utility allows you to connect your Android device to your Mac computer. You can download the utility on the website android.com/filetransfer/.
 2 Connect your Android device to your computer using a USB cable. On Windows, an autorun window will most likely open. On Mac OS, your Android device will appear on the desktop.
  3 Open your Android device on a computer to view the files stored on the device.
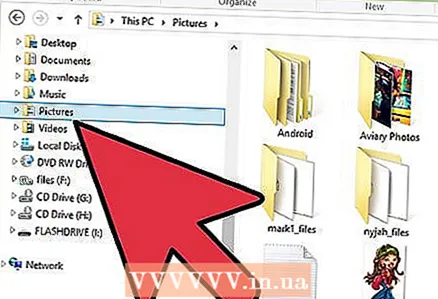
 4 Open the "Pictures" folder. This folder is automatically accessed by the Gallery and Photos applications.
  5 Copy the images you want to the "Pictures" folder (on an Android device). To do this, copy and paste the images or simply drag and drop them into the "Pictures" folder. It may take a while if you are copying a lot of images.
 - Do not disconnect your Android device until the transfer is complete.


