Author:
Ellen Moore
Date Of Creation:
11 January 2021
Update Date:
1 July 2024

Content
- Steps
- Part 1 of 4: How to Prepare Your Router
- Part 2 of 4: How to Install a Server on Windows
- Part 3 of 4: How to Install a Server on Mac OS X
- Part 4 of 4: How to Connect to the Server
- Tips
- Warnings
In this article, we will show you how to create and host a personal Minecraft server on a Windows or Mac OS X computer. To create a server in Minecraft PE, you need to pay for a Realms subscription.
Steps
Part 1 of 4: How to Prepare Your Router
- 1 Open the router configuration page. Do this to assign a static (permanent) address to the computer and forward (forward) the port used for the Minecraft server. To open this page, enter the address of your router in your browser.
- Since the interface of the configuration page depends on the router model, refer to the instructions (online or on paper) for the router to find out how to assign addresses and configure port forwarding.
- 2 Log in (if necessary). Enter your username and / or password to open the router's configuration page.
- If you haven't changed these credentials but must enter them, look for them in the instructions for your router.
- 3 Assign a static IP address to your computer. In this case, the IP address of the computer will not change, that is, you do not have to change information about your server or reconfigure port forwarding:
- find the list of devices connected to the router;
- select your computer;
- change the computer number if necessary.
- 4 Save your changes. Click “Save” or “Apple”; the router will reboot.
- When the router reboots, it will assign a new address to the computer; Moreover, the router reboots after every port forwarding setting, so assigning a static IP address is critical.
- 5 Find the Port Forwarding section. It is usually found under the "Advanced" section; if not, look for the indicated section on the router's configuration page.
- The interface of the configuration page depends on the model of the router, so in the instructions (online or on paper) for the router, find where the “Port Forwarding” section is located.
- 6 Create a new rule called "Minecraft". On some routers, you just need to enter Minecraft in the description field; for others, you may need to click New rule or similar option and then enter the router details.
- 7 Enter the static IP address of the computer. Enter the static IP address of your computer (usually 192.168.2.number) in the “IP” or “Address” line.
- 8 Select "TCP & UDP". Open the "TCP" or "UDP" menu next to the rule and click on "TCP & UDP".
- 9 Forward the Minecraft port. Enter 25565 in both text boxes.
- Port 25565 is the main port used by the Minecraft server.
- 10 Activate the rule. Check the box or click the On button.
- 11 Save your changes. Click Save or Apple. Wait for the router to reboot. Now you can start installing Minecraft Server on your Windows or Mac OS X computer.
Part 2 of 4: How to Install a Server on Windows
- 1 Make sure Java is up to date. Go to https://java.com/en/download/installed.jsp in Internet Explorer (other browsers will not work), then click “Confirm consent and continue” and follow the instructions on the screen.
- If you don't update Java, you might run into server hosting issues.
- 2 Install Java JDK (if needed). The JDK is required to run Java commands:
- go to the JDK page;
- check the box next to “Accept License Agreement” under the heading “Java SE Development Kit 8u171”;
- click on the link "jdk-8u171-windows-x64.exe" to the right of the title "Windows x64";
- double-click the installation file, and then follow the instructions on the screen.
- 3 Download the server file (JAR file). Go to https://minecraft.net/en-us/download/server in your computer's web browser, and then click on the "minecraft_server.1.13.jar" link in the middle of the page.
- 4 Create a new folder. Right click on the desktop, select New from the menu, click Folder, enter Minecraft Server and press ↵ Enter.
- 5 Move the server file to the Minecraft Server folder. Drag the downloaded JAR file to the Minecraft Server folder.
- You can also click on a server file to select it, click Ctrl+C, open the "Minecraft Server" folder, and then click Ctrl+Vto paste the file into that folder.
- 6 Run the server file. Double click on the downloaded JAR file ("server" file) in the "Minecraft Server" folder. Several files and folders will appear in this folder.
- 7 Accept the terms of use. In the Minecraft Server folder, find the text file "eula" and then:
- double click on the file "eula";
- replace the line "eula = false" with "eula = true";
- click Ctrl+Sto save changes;
- close the file "eula".
- 8 Double click on the server file (downloaded JAR file). It will continue to run in a pop-up window and additional files will appear in the Minecraft Server folder.
- 9 Close the server when it shuts down. When "Done!" Is displayed at the bottom of the pop-up window (Done), click on the text box at the bottom left of the window, enter stop and press ↵ Enter.
- 10 Find the "server.properties" file. It is located in the Minecraft Server folder.
- 11 Rename the file. Right-click the server.properties file, click Rename, delete the period, and then click ↵ Enter... This file will now be named "serverproperties" so you can open it.
- 12 Open the "serverproperties" file. Double click on it and then double click on Notepad from the menu.
- 13 Add the static IP address of the computer to the file. Find the line "server-ip =" and then enter (after the "=" sign) the static IP address of your computer.
- For example, if the static IP address of your computer is "192.168.2.30", the line will look like this: server-ip = 192.168.2.30.
- 14 Save the file. Click on Ctrl+S, and then close Notepad.
- 15 Create a batch file. The server can be started by double-clicking on the "server" file, but the server will use a limited amount of the computer's RAM. To fix this problem, create a batch file in the Minecraft Server folder:
- open Notepad (you may need to click Start
 and introduce notebookto find Notepad);
 - enter java -Xmx3G -Xms1G -jar server.jar in Notepad;
- Click File> Save As;
- enter run.bat in the line "File name";
- open the "File Type" menu and select "All Files";
- select "Minecraft Server" as the folder to save the file;
- click "Save".
- open Notepad (you may need to click Start
Part 3 of 4: How to Install a Server on Mac OS X
- 1 Make sure Java is up to date. Go to https://java.com/en/download/, click Free Java Download, open the installation file and follow the instructions on the screen.
- If you don't update Java, you might run into server hosting issues.
- 2 Install Java JDK (if needed). The JDK is required to run Java commands:
- go to the JDK page;
- check the box next to “Accept License Agreement” under the heading “Java SE Development Kit 8u171”;
- click on the link "jdk-8u171-macosx-x64.dmg" to the right of "Mac OS X x64";
- double-click the DMG file and then drag the Java icon to the Applications folder;
- follow the instructions on the screen.
- 3 Download the server file (JAR file). Go to https://minecraft.net/en-us/download/server in your computer's web browser, and then click on the "minecraft_server.1.13.jar" link in the middle of the page.
- 4 Create a new folder. Click on the desktop, click File> New Folder, enter Minecraft Server and press ⏎ Return.
- 5 Move the server file to the Minecraft Server folder. Drag the downloaded JAR file to the Minecraft Server folder.
- You can also click on a server file to select it, click ⌘ Command+C, open the "Minecraft Server" folder, and then click ⌘ Command+Vto paste the file into that folder.
- 6 Run the server file. Double click on the downloaded JAR file ("server" file) in the "Minecraft Server" folder. Several files and folders will appear in this folder.
- 7 Accept the terms of use. In the Minecraft Server folder, find the text file "eula" and then:
- double click on the file "eula";
- replace the line "eula = false" with "eula = true";
- click ⌘ Command+Sto save changes;
- close the file "eula".
- 8 Double click on the server file (downloaded JAR file). It will continue to run in a pop-up window and additional files will appear in the Minecraft Server folder.
- 9 Close the server when it shuts down. When "Done!" Is displayed at the bottom of the pop-up window (Done), click on the text box at the bottom left of the window, enter stop and press ↵ Enter.
- 10 Find the "server.properties" file. It is located in the Minecraft Server folder.
- 11 Open the "serverproperties" file. Click it and then click File> Open With> TextEdit.
- If you can't open the file, click it, click File> Rename, delete the dot between server and properties (you may first need to click the down arrow to the right of the Name line and uncheck Hide Extensions) and click Save.
- 12 Add the static IP address of the computer to the file. Find the line "server-ip =" and then enter (after the "=" sign) the static IP address of your computer.
- For example, if the static IP address of your computer is "192.168.2.30", the line will look like this: server-ip = 192.168.2.30.
- 13 Save the file. Click on ⌘ Command+Sand then close TextEdit by clicking the red circle in the upper left corner of the window.
- 14 Create a batch file. The server can be started by double-clicking on the "server" file, but the server will use a limited amount of the computer's RAM. To fix this problem, create a batch file in the Minecraft Server folder:
- open Spotlight
 , enter textedit, double click on "TextEdit" and then click on "New Document";
 - enter java -Xmx3G -Xms1G -jar server.jar in TextEdit;
- Click Format> Convert to Plain Text> OK;
- click on "File"> "Save";
- enter run in the "Name" line, and then click on the downward arrow to the right of the "Name" line;
- uncheck the box next to "Hide extensions", and then in the "Name" line change the file extension from ".txt" to .command;
- select "Minecraft Server" as the folder to save the file, click "Save" and then click "Use .command".
- open Spotlight
Part 4 of 4: How to Connect to the Server
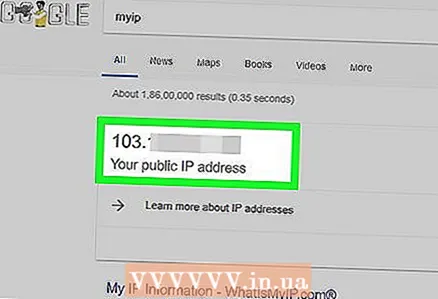 1 Find out the public IP address of your computer. You will tell this address to your friends who want to connect to your server. Keep in mind that anyone who knows this address will be able to join your game.
 - If your friends are on the same network as you, give them the static IP address of your computer.
- 2 Start your server with the generated batch file. Close the server (if running), double-click on the "run" file you created in the "Minecraft Server" folder, and wait for the server to start.
- While the server is running, its window must remain open.
- 3 Start Minecraft. Double-click the Grass Ground Block icon and then click Play at the bottom of the Launcher window.
- If you are prompted to log in (this happens when you do not open the game for a long time), enter your email address and password.
- 4 Click on Online game. This option is on the Minecraft menu.
- 5 Click on Add Server. You will find this option in the lower right side of the window.
- 6 Enter the server name. Do this in the "Server name" line at the top of the window.
- 7 Enter the address of your computer. In the "Server Address" line, enter the static IP address of the computer.
- 8 Click on Ready. This button is at the bottom of the window. The server will be created.
- 9 Select a server. Click on the server name at the top of the window.
- 10 Click on Connect. This button is at the bottom of the window. The game world of your server will open.
- 11 Invite friends to join the game. To do this, send 19 friends the public IP address of your computer and ask them to do the following:
- open Minecraft and click "Multiplayer";
- click "Direct Connection";
- enter the public IP address of the computer (not the static IP address, which is entered if friends are connected to the same network as you);
- click "Connect".
- 12 Turn off the firewall computer (if necessary). Do this if your friends are unable to join your game. Keep in mind that this will make your computer vulnerable to attack by malicious users, so turn off your firewall only if you are playing with trusted people.
Tips
- The faster the computer, the more players will be able to connect to the server (20 players is the maximum number).
- Hosting a server over an Ethernet cable is much safer than hosting over a wireless network.
Warnings
- Opening a port through a router increases the likelihood that someone will be able to access your network.
- If the computer shuts down or freezes, the server will stop working.


