Author:
Christy White
Date Of Creation:
3 May 2021
Update Date:
1 July 2024

Content
- To step
- Method 1 of 2: Using your fingers for signal whistles
- Method 2 of 2: Whistle without using your fingers
Whistling is a task that requires skill and patience. There are many ways to whistle, but one of the loudest is whistling on your fingers. There are several ways to learn to whistle loudly, with and without the use of your hands. If you follow a few simple steps, you will be whistling loudly in no time.
To step
Method 1 of 2: Using your fingers for signal whistles
 Put your lips in the right shape. Wet your lips, open your mouth slightly and pull your lips back over your teeth until your teeth are completely covered. Your lips should be all the way in your mouth so that only the outer edges are visible.
 - You may have to move your lips back and forth when you start practicing flutes, but keep them wet and drawn into your mouth at this point.
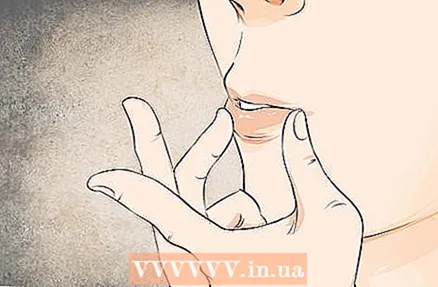 Put your fingers in the correct position. The role of your fingers is to keep your lips in place over your teeth. Keep your hands up with the palm inward. Keep your index and middle fingers close together in front of you, while your thumbs keep your ring fingers and little fingers down. Press the sides of your middle fingers together to make an "A" shape.
 - You can also use your little fingers. Hold your hands the same way, keeping your little fingers up instead of your index and middle fingers.
- You can also use one hand. Raise one hand and make the OK sign by pressing the tip of your index finger and thumb together. Then move your fingers slightly apart, leaving space for the air to escape. Keep your fingers straight.
 Place your tongue in the right place. The whistle sound is produced by air flowing at an oblique or sharp angle. In this case, the sound is created by the upper teeth and tongue directing a flow of air towards the lower lip and teeth. To make this sound, you have to put your tongue in the correct position in your mouth.
 - Roll your tongue to the back of your mouth. Use your fingers to fold the top of your tongue upward. The back of your tongue should cover a large portion of your bottom molars.
 Make the latest changes. Your lips should still be wet and cover your teeth. Keep your fingers in your mouth roughly to the first knuckle, still holding your tongue in place, which should still be curled. Close your mouth so that it is tight around the top, bottom, and outer edges of your fingers.
  Blow air out of your mouth. Now that your lips, fingers and tongue are in position you should start blowing out air so that you can finally whistle. Inhale deeply and then exhale, forcing the air out of your mouth over the top of your tongue and lower lip. If air is escaping from the sides of your mouth, tighten your lips around your fingers.
 - Don't blow too hard at first.
- Move your fingers, tongue, and jaw as you blow to find the best part of the angle. This is the area of maximum efficiency for your whistle, blowing air directly over the sharpest part of the corner.
 Listen to the sounds when you practice. Your mouth will begin to focus the air more and more accurately on the best part of the angle as you practice. Once you find the best part, your whistle will have a strong, clear tone, as opposed to a blowing, soft sound.
 - Make sure not to breathe too quickly or too often while you are exercising. You don't want to hyperventilate. If you take it easy, you will have more breath to practice with.
- Using your fingers to apply some extra downward and outward pressure on your lips and teeth may also help. Experiment with the position of the fingers, tongue, and jaw.
Method 2 of 2: Whistle without using your fingers
 Pull back your bottom lip. Fingerless whistling can be achieved through lip and tongue movement. Push your lower jaw slightly forward. Push your bottom lip up over your teeth. Your lower teeth should not be visible, but your upper teeth may be.
 - Your lower lip should be snug against your lower teeth; if you need help with this movement, you can press your index and middle fingertips on either side of the mouth to pull your lip slightly out and over your teeth at the corners.
 Position your tongue. Pull your tongue back so that it is flush with the front teeth in your lower jaw and flat against the bottom of your mouth. This action also widens and flattens the tip of the tongue, while still leaving plenty of space between the tongue and the front teeth in the lower jaw. The sound of the whistle is produced by air blown across the corner, or a sharp edge, that you create with your tongue and your lips.
 - Alternatively, you can flatten your tongue so that the sides of your tongue are pressed against the edges of your molars. Roll the tip of your tongue down slightly, creating a "U" -shaped valley in the center that allows air to escape from behind your tongue.
 Blow air out of your mouth. Direct the airflow down and towards your lower teeth using your upper lip and teeth. The focus of the sky is crucial in this technique. You should be able to feel the air on the bottom of your tongue. If you put your finger under your lower lip, you should be able to feel the downward airflow as you exhale.
  Move your tongue and jaw to find the best position. Your whistle may initially be a blowing sound at a lower volume that alternately fades and then brightens again, but don't worry. You just need to find the area of maximum efficiency, where the air is blown directly over the sharpest part of the angle you made in your mouth. Keep practicing to increase the volume of your whistle.
 - Make sure you don't breathe too often or too quickly when you are exercising. You don't want to hyperventilate. If you take the time, you will have more breath to practice with.


