Author:
Mark Sanchez
Date Of Creation:
1 January 2021
Update Date:
1 July 2024

Content
- Steps
- Part 1 of 8: Title Page
- Part 2 of 8: General provisions of the MLA format
- Part 3 of 8: Formatting the First Page
- Part 4 of 8: Text of the work
- Part 5 of 8: Quoting Style Within Text
- Part 6 of 8: Endnote Page
- Part 7 of 8: Appendix
- Part 8 of 8: Bibliography
MLA are formatting and citation norms widely used in academic and professional writing in English. If you want to write a scientific article or publication for a journal or university in the United States or another country that uses MLA formatting, then you should adhere to the stylistic rules described below.
Steps
Part 1 of 8: Title Page
 1 Do not attach a separate cover page unless your assignment requires it. In accordance with standard MLA formatting rules, a title page or separate title page is optional and should not be attached to most written works.
 - However, sometimes your instructor may specifically request a cover page for an MLA writing work, especially if it is a lengthy work. For such cases, there are a number of directives regarding the information that must be indicated on the title page.
 2 Align the heading to the center. It should be located strictly in the center of the line and indent one third from the top edge of the sheet.
 - The title of your work should be informative, but at the same time creative.
- If you want to include a subheading, it must be placed on the same line as the heading, separated by a colon.
- The first letter of every important word must be capitalized. Conjunctions and articles must be capitalized unless they appear at the beginning of a heading or subheading.
 3 Please enter your full name. In the middle of the page, write your name after the word “By” and align those words in the center.
 - Write “By” on one line, then press the “Enter” key on your keyboard and write your full name on the next line.
- Format your name like this: First Name Last Name.
 4 At the end of the page, you must indicate the name of the course for which you are writing this work, the name of the teacher and the date of the work. This important job information should be placed about two-thirds from the top of the paper.
 - Write the name and number of the course on the first line.
- On the next line, write the instructor's name.
- On the last line, enter the due date for this assignment in the following format: Month DayDigit YearDigit.
Part 2 of 8: General provisions of the MLA format
 1 Set the margins to 2.5 cm (1 inch). Top, bottom, left, and right margins should be 2.5 cm (1 inch) wide.
 - In most text editors, you can change the page margins by going to the Page Layout preferences, which are usually found in the File menu. In the settings you can find the "Fields" button, by clicking on which you can set the fields of a certain width.
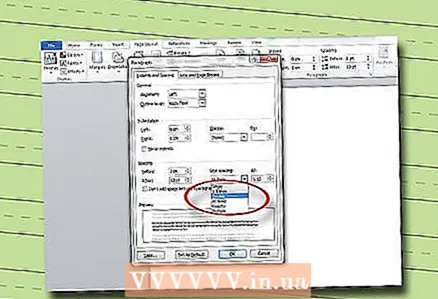 2 Set double line spacing. Your work should be double-spaced from the very first page. Remember, there is no need to add extra spacing between paragraphs.
 - In most text editors, you can change the line spacing by going to the Page Layout preferences, which are usually found in the File menu. In the dialog box that opens, you should see the button "Indents and spacing", after going through which, you should select double spacing or "2.0".
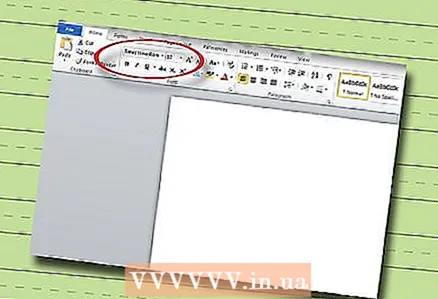 3 Use 12 font size. For MLA format, 12 Times New Roman font size is preferred.
 - If you decide to use a different font, make sure it is not too large or complex and easy to read.
 4 Install the header. The header will appear at the top of each page in a static position. The header text should include your last name and current page number and appear in the upper right corner of the page.
 - Header and footer settings can usually be found under the View or Insert menu. In the header and footer settings options, set the page numbers to display in the upper right corner of the pages, and then enter your last name in the header that appears.
Part 3 of 8: Formatting the First Page
 1 Write your title in the upper left corner. The title must contain the same information as the title page, if used. Please include your full name, instructor's name, course title, and assignment due date.
 - Write your name on the first line in the format First Name Last Name.
- On the next line, enter the teacher's name.
- On the third line, enter the name of the course.
- The due date for the assignment should be indicated on the last line. The date must be written in the format DayDigit Month YearDigit.
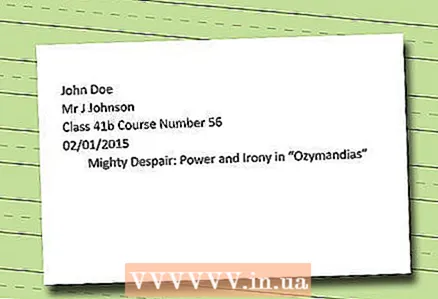 2 Center the title of the job. On the next line after the due date of the assignment, write the title of your work. Align it to the center.
 - Do not use italic, bold, underlined, or large print for your title.
- The headline should be informative but creative at the same time.
- If you want to include a subheading, it must be placed on the same line as the heading, separated by a colon.
- The first letter of every important word must be capitalized. Conjunctions and articles must be capitalized unless they appear at the beginning of a heading or subheading.
 3 Start writing the text of your work. On the line just below the heading, start writing an introductory paragraph to your work, aligning the text to the left.
Part 4 of 8: Text of the work
 1 Set the first line indent of each new paragraph. This indent should be 1.25 cm (1/2 inch).
 - Indents can be quickly inserted by pressing the "Tab" key on your keyboard.
- There is no need to insert extra space between paragraphs. To mark the beginning of a new paragraph, the indent of the first line of the paragraph is enough.
 2 Divide your work into multiple sections with subheadings as appropriate. If you are writing a lengthy work, your instructor may ask you to divide it into several sections with separate subheadings.
 - In MLA format, it is recommended to number each section with an Arabic numeral and a period, followed by the name of the new section.
- The first letter of each word in a section title must be capitalized.
- Section names should be centered and written on a separate line.
 3 Use the shape number when including tables or images in text. When you include a table or other graphics in MLA format in the text, you should align the shape in the center, include its number, title and information about the source.
 - For photographs and illustrations, use "Fig. 1," "Fig. 2," and so on. Use "Tables 1," "Tables 2", etc. for tables and graphs.
- Label each shape with descriptive names, such as "caricature" or "statistical table."
- Provide the name of the shape's creator, original source, publication date, and page number.
- All information should be included on one line just below the figure.
Part 5 of 8: Quoting Style Within Text
 1 Always include quotes in brackets for any borrowed material. After direct quotation, paraphrasing or presentation of borrowed material, the original source should be indicated in brackets after the borrowed material.
 - If you have more information about the original source, please also include the author's name and the page where the source was found in parentheses.
- If the source material was found on the Internet and does not have a page number, include only the name of the author and the title of the original source.
- If the name of the author is also unknown, it is sufficient to indicate in brackets the abbreviated name of the original source.
- If you mentioned the author's name earlier in the sentence, then you should not re-enter it in parentheses.
 2 Formatting a quote within a string. Most of the quotes in your work will be "inline", which means they don't need much formatting and can be treated like regular text.
 - Always include quotes in a larger sentence. Never insert individual quotes, that is, quotes that are written by themselves, without any introduction from you.
- The parentheses with the quotation of the original source are always followed by a comma or period, and the brackets themselves must be outside the quotation marks of the quoted text.
 3 Formatting block quotes. If the quote you want to use is longer than three lines, it should be separated from the rest of the text and turned into a "block quote".
 - After you have written the last word before the quote itself, press the "Enter" button and move to a new line.
- Each line in a block quote should be indented 1.25 cm (1/2 inch).
- A block quote does not require quotation marks, but you will still need to include the original source in parentheses after the quote text.
Part 6 of 8: Endnote Page
 1 The heading "Endnotes" should be centered. Do not make it italic, bold, or underlined.
 - If your work contains endnotes, they should be listed on a separate endnote page after the end of the work itself. Do not confuse endnotes with footnotes that appear at the end of the page on which they appear.
 2 Number the endnotes. If you have used the automatic endnote program built into your text editor, they should appear already numbered on the endnote page.
 - If you have not automated the addition of endnotes, make sure that each endnote is numbered in Arabic numerals that correspond to the number of those endnotes in the main body of your work.
- The first line of each footnote should be indented 1.25 cm (1/2 inch).
 3 Endnotes should contain concise but important information. Endnotes should only be used for information that does not fit coherently into the paragraph to which it refers.
 - Endnotes should not be more than three to four lines long. Avoid large amounts of information and never include new discussion points in endnotes.
Part 7 of 8: Appendix
 1 The "Application" title should be centered. Do not make it italic, bold, or underlined.
 - If you include multiple applications, name them “Appendix A,” “Appendix B,” and so on.
 2 Add relevant but optional information. The content of the application should be related to the content of your work, but should not include crucial or essential information for your argument.
 - The app is a good way to include related information without detracting from the main argument of your work.
Part 8 of 8: Bibliography
 1 The heading "Bibliography" should be centered. Do not make it italic, bold, or underlined.
 - Your bibliography should contain all works and materials that you directly refer to in the text of your work.
- All written works in MLA format must include a bibliography.
 2 Organize all cited material in alphabetical order. All cited works should be organized in alphabetical order by the author's last name.
 - If the material does not have an author, distribute it according to the first letter of its title.
 3 Book citation. The basic format for citing a book includes the author's name, book title, publication information, and publication type.
 - Please enter the author's name in the format Last name, first name. "Put a full stop.
- Write the title of the book in italics. The first letter of every word in the title must be capitalized. Put a point.
- Specify the city of publication, put a colon, then write the name of the publisher. Place a comma for the year of publication. Put a point.
- At the very end, specify the type of publication, for example, "Print" or "E-book". Put a point.
 4 Citation of an article in the journal. The basic format for citing a standard journal article includes the name of the author, the title of the article, the title of the journal, the release information, and the type of publication.
 - Please enter the author's name in the format Last name, first name. "Put a full stop.
- Write the title of the article in quotation marks. The first letter of every word in the title must be capitalized. Put a point.
- Write the title of the journal in italics. The first letter of every word in the title must be capitalized. Put a point.
- Indicate the issue number, then indicate the year of publication in parentheses. Put a colon after the year and indicate the page number, close the parentheses. Put a point.
- Specify the type of publication ("Print", "Electronic edition", etc.). Put the last point.


