Author:
Alice Brown
Date Of Creation:
23 May 2021
Update Date:
1 July 2024

Content
Hub bearings are very important parts of a car's suspension. They are usually located inside the hub, under the brake disc or drum. When driving, these bearings provide smooth rotation of the car wheels. If while driving you hear bumps or intermittent tapping, or the ABS light on the panel lights up, then it may be time to replace the hub bearings. You can save a lot of money if you don't go to the workshop and do the repair yourself. But be very careful - bearings, despite their small size, play a huge role. Read on to find out how wheel bearings are replaced.
Steps
 1 A warning: all cars are different. The instructions below are only general guidelines; they are not an accurate guide to repairing a particular vehicle. If, in the process or after the end of the work, you encounter doubts or difficulties, then you should contact the auto repair shop for help. Thus, you will save yourself from further waste of time, nerves and, in the long term, money.
  2 Park the vehicle on a level surface. Before replacing wheel bearings, as with any other work on the vehicle, you must take all the necessary precautions to ensure your own safety. The worst thing that can happen in this case is that your car can suddenly move or roll. Park on level ground before starting repairs. Put the automatic transmission selector in the parking lot (if the transmission is manual, turn on the first speed or neutral) and apply the hand brake.
  3 Put under the wheels on which you not going to change bearings, underrun shoes. It would be wise to fix the wheels of the car with strong stops to improve stability. Of course, it makes sense to put shoes under the wheels with which you not you are going to work, because the wheel on the problem side will be hung out before removal. For example, if you are going to change the wheel bearings on the front end, then the shoes must be placed under the rear wheels, and vice versa - if the work will be carried out with the rear wheels, then the front wheels must be fixed.
 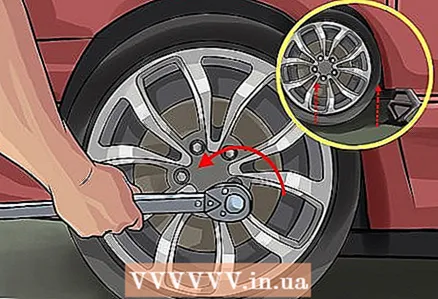 4 Loosen the wheel nuts and jack up the wheel. In order to gain full access to all internal elements, you first need to hang out the wheel, the wheel bearing of which you are going to change. Fortunately, the vast majority of cars are equipped with jacks for these purposes. But before you start lifting, it makes sense to remove the nuts with a wheel wrench, because it is much more difficult to rip them off on a suspended wheel. Then carefully jack up the wheel. If your jack does not work, then buy a suitable replacement from your nearest car dealer. For more detailed instructions on how to jack up a wheel, read the article How to Change a Tire.
 - To prevent dangerous slipping, before lifting, make sure that the jack foot is firmly fixed in the seat and that the heel is firmly on the ground. It is also very important that the jack underneath the vehicle rests against a solid metal surface, because fragile plastic parts such as moldings will instantly break under the weight of the vehicle.
 5 Unscrew the nuts and remove the wheel. Once in place, the wheel nuts should be unscrewed without difficulty. Place the nuts in a safe place where they will not get lost. Then remove the wheel itself; it should also come off freely.
 - Some motorists prefer to fold the twisted nuts into the removed wheel cap, turning it upside down in the manner of a plate.
 6 Remove the brake caliper. Remove the brake caliper mounting bolts with a socket wrench. Then, using a screwdriver, remove the caliper itself.
 - After removing the caliper, do not let it dangle freely, as the brake hose may be damaged. Fix the caliper securely in a safe place inside the wheel arch, or tie it there with a piece of string.
 7 Remove the brake disc boot, cotter pin and crown nut. In the center of the brake disc, there should be a boot - a small plastic or metal cap that protects the brake disc mount from dust and dirt. Accordingly, to remove the disc, you must first dismantle the cap and mount. The boot is usually removed like this: it is clamped with pads and lightly tapped on them with a hammer. Under the cap you will find a crown nut secured with a cotter pin. Remove the cotter pin with pliers or wire cutters, then unscrew the crown nut, remove it with the washer and hide.
 - Remember to put all these small but very important parts somewhere safe, where you can easily find them later!
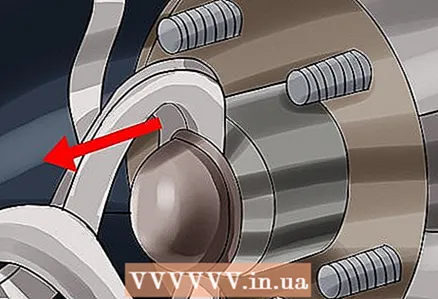
 8 Remove the brake disc. Place your thumb on the hub in the center of the assembly. Hit the disc firmly (but gently) with the palm of your other hand. The outer bearing of the hub should loosen or even fall out. Remove it, and then remove the brake disc itself.
 - If the brake disc is stuck, you can help yourself a little by tapping on it with a rubber mallet. If you do not plan to reuse this brake disc, you can use a regular hammer; however, be aware that in this case you will most likely damage the brake disc.
 9 Unscrew the hub mounting bolts and remove it. The bearing is located inside the hub, and it is usually fastened with several bolts twisted from the back. They are usually quite difficult to crawl up to, because the heads are located in a small niche between the hub and the arch. In order to unscrew and remove the hub bolts, you will most likely need to use a narrow wrench and possibly a pry bar. After unscrewing the bolts, remove the hub from the trunnion.
 - If you purchased a new hub assembly, then at this stage you can install it, then replace the wheel - and that's it, the work is completed. If you need to install a new bearing in an old hub, read on.
 10 Disassemble the hub. In order to access the bearing, you need to disassemble the hub. You have to use a key and / or a hammer to remove the outer part of the hub (and the ABS mechanism, if it is installed on your car). Then, using a special puller, you will need to remove the central bolt. This will open access to the hub bearing.
  11 Remove the bearing races and clean the steering knuckle. Removing the clips with a vise and a hammer / file will definitely destroy the bearing. Therefore, before starting work, you need to stock up on a new bearing and keep it close at hand. After removing the clips, it makes sense to clean the steering knuckle and the seat inside the hub.
 - Prepare a lot of rags or rags, as these areas tend to have a lot of used grease and dirt.
 12 Install a new bearing. Install the new bearing into the seat in the hub. Press it in with a few gentle hammer blows. Then lubricate the surface of the inner bearing race and fit it onto the steering knuckle. During installation, pay special attention to the absence of distortions of the bearing cages, the exact hit of the cages on their seats, and the presence of washers and retaining rings from the ends of the assembly.
 - Do not spare grease on the bearing. It can be applied by hand or with a special oiler for packing bearings. Lubricate the outer race surfaces and all o-rings liberally.
 13 Install all elements in reverse order. Now that you have replaced the bearing, all you have to do is reinstall all the removed parts and screw on the wheel.Keep in mind that after installing the brake disc, you will need to install a new outer hub bearing. Install the hub assembly with the steering knuckle back to the trunnion and tighten the mounting bolts. Install the brake disc and tighten the mounting bolts. Install a new, well-lubricated outer wheel bearing. Tighten and lightly tighten the crown nut and install a new cotter pin. Install a new boot. Reinstall the brake caliper with pads and tighten the corresponding fixing bolts. Finally, reinstall the wheel and tighten the wheel nuts.
 - After you are finished, carefully lower the machine off the jack. Congratulations - you replaced the hub bearings yourself.
What do you need
- New hub assembly or a set of new hub bearings
- New brake disc (optional)
- Pry bar
- Jack
- Socket set
- Ratchet wrench
- Screwdriver
- Rubber mallet
- Hammer (optional)
- Sandpaper


