Author:
Carl Weaver
Date Of Creation:
22 February 2021
Update Date:
1 July 2024

Content
- Steps
- Part 1 of 6: Installation
- Part 2 of 6: Setting up the sound
- Part 3 of 6: Setting up your video
- Part 4 of 6: Capturing Part of the Screen
- Part 5 of 6: Recording the Game
- Part 6 of 6: Putting the Final Touches
So, you want to show the world how skillfully you play this or that computer game? Would you like to record a tutorial on how to use your favorite software? Nothing could be easier, Bandicam will help you! What is Bandicam? A program for recording everything that is displayed on the computer screen, which does not require a lot of system resources. This article will teach you how to install, configure and use this program.
Steps
Part 1 of 6: Installation
 1 Download the installation file. Bandicam can be downloaded for free from the Bandicam official website. Alas, there is a Windows-only version. The free version of Bandicam, however, only supports recording 10-minute clips, over which a so-called "watermark" will be placed. To forget about these restrictions, like about a bad dream, you will have to buy the full version of the program.
 - When installing Bandicam, use the download link from Bandisoft. Installation from Softonic is undesirable - why do you need extra advertising in the installation file?
 2 Install Bandicam. Actually, this process is simple and even uncomplicated, you can even not make changes to the basic settings. However, you can choose which shortcuts you want to install (on the desktop, in the Quick Launch and in the Start menu).
  3 Start Bandicam. When the program is installed, you can run it - actually, otherwise you will not be able to go to the Bandicam setup. If you are not using an account with administrator rights, then you will need an administrator password.
Part 2 of 6: Setting up the sound
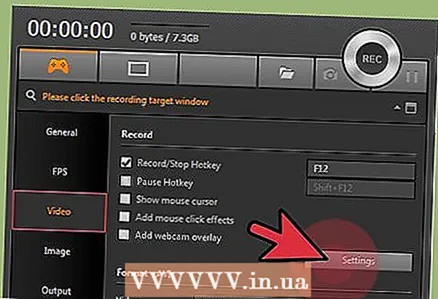 1 Open the "Record settings" window. This menu can be accessed by selecting the Video tab, then clicking the Settings button in the Record section. Make sure the Sound tab is selected.
  2 Decide if you need to record audio. Bandicam can record all the sounds that the program you are recording makes, as well as the sound from the microphone. This is especially useful if you are writing a tutorial or something like that, where you simply cannot do without comment.
 - Check the box next to "Record sound" to actually record the sound. Of course, the resulting file will be larger with sound.
 3 Select the main source device. If you want to record the sounds of the program you are recording, make sure Win8 / Win7 / Vista Sound (WASAPI) is selected in the Primary Sound Device drop-down menu.
 - Click on the Settings ... button to open the Windows sound settings.
 4 Select an additional audio source device. If you are using a microphone when recording video, select it from the "Secondary Sound Device" drop-down menu.
 - Check the box next to "Two Sound Mixing" to combine two audio tracks into one so the resulting file will be smaller.
- You can set up a hotkey for activating the microphone if you don't want it to catch your every breath. The main thing here is to use as a hot key that you are unlikely to press by accident.
Part 3 of 6: Setting up your video
 1 Open the Video Format settings. You can change the video recording settings to get the best file quality possible in your environment. Click on the Video tab in the main program window, then click on the "Settings" button in the "Format" section.
 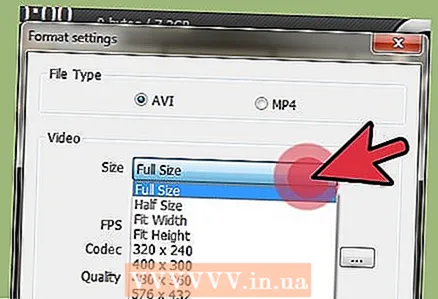 2 Select your screen resolution. The "Full Size" option is enabled by default. In other words, the resolution of your video file will be the same as that of the program being recorded. If the program is open, as they say, in full screen, then the entire screen will be recorded. If the program is open in a window, then only the window area will be recorded.
 - You can always change the recording resolution, which can be especially useful when you are preparing video for devices that only support playback of files of a certain resolution and distort all video files of a different format.
 3 Adjust the recording frames per second (FPS) setting. FPS is how many frames the program records per second of time. The base value is 30, which is the maximum for YouTube. If you want to make videos of higher quality, then you will have to increase the FPS.
 - The higher the FPS, the larger the resulting file and the more difficult it will be for your computer to record video. If you are working on an openly weak computer, then be prepared to face performance degradation.
 4 Select a codec. A codec (encoder / decoder) is a program that processes video while recording. The default codec is Xvid as it is supported on most devices. However, if your video card supports this trick, then you can use a different codec.
 - Have a new and powerful Nvidia card? Choose "H.264 (NVENC)" when you want the best recording quality. Older cards from Nvidia can work with "H.264 (CUDA)", owners of AMD cards can choose "H.264 (AMP APP)", and for integrated video cards from Intel, respectively, you can choose "H.264 (Intel Quick Sync) ".
- If you have several video cards at once (Nvidia and Intel, for example), then you need to select the option that uses your active, working video card. If your monitor is connected directly to the motherboard, then this is an Intel codec, and if the monitor is connected to a video card (Nvidia or AMD), then select the appropriate codec.
 5 Set the video quality. The Quality drop-down menu is where you can set the overall quality of the recording. In that menu, you will see numbers, and the larger the number, the higher the quality. The higher the quality, the correspondingly larger the file. However, if you sacrifice quality, then the result will be appropriate.
Part 4 of 6: Capturing Part of the Screen
 1 Add cursor highlight effects. If you are recording a tutorial, it is a good idea to highlight the mouse cursor so that viewers do not have to break their eyes looking for the cursor on the screen. Click the Settings button in the Record section of the main Bandicam window, then click the Effects tab.
 - You can add mouse-click effects. To set a color, click on the colorless buttons next to the corresponding options.
- You can highlight the cursor so that it is always visible. Sets the color in the same way as in the previous step. The most commonly used color is yellow.
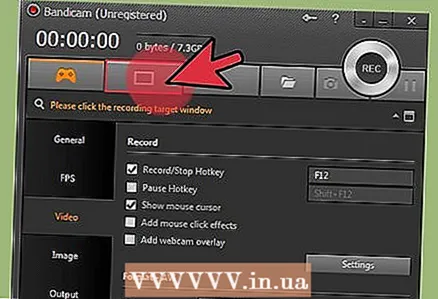 2 Click on the "Rectangle on a screen" button. It's at the top of the Bandicam window, next to the joystick button. By clicking on it, you will see the recording window.
  3 Designate the recording area. It should completely correspond to the window of the program you are recording. Click on the borders of the overgrown and pull them to the sides accordingly. You can also select the boundaries of the recording area from the menu at the top. The general principle is that everything within the blue borders will be recorded.
  4 Click on the REC button to start recording. This button is located in the upper right corner of the recording window, as well as in the main program window. When recording starts, the blue borders will turn red and a timer will appear next to it.
 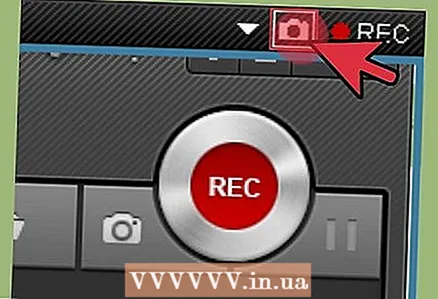 5 Take a screenshot. This can, however, be done at any time while recording is in progress - just click on the Camera icon at the top of the recording window to take a screenshot within the recording area.
  6 Finish recording. Click on the Stop button in the recording window or program window to stop recording. By clicking on the icon in the form of a folder, you can view the resulting video - the folder where the filmed videos are recorded will open, the recorded video will immediately open (in the default player).
Part 5 of 6: Recording the Game
 1 Click on the Controller button. This will switch the recording mode to full screen, designed specifically for recording games and programs running in full screen mode.
  2 Turn on the FPS counter. Bandicam will overwrite the recording with an FPS counter so you know how many frames per second your game is recording. This, by the way, is useful if you want to know how much Bandicam affects the performance of the computer when the game is running. Open the FPS menu in Bandicam, make sure the "Show FPS Overlay" option is checked. You can choose exactly where the counter will be located.
 - The counter will come in very handy - albeit because it will change color if the recording suddenly stops.
 3 Select a hotkey for recording. In the Video section, you can select a key that you press to start and end recording. By default, this is the F12 key. However, you can change it to any other - the main thing is that you do not accidentally press it during the game.
 - By pressing F12, if you have Steam running, you will take a screenshot of the game, so every time you start or stop recording a game while Steam is running, you will also take a screenshot in it. If you are recording videos for those games that you bought through this digital distribution system, then you should change the recording hotkey.
 4 Start the game. Just start it as usual. If you have activated the display of the FPS counter, then you will see it.
  5 Start recording. When you're ready to start recording, press the appropriate hotkey. The FPS score, which was green until now, turns red - this means that the recording has begun. Please note that the entire screen will be recorded, so try not to accidentally write down your personal information (login, password, and so on).
  6 Finish recording. When you have recorded everything you want, simply press the hot start recording button again to stop it. The created video will be placed in the folder of finished videos.To open it, click on the folder-shaped icon in the Bandicam program itself.
Part 6 of 6: Putting the Final Touches
 1 Watch the video. Open the folder where the video is stored, find it and launch it. Check if you wrote down everything you need, if you did not write down anything unnecessary. To open the video, click on the folder-shaped icon in the Bandicam program itself.
  2 Recode your video to make it smaller. Chances are that your video takes up quite a lot of space on your hard drive, especially if the recording lasted longer than 10 minutes. What to do, how to be7 The video size can be reduced by re-encoding the video in special programs - Handbrake, Avidemux and the like. The quality of the video, of course, will deteriorate a little, but the file size will decrease more than significantly.
 - Transcoding will also allow you to upload videos to YouTube much faster. If you plan to burn it to DVD or just want to keep it on your computer, then you may not need to transcode.
 3 Add special effects with video editing software. Bandicam won't let you add any effects to your video, but that's not their job. If you want effects, then use programs like Windows Movie Maker or Sony Vegas. In them, you can insert text between scenes on the video, combine several videos at once, add transitions, titles, and so on.
  4 Upload your video to YouTube. Actually, YouTube is one of the best places to share your video with the world! You can even cash in on it if your files become popular enough!
 - Keep in mind that not every company allows outsiders to use their programs to make money. Please clarify this question in advance.
- You need to learn how to upload videos to YouTube, but look for articles about it yourself.
- Much has been said about how to make money on video ... but not here.
 5 Burn the video to DVD. If you want to store video to DVD, then use any of the programs that support DVD burning. Burning video to DVD will give you the ability to remove it from your computer to free up space, which is especially true for large video files.


