Author:
Sara Rhodes
Date Of Creation:
9 February 2021
Update Date:
1 July 2024

Content
- Steps
- Part 1 of 2: How to Create a CSV File
- Part 2 of 2: How to Import a CSV File Using a Web Browser
- Tips
- Warnings
Multiple email addresses can be added to your Google Account using a CSV file (data must be separated by commas). The CSV file can be created from scratch or exported from an email client. Use the Gmail CSV template to find out what information to enter, then add the contacts you want. Now open your Google Contacts and import the CSV file. Don't forget to check if the contacts that were imported are correct.
Steps
Part 1 of 2: How to Create a CSV File
 1 Export CSV file from Gmail. This will give you a template that will tell you what information to enter.
 - If the file is not exported without contacts, manually add one (any) contact to export the CSV file.
- If you already have a CSV file of contacts, skip to the next section.
- If you want to create a CSV file from scratch, a complete list of data categories can be found here (in English).
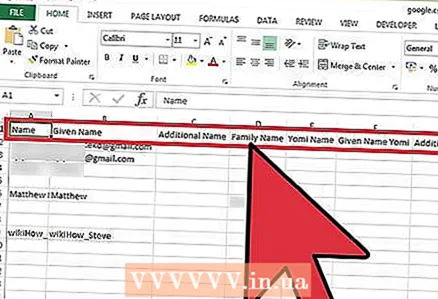 2 Open the CSV file in a spreadsheet or text editor. The first line of the CSV file will display various categories for data entry (for example, first name, last name, email address, and so on). In the spreadsheet editor, the categories appear in the cells of the first row, and in the text editor, in the first row, separated by commas.
 - Spreadsheet editors are Microsoft Excel or Google Sheets, and text editors are Notepad or TextEdit.
 3 Add contacts to CSV file. Enter data in the appropriate cells or line by line, separated by commas. If some data is missing, leave the cell blank (in a spreadsheet editor) or simply place a comma (in a text editor).
 - For example, the categories "Name", "Last name", "Phone", "E-mail" in a text file can be represented as follows: "Boris ,,, [email protected]".
- Don't delete empty cells (in a spreadsheet editor) and remember to put a comma in place of missing data (in a text editor). Gmail will scan all cells, so missing cells will cause the import process to fail.
 4 Open the File menu and choose Save. This will save your changes to a CSV file.
Part 2 of 2: How to Import a CSV File Using a Web Browser
 1 Open up Google Contacts in a web browser.
 2 Sign in to your Google / Gmail account. Enter your username and password and click Login. You will be taken to the Google Contacts page.
 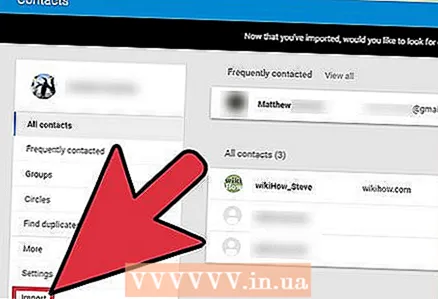 3 Click Import Contacts. This button is located on the left pane. A pop-up window will open.
 - If you are using a newer version of the Google Contacts interface, this button will be labeled as Contacts. The new version does not support importing contacts, so you will automatically be redirected to the page with the old version of the Google Contacts interface; now just repeat the described step.
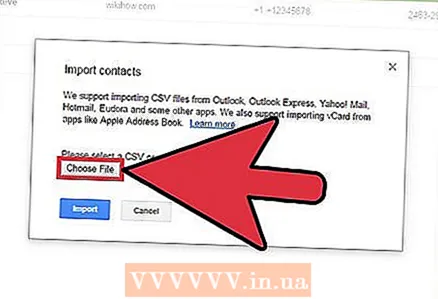 4 Click Browse.
 5 Select the CSV file to be imported. Find the file that you exported or created, and then click Open. The file is added to the Import Contacts pop-up window.
  6 Click Import. Within a few seconds, the import process will complete and the contacts will appear on the contact page.
 - If you find that the contacts were imported incorrectly (i.e. the data is in the wrong fields), you may have deleted a cell or missed a comma in the CSV file. If you are importing many contacts, it is easier to edit the CSV file, delete all imported contacts, and then re-import them (rather than editing each contact individually).
Tips
- CSV files cannot be imported using mobile devices.
- We recommend exporting contacts as a CSV file from another mail service. In this case, the file will be correctly formatted and ready to be imported into Google Contacts.
Warnings
- If you created a CSV file from scratch, double check that the data is in the correct cells. For example, make sure names and email addresses are in the correct cells and are associated with the right people.


