Author:
Joan Hall
Date Of Creation:
6 July 2021
Update Date:
23 June 2024

Content
This article will show you how to add a text watermark to your photo. The watermark will prevent strangers from using your photos for their own purposes. You can add a watermark using the free online service uMark or using Microsoft PowerPoint on a Windows or Mac OS X computer.
Steps
Method 1 of 2: uMark Online
 1 Open the uMark Online service website. Go to https://www.umarkonline.com/.
  2 Click on Overview. It's a gray button in the middle of the page.
  3 Select the photo you want. Click on the folder with photos on the left side of the window, and then find the photo you want.
  4 Click on Open. It's in the lower-right corner of the window.
  5 Click on Upload (Download). This blue button is to the right of the photo file name. The photo will be uploaded to the uMark website.
  6 Enter your watermark text. Enter text (for example, your name) that will appear as a watermark in the Watermark Text box at the top right of the page.
 - Change the font, size and style in the "Font" section if you like.
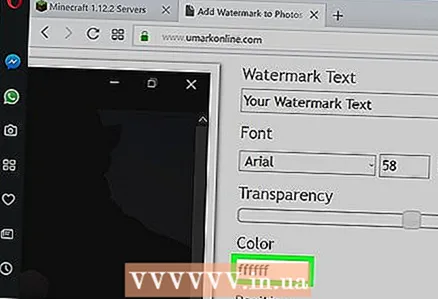 7 Change the color of the watermark. Click on the text box under "Color" and then choose the color you want from the menu.
 - You can also change the color gradient on the right side of the dropdown menu.
 8 Change the transparency of the watermark. Drag the Transparency slider to the right to increase transparency, or to the left to decrease it.
  9 Specify the location of the watermark. Click on one of the circles (9 circles in total) in the Position section to reposition the watermark on the image.
  10 Save the photo with a watermark. Right-click on the watermarked image, select "Save Image As" from the menu, enter the file name, select a folder on the left side of the window and click "Save". The watermarked photo will be saved in the specified folder.
 - If your mouse does not have a right or left button, press the button with two fingers, or press the right side of the button, or tap the trackpad with two fingers.
Method 2 of 2: PowerPoint
 1 Start PowerPoint. The icon for this program looks like a white letter "P" on an orange background.
  2 Click on New presentation. It's on the top-left side of the PowerPoint home page. A new presentation will open.
 - Skip this step on a Mac.
 3 Delete the contents of the slide. Click on Ctrl+A (or ⌘ Command+A on a Mac) to select the slide text boxes, and then click Deleteto remove them.
 - If you do not delete the contents of the slide, the watermark will not be added to the photo.
 4 Go to the tab Insert. It's at the top of the PowerPoint window. The "Insert" toolbar opens.
  5 Click on Drawing. It's in the Illustrations section of the Insert toolbar.
 - On a Mac computer, click Picture> From File.
 6 Select a photo. Click on the folder with photos on the left side of the window, and then find the photo you want and click on it.
  7 Click on Insert. It's in the lower-right corner of the window. The photo will be uploaded to PowerPoint.
  8 Go to the tab the main. It's at the top of the PowerPoint window. The Home toolbar opens.
  9 Click Caption. This option is marked with a rectangle with an A and is on the left side of the Draw section of the Home toolbar.
  10 Place the text box on the photo. Hold down the left mouse button and drag the pointer over the area of the photo where the watermark will be.
 - To resize the text box, drag one of the handles at the corners and around the box.
 11 Enter your watermark text. Enter a name, brand, or phrase to be displayed as a watermark.
  12 Click the tab again the main. The toolbar of the same name will open.
  13 Format the watermark text. Select the text (hold down the left mouse button and drag the pointer over the text), and then change the size, color, or font of the text in the Font section of the Home toolbar.
  14 Select the photo and text. Click on Ctrl+A (Windows) or ⌘ Command+A (Mac).
  15 Click on Arrange. You will find this option in the Draw section of the Home toolbar. A menu will open.
  16 Click on Group. It's on the Arrange menu. The watermark will be added to the photo.
  17 Save the photo. Right-click on the photo, select "Save as Picture" from the menu, select a folder and click "Save". The watermarked photo will be saved in the selected folder.
 - If your mouse does not have a right or left button, press the button with two fingers, or press the right side of the button, or tap the trackpad with two fingers.
Warnings
- Save the original version of the photo (without the watermark) in a separate folder in case, for example, you want to sell the photo.


