Author:
Alice Brown
Date Of Creation:
27 May 2021
Update Date:
1 July 2024

Content
Twitter is a useful tool for both business and general users. Unlike a traditional blog, Twitter allows you to send messages, so-called "tweets", up to 140 characters. Many of the 300 million Twitter users send Twitter messages from smartphones and computers. If you would like to use Twitter as a way to update your blog or website information, there is an easy way to do it. While many sites have Twitter functionality built in, Twitter.com has also created a Twitter icon that can be embedded in your site's HTML code. This article will show you how to add Twitter to your website or blog.
Steps
 1 If you do not know how your site works, then ask a web developer or programmer for help. In most cases, you will need to have some knowledge of HTML in order to properly place a Twitter block on your website or blog.
  2 Log into the admin control panel of your website or blog. Before creating your own Twitter badge, check if your site template contains the Twitter feature. Many websites like WordPress have this option and can be found in the admin control panel.
 - If you are using the WordPress platform, then log into the control panel and go to the "View" tab. Click on the "Widgets" button. Drag the Twitter shortcut to the part of the site where you want to display the Twitter icon. This is usually the top-right side of the page. Enter the address of your Twitter page, choose the title and number of tweets you want to appear on your site.
 3 Open a new browser tab, go to Twitter.com and log into your profile. If your site does not have the option to automatically add Twitter, you can still do this by selecting one of the Twitter icon options.
 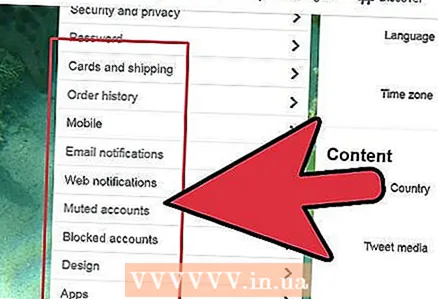 4 Look at the Twitter box on the left or right side of your screen. Click on Resources. You will be taken to a page called Buttons, Widgets, Logos and More.
 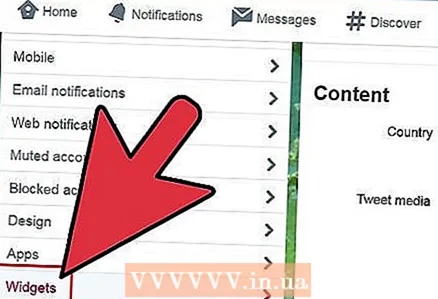 5 Click on the "Widgets" button. Then click on "My Site". Read a brief description of the types of Twitter shortcuts you can put on your website, then click the Profile, Search, Favorites, or List button.
 - Most people prefer to use Profile widgets. This will only post your tweets, not your followers' tweets.This will give you maximum control over what your site visitors will see.
 6 Click on all the options of the "Settings of your profile widgets" tab. You can choose your username, number of tweets, the color of your Twitter tag, size, and so on. Every change you make will be reflected in the HTML code of the Twitter shortcut.
 - You can see an example of what your Twitter shortcut would look like on the right side of the screen. Choose the colors and sizes of the label based on your website design.
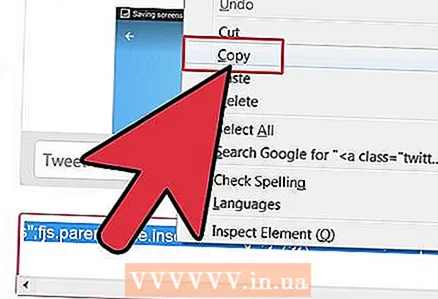 7 Click Test or Finish and Grab Code. Once the code is generated, copy it. Make sure to capture every character, otherwise your Twitter shortcut may not work.
  8 Return to the admin panel of your blog or site. Select the area on your site where you would like the Twitter shortcut to appear. Paste the HTML code in a suitable place on the site.
 - If your site is easy to administer, it should have a simple editor on the admin page. Find the HTML Code tab or section. Paste the HTML code of the Twitter shortcut in this section.
 9 Save your site changes. If you want to make changes to the Twitter shortcut in the future, you will need to go back to the Twitter page and repeat the same process to create a new HTML for the shortcut.
What do you need
- Web programmer / IT specialist
- Web browser
- Twitter account
- Access to the control panel of a website or blog


