Author:
Joan Hall
Date Of Creation:
1 July 2021
Update Date:
1 July 2024

Content
If you've always wanted to add some light to your gaming supercar, we'll show you how. This method is probably the easiest and fastest.
As always, you will do this at your own risk. We are not responsible for what may happen to your property. Exercise caution and discretion at all times. To get started, go to the first step.
Steps
 1 Pull out the system unit panel to the left of the processor and clean it.
- Carefully unscrew the bolts on the back of the system unit that are holding the side panel.
- Slide it back and pull it out.
- Take a look at the inside of the panel and determine where you want to glue the LED strip.
- Once you've selected the part you want, grab a paper towel and dampen it with rubbing alcohol.
- Wipe down the surfaces of the inner panel to remove dust, grease and other substances that will interfere with adhesion.
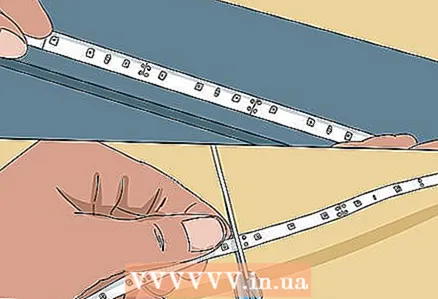 2 Cut out the LED strips and secure them.
- Measure and cut the tapes to size. Most tapes can only be cut after every 3 diodes, so keep that in mind.
- Expose the back of the tape and attach it to the panel.
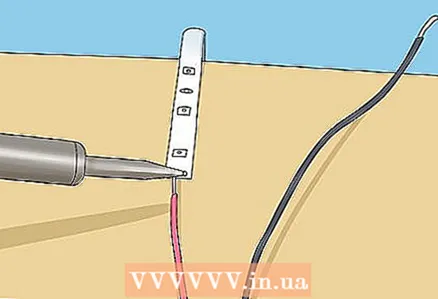 3 Connect the tapes into groups.
- Measure and cut the wire to group the tapes. Add some tolerance as you will need to use a wire stripper to strip the wire ends.
- Connect the wires to the tape with a soldering torch. Make sure the diodes (+/-) are connected correctly. Most of the wires are color-coded to make it easier to connect the wires correctly without connecting positive diodes to negative ones. White or black wire is positive and any other wire is negative.
- Use hot glue to secure the wires so that they do not move around the chassis.
 4 Connect the LED strips to the MOLEX connector.
- The first end of flexible LED strips should be provided with a pair of wires to connect the voltage. Otherwise, solder to the positive and negative terminals along the wire.
- Take the MOLEX connector. The yellow wire is 12V and the black is ground. Select the connector you want to use as a connector. The end of the connector where the two output elements converge is the one to be inserted into the voltage source.
- Use a wire stripper to separate the black and yellow wires.
- Solder the black wire (ground) from the MOLEX connector to one of the ribbon system wires.
- Do the same for the other wire.
- Secure the connections with a small piece of electrical tape.
 5 Insert the MOLEX connector into a free plug on the power supply.
- Locate a free power supply plug to attach to the tape system. When you turn on the computer, the tape should light up.
 6finished>
What do you need
- Flexible LED Strips
- 4 pin MOLEX connector
- Wire scissors
- Stripping tool
- Wire with a cross section of 0.5 mm
- Hot glue gun
- Isopropyl alcohol
- Blowtorch and wire
- Insulating tape


