Author:
Florence Bailey
Date Of Creation:
26 March 2021
Update Date:
1 July 2024

Content
- Part 2 of 4: Creating a Round Bouquet
- Part 3 of 4: Create a hand-knitted bouquet
- Part 4 of 4: Creating other types of bouquets
- What do you need
- Tips
- Warnings
- For a more sophisticated bouquet, choose a color that matches your wedding outfit. Avoid identical shades and opt for accent colors. Colors that are too similar in color can make a celebration “flat” and complicate the photographing process.
- The easiest way is to collect a bouquet of these shades. In the classic versions, combinations of cream, white, peach and light pink are used.
- Other colors will give your bouquet an attractive look. Try combining yellow and purple, blue and orange, red and green. Use soft tones and lighter shades if you're not ready for such a bold option.
 2 Choose a main flower with a sturdy stem. This flower must have a sturdy stem to support the entire arrangement.Whenever possible, choose flowers that are appropriate for the season of the wedding ceremony. Out-of-season options may require pre-order and will cost much more, and it will be difficult for them to find a replacement in case of force majeure. Choose from one to three colors to suit your needs, or browse this list:
 - Single roses (not on a branch)
- Peonies (ask your florist for advice, as many double peonies have weak stems)
- Hydrangeas
- Magnolia
- Double dahlias (single ones tend to crumble petals)
- Lisianthus
- Cymbidium orchids
- Calla lilies (or colorful mini calla lilies)
- Star lilies
3 Choose additional flowers (optional). A single flower bouquet can look chic and requires less effort on the part of a budding florist. However, you can awaken the artist within yourself by adding any number of small-sized flowers for variety. You can use almost any flower for this purpose. Explore the range of flower shops and online bridal bouquets if you are unsure of your choice of flower combinations. - Popular complementary flowers include small single roses, branch roses and freesias.
- "Filler flowers" are twigs of tiny flowers, buds, or berries. Try wax flower, gypsophila, or eucalyptus.
 4 Decide on the size. The size of the bouquet should be in harmony with you and the environment. Large bouquets are suitable for lush church weddings and beach weddings, while small bouquets fit better in more intimate spaces. There is a good rule of thumb that the perfect bouquet should not be wider than the bride's waist. Pay attention to your comfort as well: large bouquets will be hard to hold.
 - Most bridal bouquets have diameters ranging from 20 cm to 33 cm.
- Stock up on more colors than you need. The number of colors depends on their type. Usually fifteen to thirty flowers are required, but you should also take care of the extra supply. You can change your mind or come up with a new idea already in the process of drawing up the bouquet.
5 Cut off the stems under water. Dip the stems into a bucket or sink of water. Cut at a 45 degree angle, and about 2.5-5 cm from the end. This will allow the flowers to absorb moisture without causing bubbles to form in the stems. Before starting the bouquet process, you should store the flowers in a container of cold water. - Long stems will be much easier for you to work with. Cut them off after the work is finished.
Part 2 of 4: Creating a Round Bouquet
 1 For this shape, choose one kind of flowers. Typically a dozen roses are used.
 - 2 Remove leaves and thorns. Use pruning shears or florist scissors to remove them, or the leaves can be torn off by hand if the stem does not have thorns.
- Remove damaged or faded flowers.
- 3 Collect the center piece from the largest flowers. Choose the four largest flowers as the main ones. Arrange them evenly, intertwining the stems.
- Keep the bouquet under the buds where the stems intersect. If you go lower, curved stems can damage the buds.
- 4 Collect the main flowers. Add one at a time, starting from the center. Press the flowers as close to each other as possible, while collecting the dome of the buds.
- When the stems cross, twist them together into a spiral.
- For a small bouquet, one circle of primary flowers around the central one will suffice, especially if they are large and lush.
- 5 Expand the dome as more colors are added. If you are using additional flowers, insert them where there are gaps between the main flowers. Insert them around the edges, turning the buds outward. Try to arrange them so that the same additional flowers do not touch each other. When finished, you should have a large-flowered dome right in the center of the bouquet.
- Alternatively, you can put together a Biedermeier bouquet. It consists of circles of flowers in contrasting colors.
- 6 Trim the stems to make it easier to work with the bouquet. Cut them to the same length with a pruner or garden shears. Leave the ends slightly longer than desired (at least 24.5 cm), as we will trim them again in the final step.
- 7 Add the final touches. Try on the bouquet in your hand, adjusting the height, and make sure it looks balanced and round. Fill in any uneven areas with complementary colors.
- If you have decorations for the bouquet, you should distribute them among the flowers throughout its entire volume. You only need three or four elements to get a noticeable effect, and you shouldn't use a lot of them.
- You can use filler flowers to complement the bouquet. Insert them only between extreme flowers, and only to add accent to the edges of the bouquet.
- 8 Secure the bouquet with tape or raffia. Fix by stepping back about 2.5 cm under the buds, or as close as necessary to keep the flowers tightly together. Wrap the tape a few times around the stem, and then back down another 7.5-10 cm.
- You can use large, strong rubber bands, unless you are using flowers with delicate stems like tulips or hyacinths. Wrap the elastic around the two stems on one side and twist for a snug fit. Wrap the elastic around the base several times without inserting any stems. After tightening, add two more stems on the opposite side. Fix the first elastic at the top of the stem, and the second about 10 cm below it.
- 9 Tighten the ribbon in a bow or spiral along the length of the stem. Choose a ribbon that matches the flowers of your bouquet or your wedding dress. Cut a piece about three times the length of the stems.
- Wrap the tape around the stems along the entire length in a spiral pattern, tucking at the top and bottom. Secure with pins by sticking them into the flower stems.
- Tie a bow by cutting off a piece of ribbon and wrapping it around the stems. Be sure to cut off the ends of the floral tape, raffia, or elastic that was used to create the bouquet.
- If you want to add glamor, use pins with pearls at the ends.
- 10 Trim the stems again. The bride will hold this bouquet in front of her. Therefore, the stems should be short enough not to cling to the dress. The optimal length is 15-17.5 cm. Wipe the ends of the stems with a paper towel before handing the bouquet to the bride.
- 11 Keep the bouquet fresh. Keep it in a cool place in a container of water before the wedding. At the florist's shop, you can buy a preservative for flowers that prolongs their life. If possible, the bouquet should be transported in water.
- Store flowers in the refrigerator above 1.7 ºC, if you do not have a cool room, store flowers in the refrigerator at a temperature higher than 17 ºC. Remove all fruits from the refrigerator, as most of them give off gases that cause flowers to fade quickly.
- Low hold hairspray will help preserve your bouquet. Turn the bouquet upside down for a few minutes to allow the varnish to dry before returning the bouquet to the vase.
Part 3 of 4: Create a hand-knitted bouquet
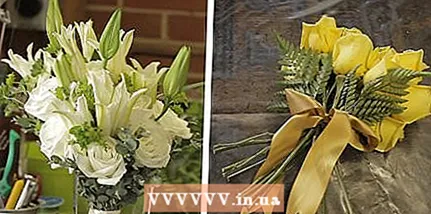
- 1 Select the flowers you plan to use. Traditional combinations include white roses, lilies and bright green foliage (eucalyptus, fern, camellia, foxtail, yarrow)
- When choosing a color combination, you should take into account any possible allergies to certain species or plants.
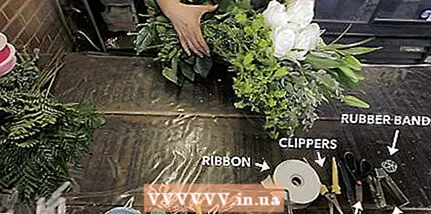 2 Collect the materials you need before starting to assemble the bouquet.
- You will need a stripper, scissors, raffia or rubber bands, pruning shears, and white tape.
- 3 Peel the flowers and leaves to collect the bouquet. Remove most of the leaves and any thorns from the stems with a stripper. Any protective petals (outer) or damaged and faded parts must be removed from the trunk.
- Leave the top leaves on the flowers if you want to add greenery to the bouquet.
- Remove the stamens from the lilies because they turn brown and stain the bride's dress.
- Trim the foliage so the bottom of the stem is completely peeled.
- 4 Collect the bouquet on your non-dominant hand. If you are right-handed, collect the bouquet with your left hand, add flowers and leaves one at a time with your right hand. The placement of flowers depends on the natural shape of the stem.
- 5 Rotate the bouquet as you add flowers. Add stems to the blank areas by interweaving them in a spiral shape.
- 6 Adjust the position of the flowers by rotating the bouquet. Make sure they are at a comfortable angle and not too far off center. Add filler throughout the bouquet to complete the composition and define the borders.
- 7 Cut off about 15 cm. stem. This will make it easier for you to further work with the bouquet.
- 8 Secure the bouquet. Wrap the stems in raffia or rubber bands as a temporary attachment.
- 9 Wrap the ribbon around the bouquet and remove the raffia or elastic after wrapping the ribbon twice around the base of the bouquet. Use 3.6 to 5.5 meters of ribbon, depending on the width of the bouquet. Tie the end of the ribbon into a knot or bow.
- 10 Cut off the remaining stems and place the bouquet in water to keep it fresh! Trim the stems evenly about 2.5 cm below the ribbon.
Part 4 of 4: Creating other types of bouquets
 1 Make a presentation bouquet. These bouquets have long stems topped with a long strip of flowers. Such a bouquet is attached with a base, on one hand. This construction is easy to make, but it can tire you out during a lengthy ceremony.
  2 Use a bouquet holder. In addition to its decorative value, it will also give moisture to your flowers. Wet the base of the holder before placing the flower stems inside, and the flowers will have water to "drink" throughout the wedding.
 - The term "nosegay" refers to a small round bouquet located inside a holder or decorative "tussy mussy". This can also apply to small, lush bouquets of greenery and herbs.
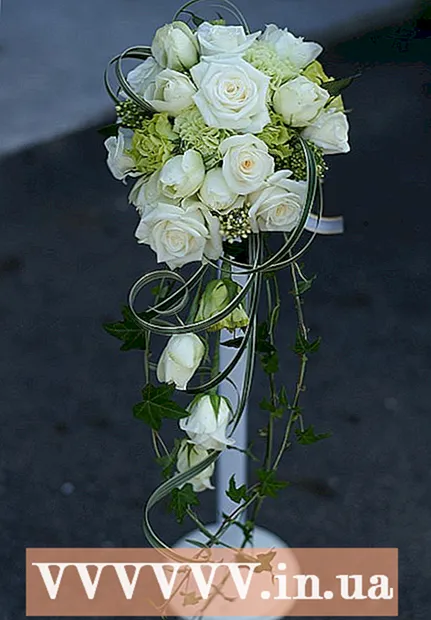 3 Build a cascading bouquet. This is most likely the most complex bouquet, because it can easily turn out to be one-sided, or vice versa, suppress the rest of the decor. Start with a special tilted bouquet holder. Arrange the flowers so they don't fall out of the holder. Spread the longer flowers in front of the bouquet and fill the space in front of the owner with larger flowers.
What do you need
- 15-30 flowers with strong stems
- 10+ additional colors (optional)
- Decorations for bouquets (optional)
- Stalk pruner
- Bucket
- Elastic bands (2 per bouquet) or flower ribbon
- Paper towels
- Wide tape
- Safety pins
Tips
- Collect your bouquet in front of a mirror to have a better idea of what it will look like.
- Consider adding embellishments to your bouquet. Buy jewelry if you want to make it more interesting without adding color. These are usually silver or pearl pins and brooches that are inserted into the bouquet using a long wire.
- If you are using roses with unopened buds, soak the stems in hot water for a couple of minutes to allow the flower to open. Do not leave for longer, otherwise they will quickly fade.
- Add flowers from your own garden to the bouquet.
Warnings
- Very large bouquets or bouquets with sharp or heavy embellishments are not suitable for throwing. Make a second, smaller bouquet for this purpose.


