Author:
John Stephens
Date Of Creation:
2 January 2021
Update Date:
1 July 2024
Content
To put it simply, a hexagon is any polygon with six sides, but a common hexagon usually has six sides and six equal corners. Take a look at the image of the hexagons for a better idea of what you are drawing. If necessary, consider only the hexagons available. Use a ruler and protractor to draw an even hexagon. Try using a circular object and a ruler to make the hexagons less accurate. If accuracy is not the most important thing, feel free to sketch a simple hexagon with just your pencil and intuition.
Steps
Method 1 of 3: Use a compass to draw an even hexagon
Use the compass to draw a circle. Plug a pencil into the compass. Extend the compass leg a suitable distance to get the radius of the circle. The radius can be only a few centimeters long. Next, place the pointed end of the compass on the paper and rotate the compass until you create a circle.
- Sometimes it is easier to draw half a circle in one direction and rotate in the opposite direction to draw the other half.
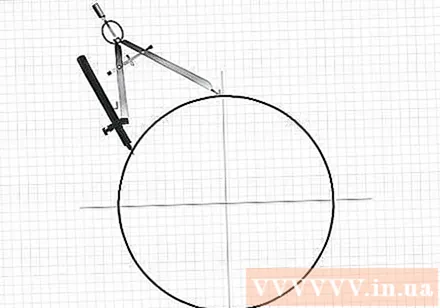
Move the compass point towards the circle edge. Place the sharp end of the compass on the top of the circle. Do not change the angle or setting of the compass.
Use the pencil holder to draw a small mark on the edge of the circle. Mark them well, but don't be too bold - you'll erase them later. Remember to keep the angle you set for the compass from the beginning.

Move the sharp end of the compass to the marker. Place the pointed tip over the marked point
Use the pencil to make another mark on the edge of the circle. This is the second marker position one paragraph from the first point. If you are moving clockwise or vice versa continue like that.

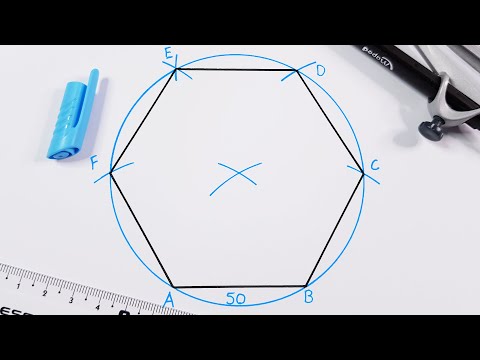
Mark the remaining four points in the same manner. You will end up in the first marked position. Otherwise, the angle of the compass has changed while you were measuring due to too tight pressure or a slight loosening.
Use a ruler to connect points. The six positions marked on the edge of the circle are the six vertices of the hexagon. Use a ruler and pencil to draw lines connecting adjacent points.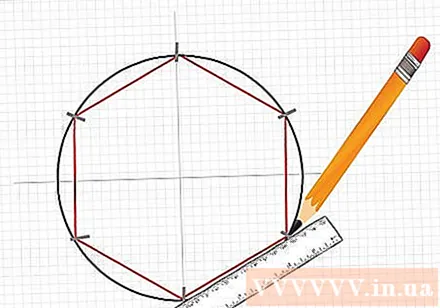
Erase unnecessary lines. These lines include the original circle, the marks on the edge of the circle, and any marks you make while you draw. After erasing all the unnecessary lines, you are done with the hexagon. advertisement
Method 2 of 3: Draw a hexagon using a circle object and a ruler
Use a pencil to line the circular edge of the glass. You will create a circle. You will need to use a pencil as you will later erase the marks you create. You can also follow the edge of an upside-down cup, jar or food jar, or anything else round.
Draw a horizontal line through the center of the circle. You can use a ruler, a book, or anything with a straight edge to do this. If you have a ruler, you can find the midpoint by measuring the length of the circle and dividing the horizontal line in half.
Draw an X on the split circle to divide the circle into 6 equal parts. Since you already have a line running through the center of the circle, the X will have a greater height than the width to divide the circle into equal parts. Think of it as simple as slicing a pizza into 6 equal parts.
Turn each of the six sections into a triangle. To do this, simply use the ruler to draw a line below the arc of each section, connecting the other two lines to create a triangle. Repeat this process six times. You can think of this as creating a "border" around pizza slices.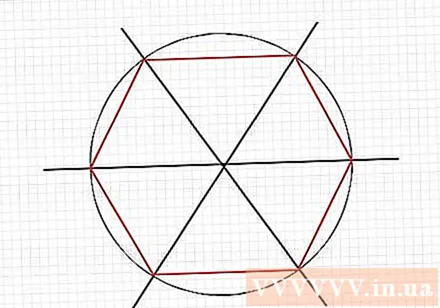
Erase unnecessary lines. These include the lines of the original circle, the three lines that divide the circle into six parts, and any marks you make in the process. advertisement
Method 3 of 3: Draw a hexagon using only a pencil
- Draw a horizontal line. To draw a horizontal line without using a ruler, mark the beginning and end of the horizontal line. Then place the pencil at the starting point and keep your eyes on the end point while drawing the line towards that point. This line can be only a few centimeters long.
- Draw two diagonal lines from the ends of the horizontal segment. The diagonal on the left side opens to the left and the diagonal on the right opens to the right. You can imagine each of these lines at an angle of 120 degrees to the horizontal line.
- Draw two more diagonal lines inward from the end points of the previous two diagonal lines. They are like creating a mirror image of the other two diagonal lines. The diagonal in the lower left looks like the reflection of the diagonal in the upper left, and the diagonal in the lower right looks like the diagonal reflection in the upper right. While the diagonal lines above extend out from the horizontal line above, the diagonal lines at the bottom pointing inward towards the void will draw the bottom of the hexagon.
- Draw a horizontal line connecting the two diagonal lines below. You will create the bottom of the hexagon. Ideally, this line would be parallel to the horizontal line above. Now you are done with the hexagon. advertisement
Advice
- To measure accurately, you should double-check the magnitude of the hexagonal corners.
- The pencil tip of the compass should be sharpened to minimize errors caused by the markings being too large.
- Make sure you draw a translucent circle that can be easily erased.
- If you use the method of compass drawing, when you connect points that are spaced instead of all six points, you get an equilateral triangle.
Warning
- Com-pa is a sharp tool, use with care to avoid injury.
Why is this method effective?
- When constructing an equilateral hexagon, the methods have to create 6 equilateral triangles with sides equal to the radius of the circle. The six radius segments drawn are of the same length and the six sides of the hexagon are the same length as the radius because the width of the compass does not change. Since the six triangles are equilateral triangles, the angles between the vertices are 60 °.
What you need
- Paper
- Pencil
- Ruler
- Compass
- One object is placed under the paper to prevent sliding of the suitcase
- Eraser
- Protractors


