Author:
Peter Berry
Date Of Creation:
17 February 2021
Update Date:
1 July 2024

Content
Eyelash curlers can damage or lose eyelashes, so accumulate new tips for curling lashes. You don't need to use eyelash curlers to get curled lashes for a long time. Try a spoon, mascara, or use an all-natural aloe vera gel. Either way, applying heat will help curl your lashes for longer.
Steps
Method 1 of 4: Curl lashes with a spoon
Use a clean spoon. Better yet, use a teaspoon, not the larger one. Make sure the spoon fits the eye so that the curvature of the spoon matches the curvature of the eyelids.

Place the spoon in hot water. The metal heating transfers heat to the lashes and helps curl them. This is like an iron on your lashes. Dry the spoon dry after heating.
Place the spoon on the eyelids. Place the spoon horizontally and gently press against the eyelids. Place the outer side of the spoon against the eyelids, the inside facing out. Align the edge of the spoon with the upper lashes.
Apply lashes to the curves of the spoon. Use your fingers to gently press the lashes against the edge and inside of the spoon. Hold for 30 seconds.- Check the curvature just created. If you want more curl, repeat the above procedure and hold for 30 seconds. You can also apply this to your lower lashes.
- Repeat with the other eye. You need to heat the spoon one more time.
Use mascara to fix curvature. Using transparent or black mascara will stabilize the curl throughout the day.
Carefully smooth your lashes while the mascara is still wet. Use a eyelash brush to separate and secure your lashes. Do not brush too much, this will reduce curvature of the eyelashes.
Finish. advertisement
Method 2 of 4: Use a cotton swab and mascara
Apply mascara as you normally would. Combing one or two layers is up to your preference. Don't wait for the mascara to dry, continue with the step below while your lashes are still wet; This helps the curvature stay longer.
Use the body of a cotton swab to push your lashes up. Holding the cotton swab horizontally across the eyes, push and hold the lashes firmly upwards. You can also use a nail file or a long thin tool to sharpen your lashes.
Hold the position for at least 30 seconds. During this time, the mascara will dry out and help keep the lashes in their curled shape.
Fix the curl with a hairdryer. Use warm temperatures and keep the dryer at least 15 cm away from your face. Turn on the dryer on the lightest setting and dry the mascara to fix the curl longer.
- Do not turn on the dryer in too hot mode. The hot air will hurt your eyes.
- If you're satisfied with the results after the mascara dries, you probably won't need a dryer.
Repeat the above steps for the lower eyelid and the other eye. Be patient with the cotton swab in place. Do not release until mascara is completely dry and curvature is fixed. advertisement
Method 3 of 4: Use fingers
Start working without mascara. Make sure your lashes are clean to keep them from smudging.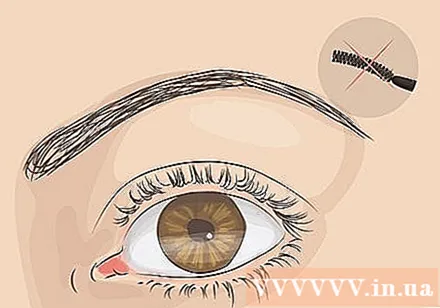
Warm up your fingers. You can soak your fingers in warm water for about 1 minute or rub your fingers together to create heat.
Push your lashes upwards. Use your index finger to push the eyelash close to the upper eyelid. Hold the position for at least 30 seconds. Repeat the above procedure for the lower eyelid and other eye.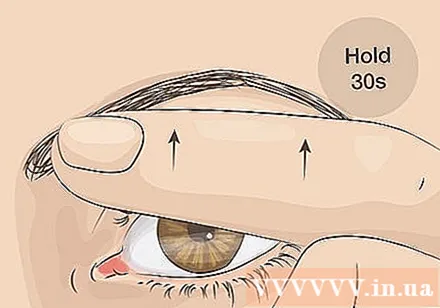
Apply 2 coats of mascara to keep curvature. Carefully brush your eyelashes inside and out, from base to tip. Be gentle so as not to straighten lashes. advertisement
Method 4 of 4: Fix the curvature with aloe gel
Use your middle finger to take a small amount of aloe vera gel. Use your thumb to gently rub the middle finger to help blend and warm the aloe vera gel.
Apply aloe vera gel to your eyelashes. Hold your thumb under your lashes and gently close your eyes. Hold your lashes firmly and gently brush them with your fingers. Repeat this several times to make sure that the gel has completely adhered to your lashes.
Push your lashes upwards for curvature. Place your index fingers horizontally below the lashes and push them up against the eye. Hold the position for at least 30 seconds until the aloe vera gel dries. Repeat for lower lids and other eye.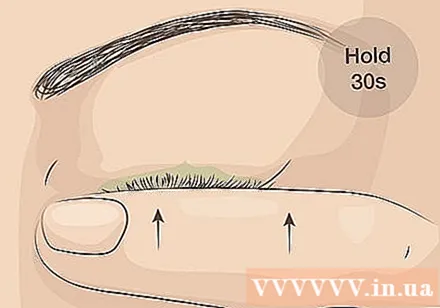
- The curl will stay longer if you hold the lashes in place and then gently dry them in one turn. Use the light drying mode, do not turn on too hot.
- Once the gel has dried, you can use more mascara if you want.
Advice
- Do not overdo eyelash heating; This will be dangerous to your eyes.
- Do not use a hair dryer to heat the metal because there is a risk of burns.
- Brushing the eyelashes on the back of the eye more than anywhere else creates the "angel wings" effect.
- You can also use your hands to curl your lashes. The hands are usually warmer than the fingertips, but not as meticulous.
- Try not to get the aloe vera gel in your eyes to avoid damaging your eyes.
- If you are using your fingers to curl your lashes, make sure your hands are well washed before doing it.
- Make sure your fingers, spoon or mascara do not touch your eyes to avoid eye damage.
- You can also use Vaseline and remember not to use too much; otherwise, the substance will get into the eyes and affect vision. Use the same way you would for aloe vera gel.
- When applying mascara, be careful not to get the grooming tip of the eye and smudge the eyelashes.
Warning
- Always wash hands thoroughly before contacting eye parts. Bacteria can invade and lead to inflammation.


