Author:
Robert Simon
Date Of Creation:
20 June 2021
Update Date:
1 July 2024

Content
There are several reasons why you might want to get rid of pictures or print on clothes. Maybe you like the item, but don't like the picture on it. The print may be old and may not look as good as before, so you may want to remove it or replace it with another one. Whatever the reason, with an iron and a household solvent, you will be able to remove ordinary printed materials like vinyl or rubber.
Steps
Method 1 of 2: Remove prints with an iron
Lay your clothes on a flat surface. Laying the item on a flat surface can be safe. An iron table or table top is best.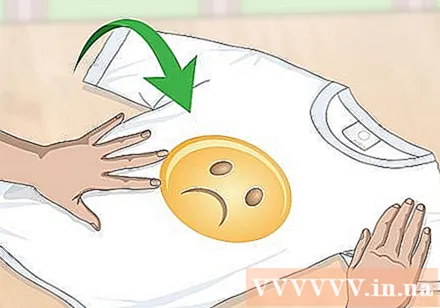
- You can lay it under the floor to see if there is no other surface. Just be careful with the hot iron when the floor is carpeted.
- This method is effective for vinyl or rubber prints that are printed onto clothing by the heat transfer method.

Place a dry towel inside the item below the print. Fold the towel so that it fits inside the item and under the print you want to erase. The towel will protect the other side of the fabric when it is hot.- If you don't have a dry towel on hand, you can also use an old t-shirt or anything that is soft and doesn't easily damage by heat.
Spread a wet cloth over the print. Soak a handkerchief or clean cloth in cold water. Drain the water from the dripping and spread the cloth over the print.- Wet cloth will provide a protective layer between the iron and the imprint from sticking when the print flows.
Place the iron on the wet cloth spread over the print. Press the hot iron on the first part of the print. Use your hand to gently press to make sure the heat reaches the print.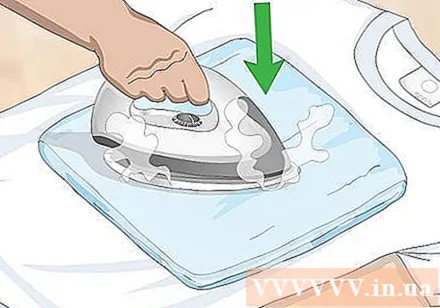
- If you are using a heavyweight old style iron, simply place the iron over the print.

Lift the iron out when the wet cloth on the print is dry. Hear the water sizzling and evaporating on the cloth under the iron. When you don't hear the sizzling sound, the fabric is dry. Lift the iron and set it aside when part of the cloth is dry.- If you leave the iron on too long after it has dried, it may burn.
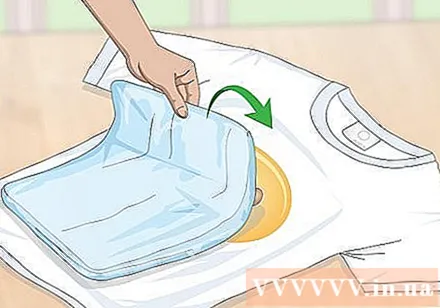
Use a razor to stretch the shape. Carefully scrape the print out with the sharp edge of the knife. Shave while using your hand to remove the printed image.
- Be sure to shave carefully away from your body to avoid injury.
- Try to only loosen the edges of the print with your knife, then remove as much as possible with your hand to avoid damaging the fabric underneath the blade.
Repeat the above process until all prints are removed. Soak the cloth again if it dries up after you peel off the first part of the print. Press the iron on the wet cloth spread over the rest of the print, then scrape and peel off until you are satisfied with the result.
- You may need to do this more than once on the fabric sections, depending on the adhesion of the printed image.
Method 2 of 2: Remove print image with solvent
Find a solvent like rubbing alcohol, nail polish remover, or glue remover. These are common solvents that you can find indoors or in convenience stores. Buy a bottle of enough solution to wet the entire print area you want to remove.
- You can also find a vinyl image remover that is specifically used to remove vinyl pictures or text from clothing.
- Solvents only work to remove vinyl and rubber prints on clothing. Silk-screen ink is permanent on fabric.
Pre-test the solvent in a hidden spot on the garment to see if the fabric is damaged. Turn your clothes around or find a spot that is hard to see when you put them on. Apply 1-2 drops of the solvent you are going to use over the hidden area and wait to see if the fabric discoloration or damage.
- If the fabric looks fine after testing the solvent then it is safe to use. If not, find another solvent to avoid damaging the clothes.
- Do not use solvents on delicate fabrics such as rayon, wool, or silk.
Turn the garment left so that the back of the print is facing up. You need to wet the fabric from behind the print to peel it off from the front. Spread the left side of the object onto the flat surface in front of you.
- The easiest way is probably standing or sitting by the table when you remove the print.
Pour solvent over the part of the print to be removed. Pour enough solvent to wet the entire back of the fabric behind the print you want to remove. Wear a mask if solvent vapor makes you uncomfortable.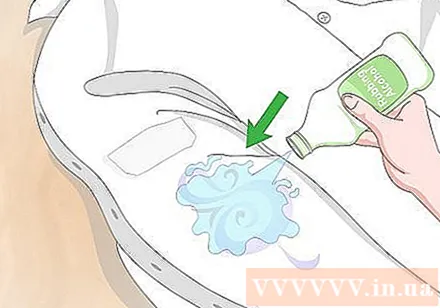
- Make sure the surface you are working on is easy to clean if the solvent is accidentally spilled.
- Stretch the fabric so that the solvent can fully soak into the fabric and make the image removal process easier, but remember not to stretch it too much, lest the clothes become damaged or deformed.
Turn clothes over and peel or scrape off the print. Turn the item over so the print is facing up. Try to remove the print with your hand or use the sharp edge of the knife to scrape it.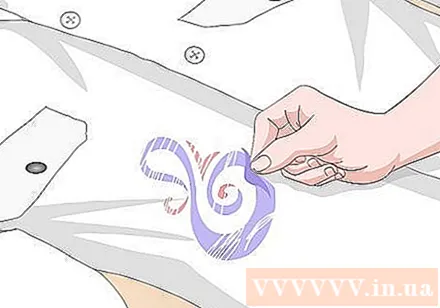
- Be careful when using a knife and always shave away from your body.
- You can use latex natural rubber gloves if you don't want the solvent to get on your hands.
Repeat the above process until you have peeled off the print. Try to peel and shave as much as possible. Turn the garment over again and pour in more solvent when you can't peel any more, then try to peel off and scrape the rest of the print clean completely.
- If you cannot remove the entire print with solvent, you can try using the heat of the iron to loosen the print.
Wash clothes as usual for solvent cleaning. Follow the directions on the item's label for safety. This will remove the smells of any harsh chemicals on your clothes, and you're ready to go!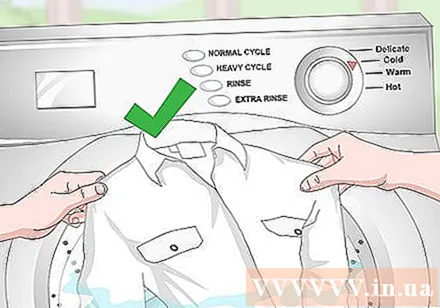
- If there are residual adhesive traces from the print after washing the clothes, try using an adhesive remover to remove the adhesive.


