Basic way to Tet hair

Author: Lewis Jackson
Date Of Creation: 12 May 2021
Update Date: 1 July 2024
Anonim
Basic Haircare Guide for Growing Healthy, Strong, Beautiful Hair (with scientific citations)
Video: Basic Haircare Guide for Growing Healthy, Strong, Beautiful Hair (with scientific citations)

Content

  • Curl the left curl over the new middle lock. The left curl will now move to the center and the middle curl will move to the left.
  • Continue braiding the right and left hair alternately. Make sure to always squeeze the outer part of the hair above the middle part, alternating with the left and right hair sections, until the ends of the hair are a few inches away.
    • Be sure to pull your hand tightly so that the braid doesn't loosen. If the braid is too loose, the hair will fall out. After the braid is tied, you can use your hand to squeeze it to loosen the braid.
    • While plaiting while using your fingers, the braids will be smoother and more succinct.

  • Comb your hair and remove any tangles. Before you start, brush your hair to keep it straight and smooth. You can apply a flick of oil or a more straight hair conditioner.
  • Divide the hair on the back of the head into an upper and a lower part. Begin to gather hair from about above the brow. You will start braiding this part first
  • Divide the curl into three equal parts. Smoothly smooth the split sections for a neat braid. The right hand holds the hair on the right, the left hand holds the left hair.
    • You can use a hairpin to keep the parts separate.

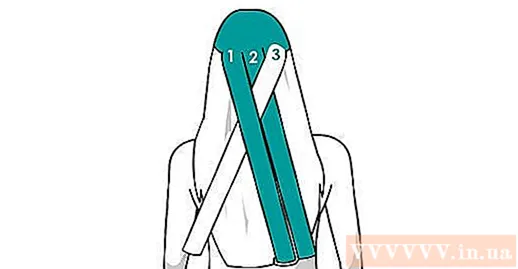
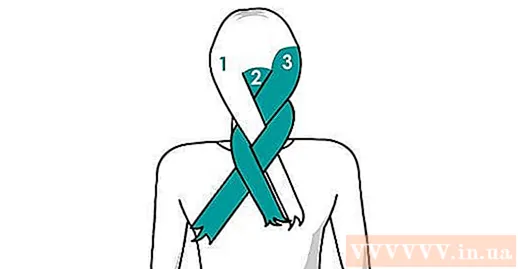
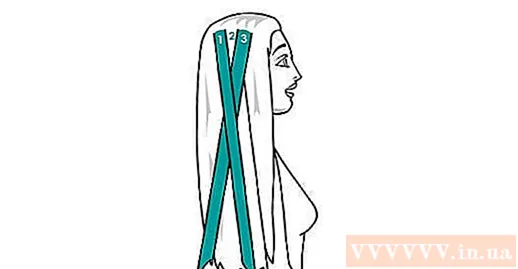
  • Start with the basic braiding. Curl the right side of hair over the middle part, this time the right side will be in the middle. Next, squeeze the left hair over the middle part. You will only use the basic braiding method up to this step.
    • If you want to braid Dutch or reverse French, you will add the right / left side down the hair in the middle instead of going up. This will make the braids look "fancy".
  • Add a small curl to the right part of the hair. Take a strand of hair about 1.3 to 2.5 cm wide from the hair and merge it into one with the hair on the right side.

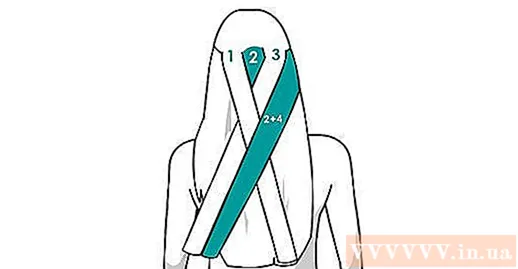
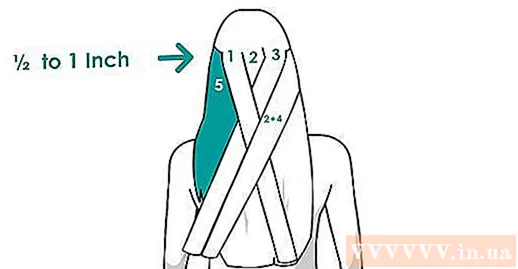
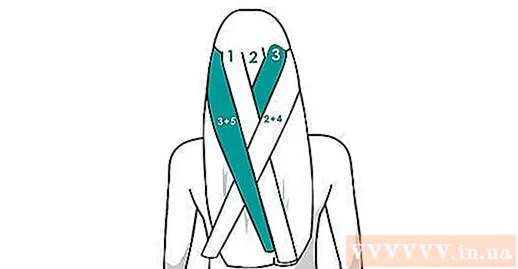
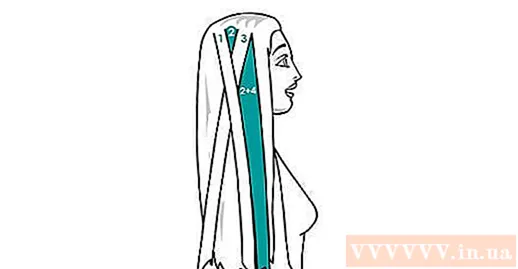
  • Squeeze the right side of hair - now thicker, over the middle part. The hair on the right will be part of the hair in the middle, the middle part will be out.
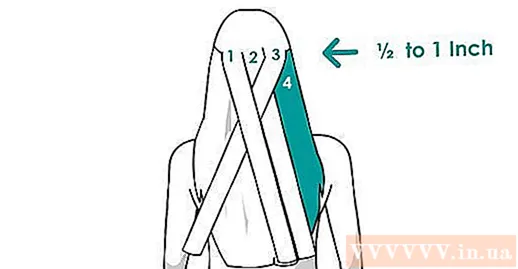
    • If you braid Dutch or reverse French hairstyles, you will add the right hair down the hair in the middle instead of going up.
  • Add a small curl to the left part of the hair. Take a strand of hair about 1.3 to 2.5 cm wide from the hair, merging it into one with the hair on the left side.
  • Squeeze the left side - now thicker, over the middle part. The left part of the hair will be part of the hair in the middle, the middle part will be on the outside.
    • If you braid Dutch or reverse French hairstyles, you will add the left side down the hair in the middle instead of going up.
  • Continue the French Tet holiday until the back of the neck. You will continuously add small curls to the right and left hair sections before moving them up / down the middle section.
    • Smooth parts of hair after each squeeze in between to smooth and neat braids.
    • Try to tighten hands.
  • Choose how the braid ends. When braided to the nape, you can tie the French / Dutch braid with a hair tie or continue braiding the basic style.
    • If the Tet holiday continues, continue to plait hands. Once tied, you can untangle the curls so that the braids look looser.
  • Take a small lock of hair close to the turn line. To braid your hair braids as thin as a headband around your head, you will use a strand of hair about 2.5 cm wide. If braiding thick braids in a boho style, use a 5 cm wide lock.
  • Divide the curl into three equal parts. One hand holds the outer two curls, the other holds the curl in the middle.
  • Start with the basic Tet style. Take the part of the hair closest to the hairline and squeeze it over the middle part. Then, squeeze the remaining outer hair onto the new middle hair. After this step, you will start Tet in French style.
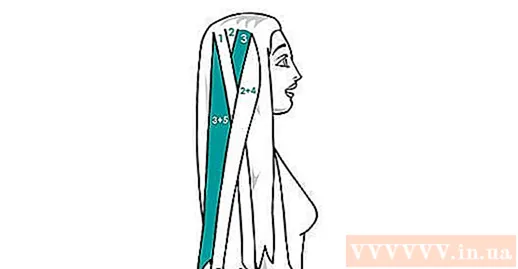
    • This will give you a smooth French braid.If you want a Dutch or reverse French style, put your hair on the outside down the hair in the middle instead of the top.
  • Add a small curl to the part of the hair closest to the rim. You will take a strand of hair from the braid, thicker or thinner than the braided section and merge it into one. The braided part is now thicker.
  • Squeeze the outlines over the middle section. This hair section will form the new middle hair. If you braid the Dutch or the reverse French style, you will include the outer hair down the middle part of the hair.
  • Add a thin curl to the inner hair. You will take a curl that is inward, thicker or thinner than the part of your knitting hair, and combine them into one. The hair that is now thicker.
  • Squeeze the inner hair over the new middle section. This hair becomes the middle part of the hair again. If you have a Dutch braid or a reverse French style, you will add the outer hair down the middle part of the hair.
  • Choose how the braid ends. If the braids are thin and elegant, you can end up just above the ears, ending up like a basic braid and tied with a hair tie. If you have a thicker boho bra, you can continue with the French braid so that the braid will wrap around your head. The next step will guide you in more detail.
  • Stop braiding when the braid is about 2.5 cm from the nape of the neck. Start the French class, going from the back of the head to the other side of the neck. At this point you can use a hair tie to tie the braid. You can also continue braiding the base style and tie the braid about 2.5 to 5 cm from the tail.
  • Choose accessories to decorate the ends of the braids after tying them. Decorative accessories not only help hide the hair ties, but also make the braids look more attractive. You can refer to the following points:
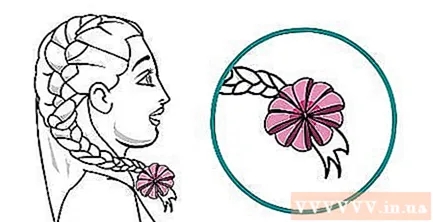
    • Apply silk flowers to braids in boho style, the bigger the flower, the more beautiful.
    • Braids the ponytail and clip it in place with a toothpick, then you can put in the bun a gorgeous sash.
    • If you braid a side braid, you can tie the end of it with a strap and release the rest for a wild boho look.
    advertisement
  • Advice

    • If you have short hair, you can make your braids look longer by tying a long, soft ribbon at the end of the braid.
    • If you have long, thick, and curly hair, your braids will look nice and curled. If you have a lot of short curls around your face, you can straighten them for a more strange style.
    • Braids will last longer if the hair is slightly dirty and unwashed. For the best braids, don't wash your hair before braiding. The natural amount of oil in the hair will help the braid to flow into the smooth.
    • If the hair is very smooth and slippery, the braids will quickly slip off. You can use foam glue to style your hair before braiding.
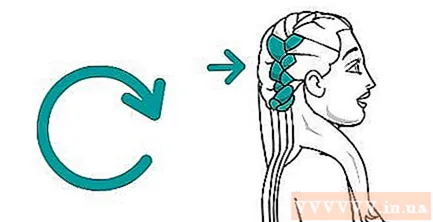
    • Hair Tet also requires practice. Don't be discouraged if your first braid doesn't look very good.
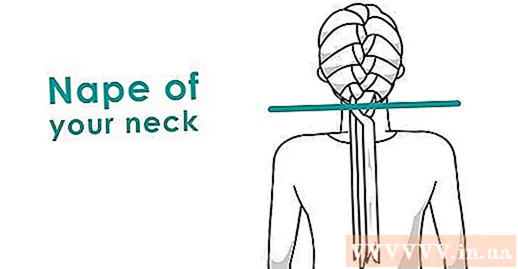
    • You should use two mirrors, one in the front and the other in the back, so you will see the back of your head when braiding.
    • Once you have mastered the basic hairstyle, you can challenge yourself with French or Dutch braids - simply the upside down French style '. You can also learn how to braid four.
    • If possible, practice braiding your friend's hair.
    • Watch more braids videos (such as MakeUpWearables YouTube channel or challenge yourself with more complex styles on other channels)
    • Practice braiding with both thick hair and thin hair.