Author:
John Stephens
Date Of Creation:
28 January 2021
Update Date:
1 July 2024

Content
Are you getting bored of going to the pet store to buy crickets every week to feed your scaly, hairy, and zigzag friends? If you are a do-it-yourself person, you may be interested in raising the cricket yourself. You will have a stable supply of crickets without spending money at home, so convenient, right?
Steps
Part 1 of 3: Prepare
Buy multiple crates or large boxes. You will need to keep the crickets in a box or box. The easiest way is to use two boxes, one for growing crickets, and the other for growing growing ones. Determine how many crickets to keep and buy one (or more) boxes of the right size.
- Make sure the cricket box is large enough for the whole flock of crickets. One big mistake that cell phone owners make is not buying a large enough box. When raised in too narrow a space, the crickets can eat each other, resulting in a less supply of crickets, and you probably wouldn't want this. Remember to buy the box large enough!
- Buy a clear plastic household container with a sturdy lid to keep your cricket inside. Plastic boxes with high walls are a good choice. The 53-liter box can accommodate a cricket nest of over 500 with enough cardboard boxes or egg packs for the crickets to climb. The smooth surface of the plastic box will help reduce the number of crickets escaping.
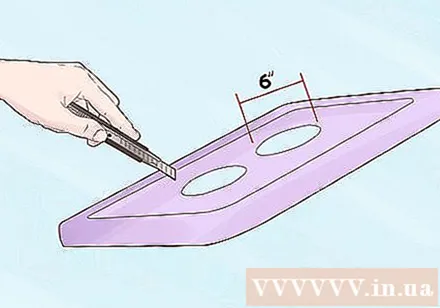
Create some ventilation in the box. Cut one or two holes about 15 cm in diameter on the lid to allow air to circulate. Put the mosquito net on top to keep the crickets from crawling out, as they are capable of gnawing the plastic net. You can also use a hot glue gun to fix the net. If you want more control over the temperature, you can experiment with a variety of exhaust vents.
Line the bottom of the box with a layer of vermiculite. Spread a layer of vermiculite on the bottom of the plastic container. This way, the crickets will have a substrate to crawl and the cricket box will be kept dry to prevent bacteria and reduce odors. Especially for crowded cricket nests, the vermiculite layer has to be changed every 1-6 months, so buy a little more.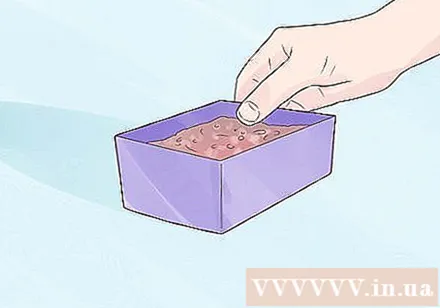
Place a plastic container of moist, loose topsoil into the cricket housing. The female cricket needs this earth box to spawn. The box should only be slightly higher than the vermiculite so that the crickets can get in easily. Make sure the topsoil is free of fertilizers and pesticides.- You can place the net on the ground to prevent the crickets from digging or eating eggs. Females can lay eggs through the net by means of their spawning parts (spawning troughs).
Buy 50 or more crickets. Make sure there are enough crickets for your pet to eat and 30-50 more for breeding. It's important to have both male and female crickets, but a larger number is fine.
- The female cricket has three long needles on the back of the tail, and the main needle (called a spawning tray) is used to lay eggs on the ground. The female cricket wing grows to its full length.
- Male crickets have only two needles behind the tail. The short wings and not fully grown help create the familiar sound of crickets that we often hear at night.
Part 2 of 3: Starting the process of raising crickets
Establish crickets nests and feed them. Put all of the crickets into the prepared cricket box. Place a shallow dish of cricket food or something else in the box (good dry cat food is fine), a little away from the dirt box.
- You can add fruit, sliced potatoes, green vegetables and other vegetables to crickets to supplement their diet. Be sure to remove any leftovers before they become moldy or rotten.
- Other foods that can be eaten by crickets include freshwater fish pellets, rabbit food (alfalfa pellets) or any other high protein food.
- Try to mix different types of cricket foods to enjoy. If a cricket is healthy, your pet will be healthy. Try to supplement dry foods with pieces of fruits and vegetables plus green vegetables like lettuce. This ensures that the crickets will become a nutritious snack for your pet.
Remember to provide enough water for the crickets. Crickets need a close and constant supply of water to stay alive and healthy. You just watch the crickets rise when you mist the cricket box and you will see. Here are a few ways that cricket owners have invented to make crickets comfortable and hydrated:
- Use a reptile drinking trough with an upside-down water bottle attached, and put a foam inside the trough. The sponge will prevent water from flooding the inside of the box.
- Cut the core of the toilet paper roll vertically and then unfold it into a rectangle. Use paper that has a good absorbency, such as a tissue, wrap it around a piece of paper and stand it up at a corner to form a "fortress".
- A water gel dish (also sold as a soil substitute, such as "polyacrylamide") or a flavorless jelly is also a great source of water.
Warm the crickets. To stimulate crickets to reproduce and incubate eggs, you need to keep them warm. You can heat your cricket using a variety of methods such as a reptile heater, a heating pad, or a light bulb. A room fireplace can also provide heat for the crickets and incubate them.
- In mating, male crickets only nape when the temperature is between 13-38 degrees Celsius. The crickets grow best at 27-32 degrees Celsius.
Spend time for crickets to breed. With enough food, water and heating, generally well cared for, crickets will thrive. Wait about two weeks for the crickets to mate and lay eggs. The crickets will dig into the ground about 2.5 cm below the topsoil to lay eggs. After two weeks, the topsoil will be filled with an oblong cricket egg that is about the size of a grain of rice. Remove these clay boxes and put them in the incubator.
- While you wait for the crickets to lay eggs, make sure to keep the moisture in the soil. Once dry, crickets will spoil and become useless. You can pour water into a spray bottle and spray it with mist from time to time to make sure the heat doesn't dry out the soil.
Part 3 of 3: Complete the spawning process of crickets
Hatch. Crickets eggs need to be incubated with heat until hatched. You need to put the box of crickets eggs in a larger container with a tight lid and put in a place where the temperature is 29-32 degrees Celsius. After about two weeks (it will take longer if the temperature is lower), the baby crickets Small the size of a grain of sand will bloom hundreds of animals a day.
Collect the baby crickets and place them in the cricket box. You need to provide adequate food and water so that the pin-tip juveniles grow until they reach the right size to return to the main cricket box - this usually takes 7-10 days .
- Be sure to moisten the baby cricket box regularly to make sure it has enough water.
- Consider placing the baby cricket box on a heating pad at 27-32 degrees Celsius.
Repeat the process of raising crickets. Continue with the above steps with new crickets to produce hundreds to thousands of crickets, and you will have an abundance of supplies for your pets, maybe even your friends' pets. Soon, you will become an experienced mobile phone user! If crickets die, you should pay special attention to the following factors:
- The space is too tight. Crickets need a lot of space to live and breed. If the crickets get too crowded, they will start eating each other to eliminate the competition in the ecosystem.
- Insufficient / excess water. They may need more water than you think - misting and adding water to your trough every two days is extremely important. However, do not drowned my crickets. Regular misting and adding water are enough to keep the moisture in the cricket box.
- Not warm enough. Crickets like to live and reproduce in high temperature environments. You should try to maintain the optimum temperature in a cricket box between 27 and 32 degrees Celsius.
Advice
- Get rid of dead crickets - the crickets will eat the dead ones and spread the bacteria, ultimately damaging the whole nest.
- If you lack food and water for crickets, you can replace both with a slice of potato.
- A strip of tape stuck inside the cricket box can prevent the crickets from escaping because the slippery tape prevents them from crawling.
- Change the sponge in the dish every two weeks or when it becomes dirty to prevent bacteria from growing in the water.
- Learn more about the diet and care of crickets. This will help you take better care of the cricket and succeed in raising it.
- The foam tape used to seal the door slot can be used to seal the lid of the cricket box, preventing the cricket from escaping.
- Every 6 months, you should buy a new batch of crickets to start the process of raising crickets again. This will help reduce problems that may arise from blood co-production. This is also a good opportunity to replace the new layer of vermiculite.
- The crickets breathe through the skin, so they won't be able to breathe without space.
- Crickets eggs will hatch in about 7-13 days. The optimal temperature for this process is about 29 degrees Celsius.
- Feed crickets with oranges to supplement vitamin C.
- If you want to take a handful of crickets out of the box, you can use the tissue rolls up against the box, then remove and shake the cricket to fall into the pet's cage or move to where you want.
- If you have a cricket for a pet that needs a lot of calcium (for example, a gecko, which needs calcium powder), you can give it a calcium-rich food like spinach or cheese. These foods also address vitamin deficiency concerns. Cricket foods will also make a difference to your pet.
Warning
- Watch out for pests that attack crickets like mold, ticks, flies, and bacteria. You need to take preventive measures and eliminate pests to keep crickets healthy.
- Do not keep the humidity too high. You need to place plates of water for crickets, but try to keep the humidity low to reduce mortality, mold, ticks and flies.
- Male crickets can make a lot of noise when they crow.Consider leaving them somewhere so that they won't be disturbed by the crowing of the crickets.
- 50 breeders can produce more than 2000 baby crickets during the breeding cycle. You will probably have more crickets than you planned and don't know what to do with them.
- If you have a cat, this shouldn't be a problem. Cats love to hunt and / or eat crickets! Unless a cat eats crickets, there is no harm in eating the crickets.
- Use only topsoil free of fertilizers and pesticides to ensure crickets and eggs are free from poisoning.
- When hatched, baby crickets are only the size of a grain of sand. Pay attention not to let them get out of the box. (They are incapable of crawling into glass or clear plastic boxes.)
- Somehow, some crickets got out. If you don't like letting the crickets run around your house, you can set up the cricket trap.


