Author:
Louise Ward
Date Of Creation:
8 February 2021
Update Date:
1 July 2024

Content
Decorating a cement wall is complicated if you don't have the right tools. Fortunately, there are a few good practices that do not require expensive, hard-to-find tools. Choose a wall hook that withstands 8 pounds (3.6 kg) for hanging light items, a 25 pound (11 kg) staple wall hook for hanging decorations over 25 pound (11 kg).
Steps
Method 1 of 3: Attach a wall hook
Choose a wall hook to hang objects weighing up to 8 pounds (3.6 kg). Since the back of the hook has super glue, there's no need to punch the wall. First, weigh the item to choose the right hook.
- Wall hook products vary in size and indicate the maximum weight that can be held. The largest wall hook can withstand forces up to 8 pounds (3.6 kg), while the smallest can withstand only 1 pound (0.45 kg) suspension.
- Use 2 hooks at the same time if the item is wired or has a hook on the back attached.

Clean the wall with alcohol to make the hook stick more firmly. Dip a clean rag or paper towel in the rubbing alcohol solution and wipe away any dirt, old mortar left on the wall. This helps the hook stick to the wall.- If you don't have rubbing alcohol, try cleaning the wall with warm soapy water. Please dry the cleaned area.

Use a pencil to mark the point where you want to attach the hook. If the object has steel wire in the back, pay attention to the length of the slack section. Check by stretching the middle point of the string towards the top of the object. Measure the distance from the bottom of the object to where the midpoint of the wire reaches when fully stretched.- If you plan to hang an object that has two hooks on the back attached to two wall hooks, be sure to measure the distance between the two hooks to mark the wall.
- If you hang an object with wire to two wall hooks, measure the width of the object and divide it by 3. You should have the two wall hooks separated by the result of the division just now.
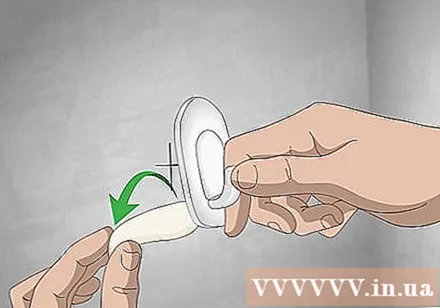
Separate the double-sided tape from the tape protector and attach it to the back of the hook. If there is no adhesive behind the wall hook, peel off the protector from one side of the tape. Stick the side of the tape behind the wall hook and clasp it with your hands.- Some wall hooks have an adhesive layer on the back. If you have such a hook, skip this step and move on to the next.
Press firmly for about 30 seconds so that the hook is firmly attached to the wall. Peel off the protective paper on the back of the hook, pull it out slowly, and press firmly against the wall hook. Hold for about 30 seconds, then release.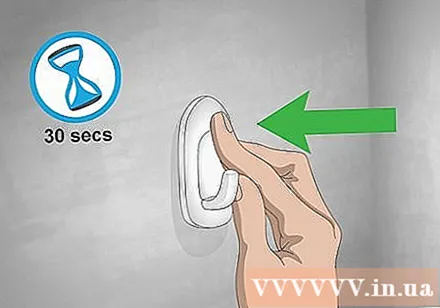
Wait 30 to 60 minutes for the glue to dry. After the glue dries, you can hang the item on the hook.
- If the item causes the wall hook to come off even after you have waited for the glue to dry, check the specifications to see if the hook you are using can withstand the weight of the item to be hung.
Method 2 of 3: Use a wall-mount pin
Purchase a 25 pound (11 kg) staple wall hook. This type of hook is specially designed for cement wall and brick wall. Each hook consists of four extremely strong pins that are fixed to the wall.
- You need a hammer to close the staple hook.
- Use 2 hooks to hang the same object if necessary and be sure to prepare support equipment.
Mark the point where you want to mount the hook on the wall. If the object has steel wire in the back, pay attention to the slack when choosing a hanging position. Check by stretching the middle point of the string towards the top of the object. Measure the distance from the bottom of the object to where the midpoint of the wire reaches when fully stretched.
- If you use 2 pin hanger hooks, measure the distance between the two built-in hooks on the back of the object or the width of the object and divide it by 3. Either of these results helps you determine the distance between the two required points. marked on the wall.
Use a hammer to push each small pin to the wall through the available holes. Press the hanger against the wall so that the center of the base coincides with the marked position. Use one hand to hold the hook firmly and with the hammer handle the four pins respectively to the wall (close half of the pins). Release your hand to hold the hanger and see if the hook is in place. Finally, use a nail hammer to dig into the wall.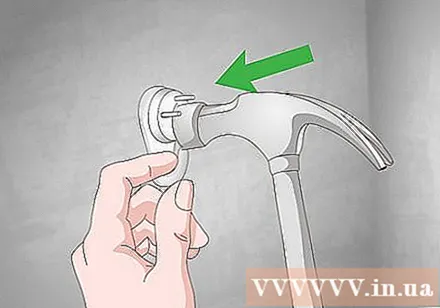
- To avoid hitting your hammer with your hammer, you need to be extremely gentle in the first few beats. When you feel the pin is firmly attached to the wall, release your hand holding the hanger and tap the hammer against the nail to close the note.
Attach the steel wire or item hanger to the hook. Stand back to see if the object is suspended. Align more if needed and enjoy the results. advertisement
Method 3 of 3: Install the expansion screw
Choose a expansion screw to hang items heavier than 25 pounds (11 kg). The expansion screws are usually made of plastic and are used for screwdriving. You need the drill and the drill bit of the same size as the expansion screw.
- You can purchase a mechanical kit that includes hatch screws, screws and the right size drill bit.
- Hang 1 object with two expansion screws if needed.
Hammer drills are best. You can use a conventional electric drill with a drill, but the drilling speed is relatively slow and can cause the wall to leak a much larger hole than expected. Buy or borrow a hammer drill if you can.
- You can rent hammer drills at your home hardware retailer, Lowe's home repair supply chain systems, Home Depot building materials supermarket or repair shop. Remember to call before coming.
Drill screw holes. Measure carefully and mark the screw position. Place the drill bit in place of the need to drill. Make sure to hold the machine firmly and check that your drill bit, handle, and arm are parallel to the floor. Drill with strong pressure into the wall and stand.
- For cement walls, it is best to drill at the slowest speed.
Insert the expansion screw into the hole and cover it with a hammer. The expansion screw should fit snugly against the drill hole, but it should not be too tight to avoid hitting the hammer hard. If the hole is too small, replace the drill with a larger diameter and drill again.
Insert the screw into the hatch. Use a screwdriver or screwdriver in the drill set to tighten screws. Stop your hand before the screw is deep in the wall because you need to hook the wire or hang the item over the protruding part of the screw body. Hang things up, align them to balance and enjoy the fruits of your own labor. advertisement
Warning
- Remember to carefully read and follow the operating instructions for the drill before use.
- Protect your eyes while drilling. Consider wearing sunglasses or goggles.
- Use an in-wall electric detector with metal detection to make sure you don't mistakenly drill into underground power lines.
What you need
When attaching wall hooks
- Optional wall hook
- Alcohol cleaning solution
- A clean rag or paper towel
- Pencil
- Ruler of the roll
When using a wall hook
- Wall hanger staples
- Hammer
- Pencil
- Ruler of the roll
When mounting the expansion screw
- Bolts and screws
- The drill bit is the same size as the expansion screw
- Hammer drills or conventional electric drills
- Pencil
- Ruler of the roll


