Author:
Peter Berry
Date Of Creation:
18 February 2021
Update Date:
1 July 2024

Content
This wikiHow teaches you how to use the Facebook "Poll" app to create your Facebook page engagement survey. While this form can be accessed and filled out on the Facebook mobile app, you can only create forms using your browser.
Steps
Part 1 of 3: Survey Setup
Open the Facebook Polls page. You can proceed by entering the link https://apps.facebook.com/my-polls/ into the URL bar of your browser.
- If you aren't logged into Facebook, you will be prompted to enter your email address and password in the upper-right corner of the page to continue.

Click Get Started Now (Start right now). This green button is in the middle of the page.
Enter a title for the survey. The title should be short and show the poll content.
- For example, a survey asking about people's favorite animal could be called "Choose your favorite" (or simply "Which animal do you like?").
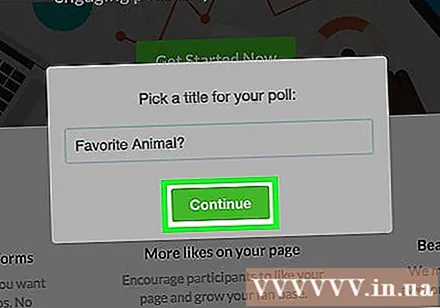
Click tiếp tục (Continue). This option is below the title field.
Click Continue as when the option appears. This will allow the "Poll" application to access your Facebook page. advertisement
Part 2 of 3: Create questions
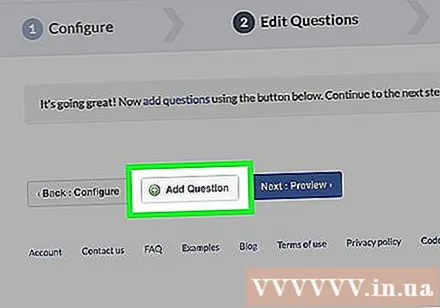
Click + Add Question (More questions). This option is near the center of the page, to the left of the button Next: Preview (Preview) blue.
Enter a question. Enter a question in the "Question" field at the top of the window.
- With the above example, you could enter "Which animal do you like?" come in.
Determine the type of question. To do so, click on the bar below the "Question Type" heading, then choose one of the following options: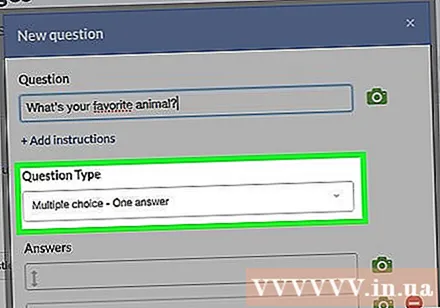
- Text Box (Text box) - Survey participants will enter their answers themselves.
- Multiple Choice - One answer (Multiple choice - one answer) - The participant will select their answer from a list of choices.
- Multiple Choice - Multiple answers (Multiple choice - Multiple responses) - Participants select one or more answers from the available list.
- Drop-down list (Drop-down list) - Survey participants will click on the box and select their answer from the list.
- Ranking (Ranking) - Survey participants will select each item based on how the items apply to them or questions.
- Scale of 1 to 5 (A scale of 1 to 5) - Respondents will choose a number between 1 and 5 ("bad" to "great", by default).
- For the animal example, you can choose a drop-down list, a multiple choice list (one answer) or a text box.
Enter your answer. The format of the answer will depend on the type of question you choose:
- Text Box Click the box below "Data type" to select the type of response you accept, from a single line of text to your email address and phone number.
- Multiple Choice/Drop-down list/Ranking - Enter the text to be displayed next to the check box in the field below the "Answers" heading. Click Add Answer to add more options, or click Add "Other" to add a text field.
- Scale of 1 to 5 - Select the rating by clicking on the box next to the number "1" or "5" and enter the text of the label.
- You can also click the red circle to the right of some of the answers to delete them.
Customize advanced options on questions. To proceed, click to the left of one or all of the following, if necessary:
- This is a mandatory question (This is a required question) - Participants will not be able to continue the survey until they have answered this question.
- Randomize answers order (Random selection of responses) - Change the order of questions each time the survey is done. Does not apply to certain types of responses (eg, a scale of 1 to 5).
Click Save (Save). This green button is in the lower-right corner of the "New question" window. The question will be added to the survey.
Complete the survey setup. You can add more questions by clicking the button + Add Question and fill out a different form, or edit existing questions using the buttons above each question:
- Click the icon pencil to edit an existing question.
- Click the icon two sheets of paper to copy the question.
- Click the arrow up or down to move questions up or down in survey order.
- Click the icon red circle to delete the question.
Part 3 of 3: Post the survey
Click Next Preview is to the right of the button + Add Question.
Review the survey. If everything looks the way you want it to be, then you can proceed to post.
- If you want to edit something, click the button Back: Edit Questions (Edit questionnaire) in the upper left of the survey box.
Click Next Publish (To post). This green button is in the upper right of the survey box.
Click Post on Timeline (Post to timeline). This option is to the right of the "Sharing Tools" text. A window with a Facebook post will appear where you can add an introduction to clarify the survey.
- On some browsers, this might be "Add to your page".
Click Post to Facebook (Post to Facebook). This button is in the lower-right corner of the post window. The survey will be posted immediately to your Facebook page.
- If you want to include a message in a post, first click in the text field at the top of the window and enter your message.
- Text frames are a good place to message users that they need to turn off display ads as soon as they click on a survey link to see the real content of the survey.
Advice
- Upgrading the "Polls" application to the "Premium" version will allow you to add visual responses.


