Author:
Laura McKinney
Date Of Creation:
8 August 2021
Update Date:
1 July 2024

Content

Pull the sides of the laces at the top pair of holes near the heel. Pull the ends of the laces as they come out from the top pair of Converse shoes. This will create a horizontal line similar to the threaded section below near the toe. Tie up your shoelaces as usual once you've put your feet on. You can tuck your shoelaces underneath the tongue if you don't want to show them. advertisement
Method 2 of 3: Horizontal shoelace style
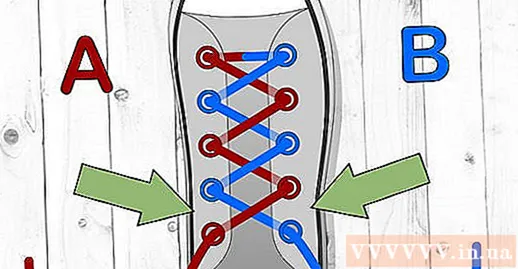
Put shoelaces on "Side A up. Laces on "Side A means that the laces on the left side of the shoe will be inserted into the second hole on the same side from the toe. Remember to keep the laces from twisting, especially when you are using a type of laces. flat version.
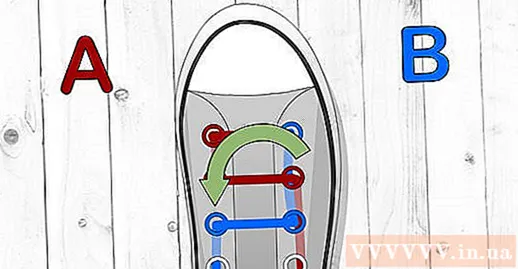
Thread the string "Side A" across. Pull the shoelace over the top of the shoe and insert it into the right hole on the opposite side of the hole you just pulled out. You should see a horizontal line above the shoe. The rest of the laces will be on the bottom one side of the Converse shoe.
Bring up the wire on "Side B", skipping a pair of holes. Lacing on "Side B" means that the laces on the right side of the shoe will be inserted into the right third hole from the toe. The second hole from the toe is now inserted with the string on "Side A". Again, remember not to twist your shoelaces, especially if you are using flat laces. Continuously fix the laces with your hands until they are flat.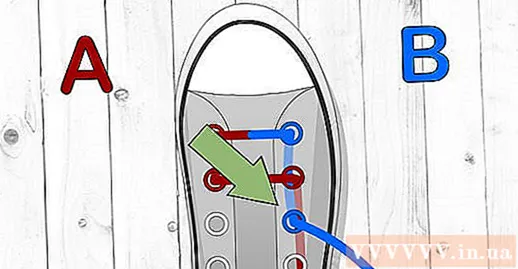
Thread the string "Side B" sideways. Pull the end of the laces horizontally over the top of the shoe and insert it into the third left hole from the tip of the shoe level with the hole you pulled out. This will add a horizontal line above the shoe and the rest of the laces below.
Alternately insert the laces into the shoe holes following the above procedure. The string in "Side A" will be inserted into the second, fourth and sixth pair of holes from the toe. The wire in "Side B" will be inserted into the third, fifth and seventh pair of holes from the toe. This will give you a column with horizontal rows without any diagonal lines below.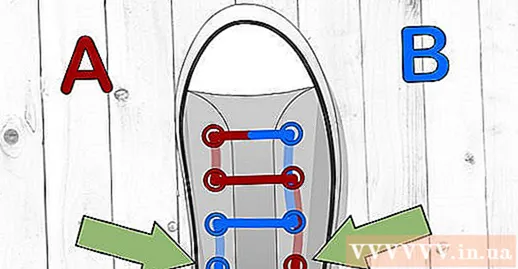
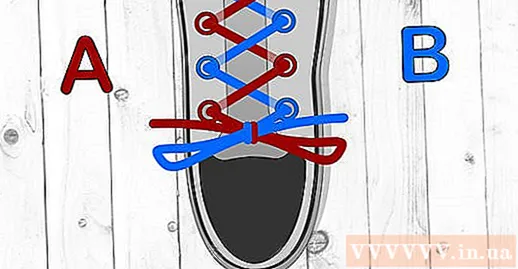
Pull out the laces and tie the rest of the laces. Pull the "Side A" strap through the right hole and the "Side B" strap through the top left hole near the heel. Tie the sides of the shoelaces to the base bow shape to complete. You can also tuck the laces under the laces so that the laces don't show. advertisement
Method 3 of 3: Double-color shoelace style
Combine two shoelaces into one. Arrange two shoelaces evenly and overlap. From the outside you will have a thick two-layer and two-color flat wire. Note that this style is quite similar to a cross-tie and has a similar lacing. This is a popular lacing style for Converse shoes because it is fun, eye-catching and easy to change to your liking. However, you will find it harder to tighten and tie your shoelaces than with a single second, so you need to consider that before choosing this type of lacing.
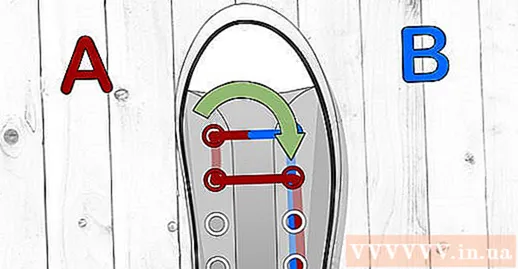
Insert the shoelace into the bottom hole pair with the toe. Pull the shoelace through the bottom pair of holes with "Color One" on the top. The other color, ie "Color Two" will be hidden below the upper string. The laces will be inserted into two holes from the bottom up so that the ends of the laces are pulled upwards. The two ends of the wire will be on either side of the hole when this step is completed.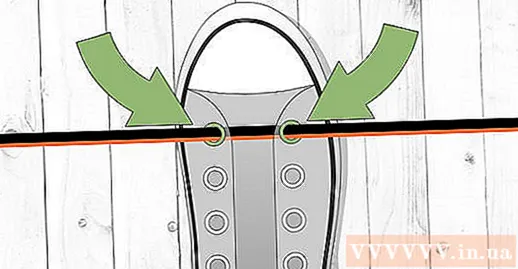
Thread the string on "Side A" diagonally upwards. Pull the string on "Side A" from the bottom left hole into the second hole on the right from the toe. Make sure the laces are twisted so that "Color Two" is on top and "Color one" is hidden below. The diagonal line will connect the bottom hole and the next second hole on the other side of the Converse shoe. Insert the shoelace from below the second right hole from the toe and pull upwards.
Thread the string on "Side B" diagonally upwards. Pull the string on "Side B" from the bottom right hole through the second left hole from the toe. The laces should be twisted to match the other half of the laces. "Color two" will appear above and "Color one" will be hidden below. The two holes will be connected by a diagonal line. Insert the shoelace in from below the left hole, so that the laces are pulled up above the left hole.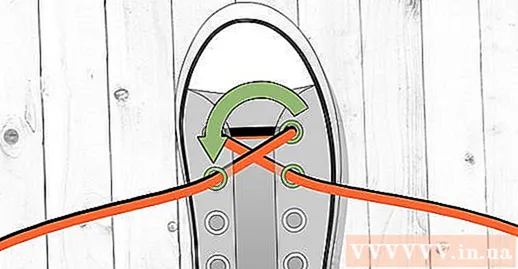
Twist the shoelace to the other side. Then repeat the cross-stringing. Repeat the cross stitch but twist the laces to Color one above longer Color two is hidden at the bottom.Alternately pass between "Side A" and "Side B", cross through the holes so that each end of the wire when pulled from this hole will be inserted into the next hole on the opposite side.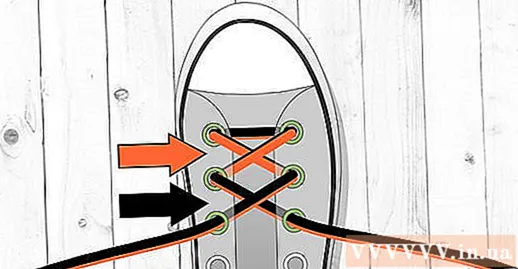
Twist and thread the shoelaces until the hole is gone. Continue to twist and thread your shoelaces diagonally. Each piece of string "x" will have its own color but will be different color from the "x" above and below.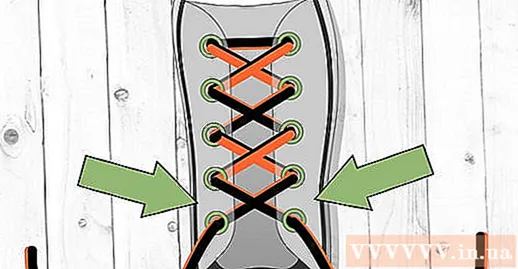
Thread the laces to the last hole near the heel of the shoe and tie when finished. When it comes to the last pair of holes, it doesn't matter which color side the wire shows. Both sides show up when you tie your shoelaces. Another way to make lacing easier is to insert a shoelace into the tongue and use only the other to tie it. If not, you can tie both shoelaces together at the same time. advertisement
Advice
- Try not to twist your shoelaces. Every time you put the strap in the hole, you will use your hand to stroke the laces. You may have to take off your shoelaces and put them on again.
- Continue piercing until satisfied. Often times you will find yourself having one long and one short lacing when you go to lacing. At that time, remove the shoelace and put it back on.
- Change your shoelace style every week or month. Choose a different type of piercing that is always new and trendy.
- Choose shoelaces of different colors. You can now find shoelaces in a variety of colors, including glow green and magenta.
Warning
- Always choose to buy shoelaces that have not been treated with harmful chemical ingredients. Check the information on the package for details.
- Be patient when wearing shoelaces. If this is your first time wearing a shoelace, you may inadvertently create knots or fray the laces when finished. Pierce slowly and calmly.
What you need
- Converse shoes
- Shoelace


