Author:
Lewis Jackson
Date Of Creation:
6 May 2021
Update Date:
1 July 2024

Content
In this article, wikiHow will show you how to detach the screen of iPhone 6S and iPhone 7 to see the internal parts of the phone. Remember that when opening iPhone, Apple's warranty will be void.
Steps
Method 1 of 3: Prepare to remove the iPhone
Turn off iPhone. Press and hold the iPhone's Power button, then drag the slider slide to power off (Slide to power off) at the top of the screen to the right. iPhone will be switched off and the risk of electric shock minimizes.

Remove the SIM card of the iPhone. On the right side, slightly below the Power button, is a small hole: use a thin object, such as an straightened paper clip or a pin, into the hole to push the SIM tray out. When the SIM tray has bounced out, you just need to take the SIM out of the tray and push it in as before.- Do not forget to store the SIM in a dry, clean place. Ideally, you should keep it in a small plastic box or bag, if available.

Prepare the work surface. You should remove the iPhone screen in a flat, bright, and clean place. It would also be nice to have something soft, such as a microfiber towel, to put the iPhone screen down.- Consider cleaning thoroughly with a damp cloth and letting the work surface dry before working on iPhone to remove dust and other tiny debris.

Gather your tools. To open iPhone 7 and iPhone 6S, you need the following:- Screwdrivers Pentalobe P2 - Almost every iPhone repair or disassembly you use this screwdriver.
- Phillips # 000 screwdriver (iPhone 6 only) - Make sure this is a head screwdriver + not flat head.
- Tripoint Y000 screwdrivers (iPhone 7 only) - Used for some iPhone 7 specific screws.
- Spudger bar This thin, soft switch is used to pry the monitor and connector. You can use a similar object, such as a guitar pick.
- Heat source - This is a sandbag or gel bag that will be heated in the microwave and placed near the iPhone to loosen the screen glue. There are different versions of this generic product category.
- Vacuum rubber gasket - You will need it to pull the screen off the iPhone.
- Plastic bag - Used for all screws and parts removed. You can also use a food bowl or container if needed.
Insulate yourself. Static electricity can completely damage any of the countless unshielded circuits in the iPhone case. So, insulate yourself before starting with the first screw. Once fully insulated and prepared, you can start removing your iPhone 7 or iPhone 6S. advertisement
Method 2 of 3: Remove iPhone 7
Remove the two pentalobe screws located on the bottom of the iPhone. They are located on either side of the charging port. As with any other screws removed in the process, don't forget to put them in a bowl or bag when you're done removing them.
Prepare your heat source. If using a gel bag or similar object, microwave it as directed.
- Do not use a hairdryer when opening iPhone.
Place the heat source on the base of the iPhone, covering the Home button and part of the bottom of the screen.
Wait at least five minutes. The heat source softens the adhesive used to fix the screen, allowing you to lift it slightly.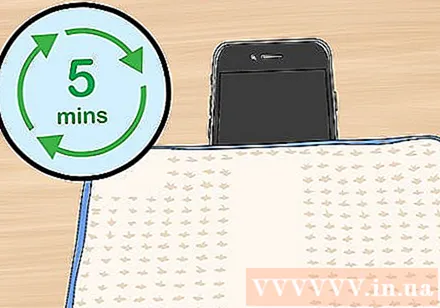
- The glue that fixes the iPhone 7 screen is extremely solid. So you'll probably have to heat it up several times.
Attach the vacuum seal to the base of the monitor. Make sure the cushion is firmly pressed flat before proceeding.
- The rubber pad is not covering the Home button.
Pull up the screen. Just raise the screen high enough to create a gap between the screen and the iPhone case.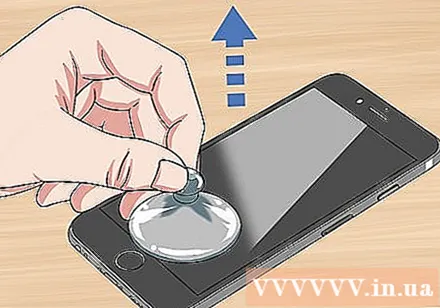
Insert the lever into the gap. If using another tool, use it.
On the left part of iPhone, move the slider upwards. For good results, move the lever from left to right as you lift it up to separate the display from the case.
On the right side of iPhone, move the slider upwards. Be careful in the operation as there are several wires on this side of the phone.
Use a credit card or similar object to separate the top of the screen. The top of the screen is fixed with plastic pins. Make sure to insert your credit card or similar object deep enough to loosen the pins.
- Do not pry the top of the screen up.
Pull the screen down a bit. Pull down the screen about 1 cm or less to remove the staple at the top of the screen.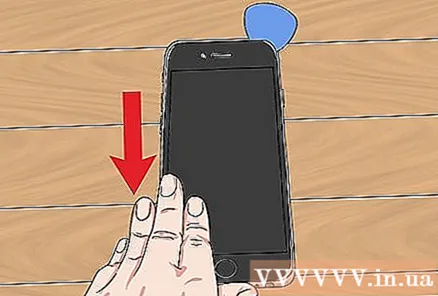
Flip open the iPhone screen to the right. Here, we will open the iPhone screen like opening a book. This is to make sure the connecting cable on the right side of the phone is undamaged.
Remove the L-shaped connector bracket. This frame is on the lower right side of the iPhone's internal components. Here, you need to remove the four Y-head screws.
Push up the display connector and battery. In the area shielded by the brackets, three rectangular boxes are attached to the ribbon: you need to flick them up with the bar to continue.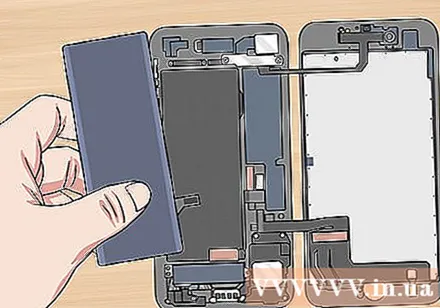
Remove the wide, thin frame located in the top right corner of the phone. This frame covers the last connector that fixes the screen. To do so, you need to remove the two Y-head screws.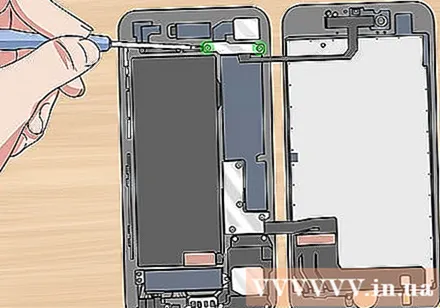
Last bounce the battery connector. It's under the frame that you just removed.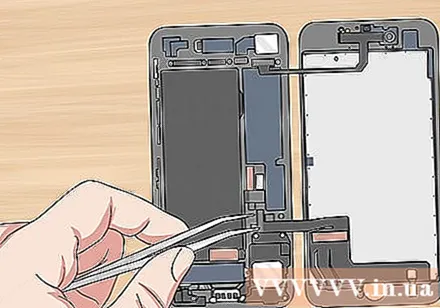
Take out the monitor. At this point, the display is no longer connected to the phone: you can remove it easily. iPhone 7 is now open and ready for you to explore! advertisement
Method 3 of 3: Unscrew iPhone 6S
Remove the two pentalobe screws on the bottom edge of the iPhone. They are located on either side of the charging port. As with any screws removed during this process, you need to store them in a bowl or bag when you're done removing them.
Prepare a heat source. If using a gel bag or similar, heat in the microwave according to the instructions for use.
- Do not use a hairdryer when opening iPhone.
Place the heat source on the base of the iPhone. It will cover the Home button and part of the lower area of the screen.
Wait at least five minutes. The heat source softens the adhesive that fixes the screen, allowing you to lift the screen off the phone.
Attach the vacuum seal to the bottom of the screen. Make sure the mattress has been securely flat before proceeding.
- The vacuum rubber gasket isn't covered on the Home button.
Pull up the screen. Just raise the screen high enough to create a gap between the screen and the iPhone case.
Insert the lever into this gap. If using another tool, use it.
On the left part of iPhone, move the slider upwards. For best results, move the slider from left to right when scrolling up to separate the screen and phone cover.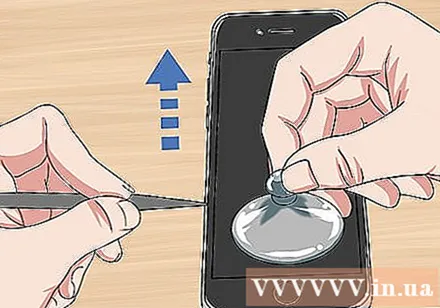
On the right part of iPhone, move the slider upwards. When you do, you should hear the pins come apart.
Flip up the screen. Here, the top of the screen is the hinge. Make sure you don't push the head more than 90 degrees.
- If there is a book or other similar sure thing, fix the screen with tape or rubber with a rubber band, forming a 90 degree angle before proceeding.
Remove the battery connector bracket. Remove the two Phillips screws on the gray support near the lower right corner of the battery, and then pull up the bracket.
Disconnect the battery connector. This is a rectangular box next to the battery located in an area shielded by the support frame. Use your lever or pry tool to pry the battery connector.
- To prevent the battery from accidentally being connected, make sure the battery connector is perpendicular to the battery as much as possible.
Remove the display cable holder. This silver frame is located in the top right corner of the iPhone case. To do so, you need to remove four Phillips screws.
Disconnect the camera and monitor connectors. Under the silver frame are three ribbons: one for the camera and two for the monitor. They connect to the iPhone case using connectors that are similar to the one you manipulated with the battery. Use a lever to disconnect these connectors.
Remove the screen. Now that the monitor is disconnected, just remove it and put it in a safe place. The iPhone 6S is ready for you to explore! advertisement
Advice
- Once it's done removing it, you can do things like change the battery or add new glue to your iPhone.
Warning
- Take extreme care when disassembling an iPhone, as it contains a lot of sensitive and expensive electronic components: all of which are easily damaged inadvertently.
- When unpacked, iPhone is no longer covered by the warranty.
- Handle the phone with care when using force. Excessive force can scratch, damage or crack phone parts or even break small details that are important to the phone's performance.


