Author:
Randy Alexander
Date Of Creation:
28 April 2021
Update Date:
1 July 2024

Content
With more and more devices that can connect to wireless networks, setting up a wireless router for the home network is thus becoming a staple solution for most homes. It allows devices to connect to the internet from anywhere in the house without the messy wires. To start setting up your network, see Step 1 below.
Steps
Part 1 of 3: Hardware connection
Buy a wireless router. These devices come in all shapes and sizes, compare the features between them to choose the one that's right for you. If you need to cover multiple areas or have multiple walls indoors, you will need a router that supports antenna upgrades with longer extension antennas (if it's not included in the router case). If there are many wireless devices simultaneously connecting at different speeds, you should use MIMO (Multiple Input Multiple Output) router type, because otherwise, the supported speed is highest for all. equipment will be reduced at that time.
- All modern routers will support the 802.11n (or Wireless-N) standard. This is the most stable standard, offers the fastest speeds and is backwards compatible with older standards like 802.11g.
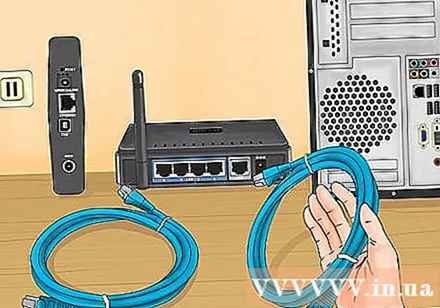
Connect the router to the modem (the device that connects to the internet). Regular routers and wireless routers allow you to share your broadband internet connection with multiple devices. You need to connect your broadband modem to the router and it's best to place the router near your modem.- Connect the router and modem with an Ethernet cable. Most routers come bundled with a short Ethernet cable that you can use for this connection.
- Connect the modem to the WAN / Internet port on your router. This port is usually located on its own and may have a different color from the LAN ports.
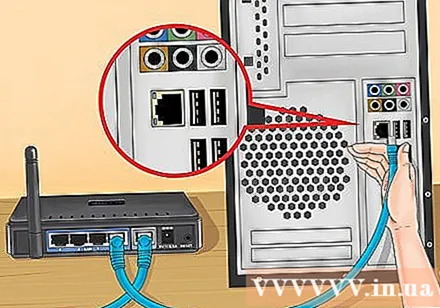
Connect the devices with Ethernet CAT 5 cable (or better). If you have a computer or game console (video game) or TV near the router, you can connect them to the router via an Ethernet cable. Connection via this cable is more stable, faster and requires no additional configuration.
Connect to at least one computer via an Ethernet cable. First of all you will need a computer connected to the router via an Ethernet cable to adjust the settings on your router. You can then disconnect this if you want the computer to connect wirelessly. advertisement
Part 2 of 3: Router Configuration
Find the router's IP address. If you are installing a new or new router, you need to specify the default IP address, usually this IP address can be printed on the router's sticker or in the documentation. If you can't find your router's IP address, you can look up the router model on the web to see its default address.
- IP addresses are formatted as four groups, each with up to three digits and separated by dots.
- Most default IP addresses are 192.168.1.1 or 192.168.0.1 or 192.168.2.1
Open a web browser on the computer connected to the router. Enter the router's IP address in the address bar and press Enter. Your browser will connect to the router's configuration menu.
- If your router came with an installation disc, you can run the configuration program from the disc instead as it will do many of the same installation functions as installing through a web browser.
Enter your username and password. To access the configuration page, you must enter the router's IP address, enter a valid username and password at the prompt. This is the basic account that is set up on the router. Although this information may vary from model to router, it must be printed on the router or in accompanying documents.
- The most common username is "admin".
- The most common passwords are "admin" and "password".
- Many routers only require you to enter a username and a password to leave it blank, and some templates allow you to leave all of these fields blank.
- If you can't find out the IP address, username or password, look up your router model online to see its default login settings. If it has been changed, press the Reset button on the back of the router for 10 to 30 seconds (as shown in the instructions for the router models) to restore factory default settings and try again.
Open Wireless Settings. When you log into the router, you will be taken to the router's main menu or status screen. From here you will have different options for you to choose from. The Internet section usually leaves the default settings, unless you have received specific setup instructions from your internet service provider. The Wireless section allows to set up your wireless network.
Enter a name for the wireless network. In the Wireless section, there is a field named SSID (Service Set Identifier) or Name. Enter here a unique name for your wireless network. This will be the name that other connectable devices will see when searching for networks.
- Check the Enable SSID broadcast checkbox. This "turns on" the wireless network, allowing devices within the signal range to see its SSID. * See also the Tips section below for more information on SSID settings.
Choose a security method. From the list of available security options, choose the WPA2-PSK encryption method for the best security.This is the most difficult type of encryption to crack and thus gives you the best protection from hackers and intruders.
Create a passphrase. After choosing a security method, create a password for your network. Choose a password that's hard to guess by combining letters, numbers, and symbols. Do not use passwords that can be easily inferred from the network name or your information.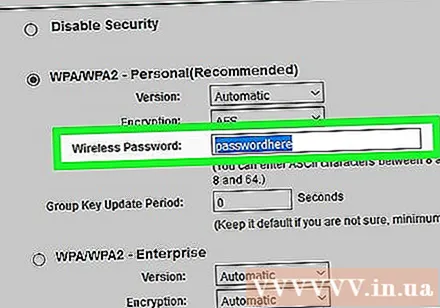
Save settings. After you have finished naming and securing the wireless network, click the Apply or Save button. It may take a few minutes for the changes to be applied to the router. Your wireless network will be activated after the router is finished reinstalling.
Change the default router name and password. After completing the network configuration, you should change the username and password you used to access the router. It will protect the router from unauthorized changes. You can change it in the Administration section of the router configuration menu.
Block websites. To restrict access to some websites from devices connected to your network, you can use built-in blocking tools. It's in the Security / Block section of the router.
- You can block by specific domains or by keyword.
Part 3 of 3: Connecting devices
Connect your computer, tablet or smartphone to the wireless network. On devices that support wireless networks that perform network scans, you will see the new wireless network name as long as you are within range of the router. Select it and you will be prompted for a password.
Enter the wireless network password. After entering the password, the device will automatically connect to the wireless network. The device saves the network in memory and connects automatically whenever your device is in range of a signal.
- For detailed instructions on selecting and connecting to a wireless network for your particular computer, tablet, or smartphone, follow this guide.
Connect other devices. In addition to computers and tablets, you can connect other devices, such as printers, game consoles, TVs, and more. See the following instructions for instructions specific to each of your devices.
- Wireless printer settings.
- Connect PlayStation 3 to wireless network.
- Connect Xbox 360 to wireless network.
- Connect the Nintendo Wii to the wireless network.
- Connect Apple TV to the wireless network.
Advice
- If you bought a used wireless router from a friend or from a store, reset it to factory settings before installing. If not, it is possible to configure your wireless network according to its previous system. Find the reset button on the router and press it for about 30 seconds with a pin or pencil to return it to factory settings.
- For the best security, you can choose not to broadcast the SSID or show your Network Name. Then, the router will not only require the user to enter a password, but first they must determine its SSID. It's a layer of trouble to deal with some users and can cause them to try to access someone else's network instead of yours. Of course, it also means it's a little harder to set up - but if you've got everything set up when the SSID was broadcast, go back and turn it off, everything will reconnect from the set. mind.


