Author:
Robert Simon
Date Of Creation:
19 June 2021
Update Date:
1 July 2024

Content
The fashion of navel piercing is more and more popular. For many reasons, some people choose to get their own belly pierced. If you plan to get your own piercing at home, read on. However, you should be aware that it is always safer to get a piercing professionally done.
Steps
Part 1 of 3: Prepare your piercing
Prepare the right tools. The right tools are essential when getting the umbilical piercing; otherwise, the piercing may go bad or become seriously infected. To get your umbilical cord piercing as safe as possible, you will need: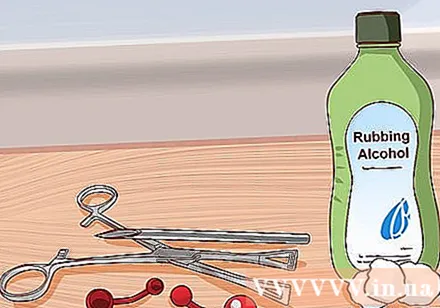
- A sterile 14G piercing needle, a 14G umbilical cord made of stainless steel, titanium or bioplast, rubbing alcohol or an alcohol swab, body markers, a piercing clip and several cotton pads gòn.
- You should not use sewing needles, bandages, or piercing guns to get your umbilical piercing, as these are unsafe and do not work well.

Create a clean environment. Before you start getting umbilical piercing, you need to take the necessary precautions to avoid the risk of infection. Spray the countertop with an antiseptic (not antiseptic).
Hand washing. Don't forget to wash your hands (and forearms) in warm water! Everything must be completely sterile. An even safer measure is to wear latex gloves (if the gloves are sterile and do not go out). Dry your hands with a paper towel - don't use a sponge, as this could be where bacteria live.

Disinfects umbilical forceps, piercing needles and umbilical tips. New tools (you should buy a new piercing tool) are usually in sterile packaging. However, if the tool has no packaging or is already in use, you will need to disinfect it before getting pierced.- You can also disinfect by soaking the tools in rubbing alcohol for 1-2 minutes.
- Remove tools from alcohol (wear latex gloves if possible) and place them all on a clean tissue to dry.

Wipe the skin around the navel. Before piercing, you need to thoroughly clean around the navel to remove bacteria from the skin's surface. It is best to use a piercing gel cleanser (like Bactine) or rubbing alcohol.- Soak a cotton ball with a lot of alcohol or antiseptic and thoroughly wipe the area of the skin about to get pierced. Allow to dry completely before moving on to the next step.
- If you are using alcohol to disinfect it, it is important that you use alcohol with an isopropanol concentration above 70% for the necessary antiseptic effect.
- If necessary, use a cotton swab or similar object to disinfect your belly button. Be sure to clean both above and below the piercing site.
Mark the location of the piercing. Before piercing an piercing, you should determine the point at which the needle is inserted and where the needle is coming out, so it is a good idea to use a pen to mark the entry and exit points of the piercing needle. The recommended piercing hole is about 1 cm away from the navel.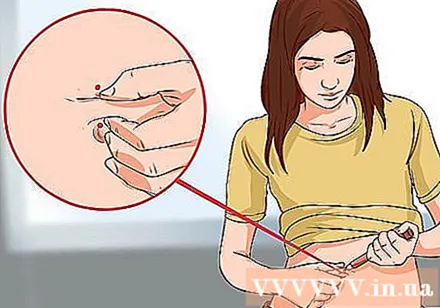
- The piercing is usually placed above the navel instead of below, but you can choose the position you like.
- Use a small hand-held mirror to check if the two marker points are aligned vertically or horizontally. Only do this while standing, as your abdomen will flex while sitting and you won't be able to align it.
Think about whether you should numb the pierced area. Some people who are afraid of pain may want to numb the area around their navel with an ice pack wrapped in a towel before piercing.
- Note, however, that the skin becomes hard and supple when numbed with ice makes it harder for the needle to penetrate.
- Another way is to use a cotton swab to apply a little anesthetic gel (like the gel to numb the gums before the injection) into the skin area.
At this point, you can twist the "head" of the umbilical cord and remove it (leave the tail part intact). This way you won't have to be awkward about having to keep both the clamp and the needle in place. advertisement
Part 2 of 3: Piercing
Clip the cleaned skin. Now you can start getting pierced! Use a piercing clip to grip the skin of your navel and pull slightly away from your body.
- The needle insertion point is marked should be between the lower half of the clamp, and the needle out point should be between the upper half of the clamp.
- Be sure to hold the clamp with your non-dominant hand, as you need to use stronger, stronger hands to hold the needle.
Rest. You will need a sterile 14G-sized piercing needle. These needles are hollow in the center, making it easy to put on the umbilical cord when you push the needle through.
Pierce the needle from the bottom up. Align the pointed end of the needle with the marker on the lower part of the clamp. Take a deep breath and push the needle through the skin in one smooth motion, making sure the outlet of the needle coincides with the marker on the upper part of the clamp.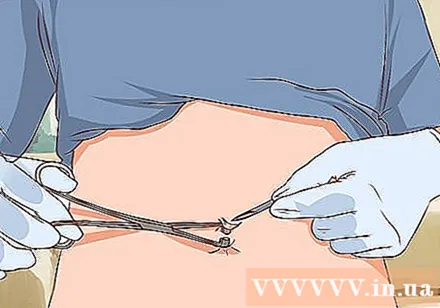
- Never pierce the needle from top to bottom. You need to see the needle outlet point, which is not possible if you insert the needle down.
- Standing when pierced is best, as it is easiest to manipulate and observe what you are doing while standing. But if you are afraid of fainting, lie down while getting pierced (don't sit!)
- Don't worry if your piercing bleeds a little - this is perfectly normal. Just use a clean cotton swab dipped in the salt solution to wipe the blood.
Wear umbilical piercings. Place the unscrewed jewelry end into the needle hole (the jewelry will be almost equal to or smaller than the needle) and push the needle out with the jewelry. DO NOT pull out the needle. You need to keep the contact between the needle and the umbilical cord for a smooth transition. The needle will fall off the tail of the jewelry when it comes out of the skin, so be ready to grab it.
- Try not to pull out the needle too soon before the jewelry is completely through!
- Take the tip of the jewelry you have removed and screw it back on the end. Great! Your navel is then pierced!
Wash your hands and clean your piercing. As soon as you are done, wash your hands with antibacterial soap, then use a cotton ball dipped in salt or wound cleaning solution and gently wipe around the piercing.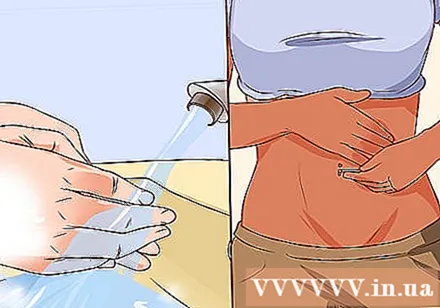
- This is the cleaning regime for the first day and of course the most important. You should take a few minutes to wash it thoroughly.
- Do not pull your piercings. Clean and let the piercing heal. You can get an infection if you touch it or play with it.
Part 3 of 3: Follow proper care steps after getting piercing
Take care of your piercing. Your work is not done yet! Remember that the new piercing is also an open wound, so it is extremely important to maintain a strict hygiene regime for the next few months. You will have to do this until the piercing heals to prevent infection and itching.
- Wash your piercing with antibacterial soap once a day. Avoid rubbing alcohol, hydrogen peroxide, or ointments, as these can cause dryness and irritation if used daily.
Wash with salt solution. A great way to keep your piercing clean and free of infection is to wash it with a saline solution. You can buy a saline solution from a pharmacy or a piercing facility, or make your own at home with iodized salt with 1 cup of warm water.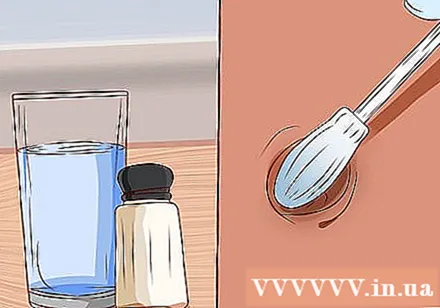
- Dip a cotton swab in the solution and carefully wipe around both ends of the piercing.
- Gently push the jewelry from one end to the other to wash it off.
Avoid swimming in any water body. Whether it's a river, a lake or a hot tub, you should avoid immersion for the first few months, as the water can harbor bacteria and easily infect your piercings.
Wait a while for the piercing to heal. If you see clear or white discharge, the wound is healing normally. Anything that has a color or smell is a sign of infection and should be checked by a doctor.
- Some experts recommend a strict regimen of care for 4-6 months after your umbilical piercing. After 2 months, assess your piercing condition.
- Do not play around! You need to let your piercing heal before changing it. You can change the headpiece, but don't touch the tail. This action not only causes pain, but also slows the healing process.
Pay attention to signs of infection. Even when it appears to have healed, the piercing can still become infected. If you suspect an infection (signs including swelling, pain, bleeding or drainage), apply warm compresses every 3-4 hours, then wash the wound with an antiseptic solution and apply an antibiotic cream. .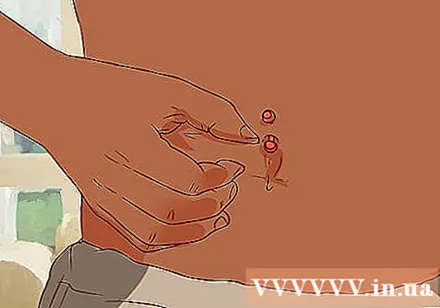
- If you don't feel better within 24 hours, call your doctor.
- If you don't want to see a doctor, you can go to a piercer. They will help you adjust your care regimen and provide you with specialized products.
- Never remove the umbilical cord when treating an infection - this will only put the infection at risk of getting stuck inside the piercing.
Advice
- Learn about umbilical piercing. Be sure to have your umbilical cord pierced and be confident in it at home.
- Don't touching a new piercing. You should only touch it when cleaning the wound with antibacterial soap.
- Watch for signs of infection. If in doubt, see your doctor.
- If you are not confident about getting your own piercing, find a professional piercer.
Warning
- Are not use household items available in the house to get piercing. They are unsafe and can cause infection.
- The piercing can cause scarring if you don't wear it later.
- You may be in danger of getting your own piercing. If you love getting umbilical piercing, it is best to go to a professional piercing facility.
- This is not suitable for children under 13 years old.
- Don't use piercing guns. The piercing gun is very unsanitary and it pierces the piercing with strong force.
What you need
- The needle is hollow of size 14 G aseptic. You can also use a cannula needle to make it easier to pierce your jewelry.
- Highlighter
- Rubbing alcohol or other skin disinfectants
- Clamp / tweezers
- Jewelry aseptic (sizes 14G and 18mm make room for when the wound is large. A bioplast or bioflex piercing is best because it can flex and cut short as the swelling subsides).
- Sterile latex gloves (optional, but recommended)


