Author:
John Stephens
Date Of Creation:
23 January 2021
Update Date:
1 July 2024

Content
A wind turbine is a simple mechanical device similar to a windmill. The air current that drives the turbine blades rotates, and the mechanical energy of that movement is transmitted along the turbine shaft. The turbine shaft rotates the other components of the generator, creates clean energy (renewable energy) for your home, and reduces your electricity bills. Alternatively, the turbine can be built from simple materials that can be found at hardware stores.
Steps
Part 1 of 5: Plan for wind turbine installation
Determine the average wind speed where you plan to place the turbine. For efficient power generation, the turbine needs a minimum wind speed of 11-16 km / h. Most turbines perform best with wind speeds between 19-32 km / h. To find the average annual wind speed where you live, you can check an online wind map that says average wind speeds.
- You can also purchase a wind velocity meter called a wind gauge that measures wind speed at the site of the turbine. Do this every day for a while.
- If the wind speed at that place is relatively stable, one month's measurements are more than enough, although the wind speed varies quite a lot with the seasons. You then calculate the average of the figures to see if it is reasonable to locate the turbine there.

Consider building laws related to wind turbines. Each region has different building laws, so check with regulators to make sure your turbine is not breaking the law. Some laws regulate the minimum distance between the turbines, as well as the minimum distance from the turbine to the property's boundary. Local laws may also impose height limits to consider when designing a turbine.- You should discuss the construction of a turbine with your neighbor before investing too much time in design and construction. This way you can address their concerns about wind turbines, and eliminate misperceptions about noise and the potential to disrupt radio waves (radio and television).
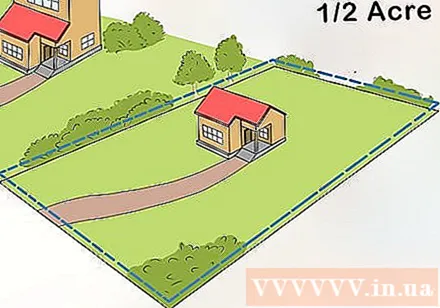
Turbine space assessment. Although the turbine itself doesn't need a lot of space, to avoid potential conflicts with neighbors it is recommended that you set aside a minimum of 0.2 hectares for a turbine with 3 kiliwat generating capacity and 0.4 hectares for a turbine with a power output. up to 10 kilowatts. The space height should also be enough to be able to build turbines with a height so that houses and trees do not block the wind.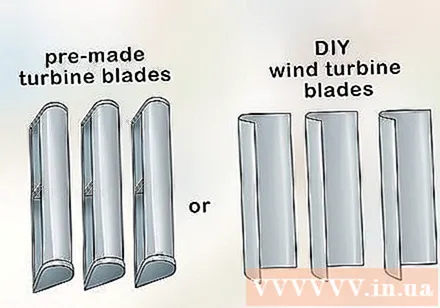
Use pre-made or homemade turbine blades. The type of turbine blade intended to be used and the blade construction can have an impact on the overall turbine design. The old farm windmills were essentially small sails attached to the spindle, but the wind turbines were like giant propellers and had large wings with a drop-like shape. The blades should be of the right size and spacing in order to function properly.- If you want to make the wings yourself, you can make them from wood or cross-sectional parts of PVC pipes. You can find instructions online using the keyword "homemade wind turbine blades".
- Regardless of whether you buy or build your own wings, you typically have 3 blades for a wind turbine. Using an even number of blades like 2 or 4 will make the turbine more prone to vibrations when spinning. Increasing the number of blades increases the torque, but may cause the turbine to rotate more slowly.
- The turbine blades can also be made from household products such as shovels. If following this method, choose a hard shovel, then you should replace the wooden handle with a more durable material, such as metal rolling.
Choose generator. You need to connect a wind turbine to a generator to generate electricity. Most generators are direct current (DC), meaning that in order to supply electricity to your home, you must connect that generator to a converter to generate alternating current (AC) for internal devices. home.
- You can use a DC motor as a generator although the flux may not be strong enough to produce a strong electric field.
- The generator depends on rotation (in this case, the movement of the turbine blades) and magnetic force to generate electricity. A pre-made generator is the easiest option for beginners, but you can make your own by searching the Internet for "make wind turbine generators" documentation.
- If you decide to buy a DC generator, choose one with a high voltage rating and amperage, slow rotation speed (a few hundred instead of a few thousand rpm). You need to generate a minimum current of 12 volts in continuous time.
- The generator must be connected to the maintenance battery and the charge controller positioned between the generator and the converter to protect the inverters and the battery each time the voltage spikes. This also helps provide power to the converter during low wind times.
- You should not use a car generator as a wind turbine generator. They require much faster rotation speeds than wind turbines.
Part 2 of 5: Assembly of crankshaft and crank of a vertical axis wind turbine
Assembly of the reel. You need to weld the spindle to the shaft base, but many pre-made wind turbine sets already weld the two parts together. If you are assembling turbines from purchased loose parts or redundant parts, be sure to wear protective gear such as special glasses, gloves, shirts and boots before welding.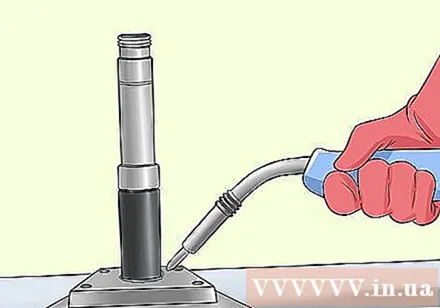
- After you've assembled the reel, you can assemble the rest to that spindle. This is usually the most efficient way to assemble a turbine if you are working on this project yourself.
Slide the sprocket onto the spindle. To avoid friction and damage to the spindle / sprocket, it is recommended to install a bearing between these two parts. Fit the bearing on the taper end of the shaft off the shaft base, and slide the bearing ring toward the shaft base until it is fixed at the thicker position of the spindle. Then you slide the sprocket into position on the bearing so that the knobs of the sprocket face up.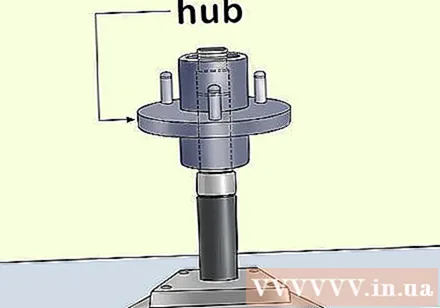
- The distance from bearing to spindle base is about 10.2 cm. When the wind blows strongly, the turbine can bend, causing the blade to slash and damage the shaft.
- If you don't buy a complete set and make your own, consider using a 4 on 4 (4 bolt-4 inch) trailer sprocket. The 4 on 4 sprocket is available at trailers' spare parts shops, such as auto parts stores.
Attach the lower dial to the sprocket. The turntable should have holes for sliding into the sprocket protruding knobs, and protruding ears to connect the crank to it. Fit the spinner onto the sprocket knobs and fix it in place. After aligning the turntable on the sprocket, you will fix it with the wheel nut, first by hand, then use the spool key to tighten it.
Connect crank. You have two cranks for each turbine blade, meaning a total of six cranks for a turbine with three blades. You need bolts to connect the crank to the ears of the lower crank, and a cushion to separate the lower handwheel from the top handle. Later: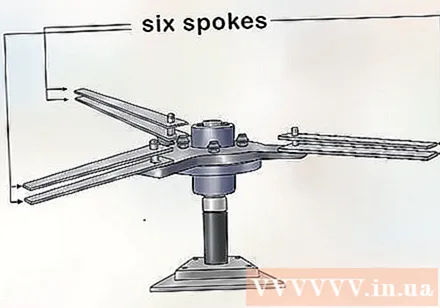
- Slide one bolt into a hole in the turntable ear, hook the crank handle to that bolt, push the spacer onto the bolt, engage the second crank bolt into the bolt and use the top spinner to clamp the two cranks together with the spinner. cushion. The lower disc and the top disc should have the same shape, with the same number of ears connecting the crank.
- Screw in the top sprocket by hand to keep the turntable in place, then tighten the remaining bolts of the first set of crank. Repeat this process for all cranks.
- After all the handwheels are clamped between the lower and upper spinner, use the spool key to tighten the bolts. After tightening the bolts, the lower dial, the top dial and the crank wheels are ready for easy rotation with the sprocket on the bearing.
- Since the turbine structure will be continuously affected by wind and other environmental factors, the bond between the bolt and the handwheel must be tight. To ensure a secure bond, it is recommended to use a thread-locking solution sold at hardware stores.
Attach four pins to the top turntable. These pins shall be threaded and each pin is 6 cm long and 0.635 cm thick. You may need to use a hacksaw to cut these pins to the required length. Then, hand the handle against the top of the top turntable so that the pins are evenly distributed around the spindle.
- Only screw the pin to the turntable deeply enough that each pin is vertical and secure. All pins should protrude from the turntable at an equal length.
- If you use a hacksaw to cut the dowels, take care to avoid damaging the thread. Damaged threads will prevent you from mounting other parts.
- You need to attach the fasteners securely, as well as bolts that connect the cranks. Finally you should add the thread-locking solution to the pins.
Part 3 of 5: Mounting the magnet of a vertical axis wind turbine
Install the lower magnet rotor on the pins. You can make your own lower rotor and top rotor with the rotor disc, epoxy coating and neodymium magnets with the dimensions 5cm x 2,5cm x 1,25cm, or you can purchase a pre-made product. in wind turbine set, or buy from wind turbine parts manufacturer. Directing the magnets upwards, match the lower disc of the magnet rotor to the four bolts that you have firmly fastened to the turntable.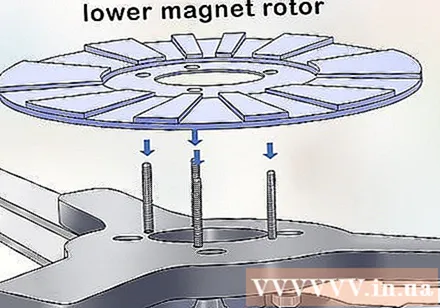
- Whether you make your own or use a pre-made magnet rotor, always use care when handling individual magnet bars or magnet rotor plates. Their magnetic force is so strong that it can cause serious injury if you handle it recklessly.
- The neodymium magnet is quite brittle. You will need 24 bars, 12 bars for the upper rotor, and 12 for the lower rotor, but you should buy extra in case the magnet breaks during the plate mounting. These magnets are available for sale online.
Make the magnet rotor if necessary. If you purchase the complete set that comes with a magnet rotor, simply attach it to the pins as described above. For a homemade rotor, you must evenly distribute the magnet bars around the edge of the rotor. To prevent improper placement of the magnet and damage the rotor, draw the position of the magnet on paperboard or plain paper.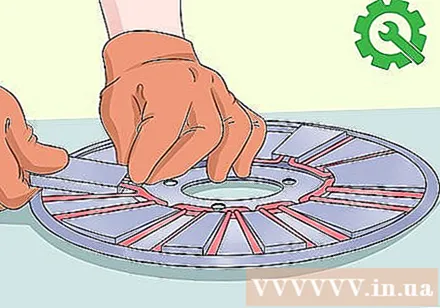
- This piece of paper will be placed in the center of the rotor where the magnet is not placed. Lines from the center to the edge of the paper are indicative of where you should place the magnet on the rotor. You can use tape to fix the piece of paper and refer to these paper samples online.
- You should use a marker to mark the polarity of the magnet before starting to install. If the magnets are attracted to each other and you cannot distinguish the polarity, make a test tool by applying a small magnet to the popsicle stick.
- Slide the "N" side of the test tool on the neodymium magnet. If you feel a force, that side of the magnet is extreme. If you feel gravity then that side is polar opposite.
- Use a pea-sized amount of epoxy paint to install the magnet. You apply paint to the surface of the magnet before placing it on the plate.
- Carefully keep your fingers away from the gap between the magnet and the rotor, slowly move the magnet bar to the corner of the rotor plate. The magnet should stick to the surface of the disc, then you can slide it into place following the line on the sample paper.
Insert the spacers into the latch. You can use a 0.375cm thick metal pipe and cut it into 3,175cm long segments to create a cushion. You cut the length of the cushion as accurately as possible. Slide the spacers onto the protruding latch on the magnet rotor surface.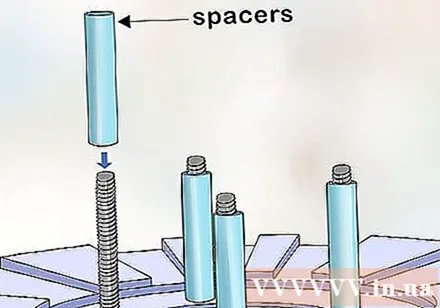
- The uneven spacer size can cause the upper magnet rotor to tilt. This is dangerous and can also adversely affect turbine efficiency.
- The excess of the pin above the cushion should only be slightly more than 2.5 cm. There is extra space for the top-magnet rotor tightening bolt belt, along with all the components between the two rotors.
Place the stator on top of the lower magnet rotor. The stator consists of many metal coils that play a very important role in generators. It comes bundled with the wind turbine kit, either you buy from the wind turbine parts manufacturer, or you can build it yourself. The pins around the central spindle will be inserted in the center of the stator, and you must center the stator towards the spindle.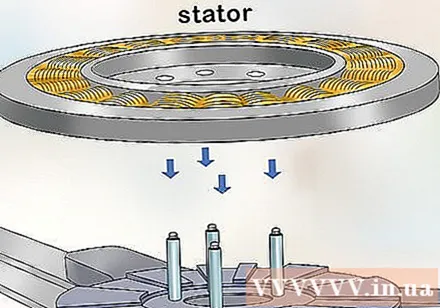
- The stator consists of three beams, each consisting of three 24 gauge copper coils, each with 320 turns of copper wire. Stator making is time consuming and not easy.
- If you decide to make your own stator, you can find a how-to guide online with the keyword "how to build a wind turbine stator".
Build stator coaster at home. You can build stator winders out of waste wood and nails. Connect two pieces of plywood with four nails so that the space between the two pieces is about 2.5 cm. Four nails should be placed in a rectangle that corresponds to the size of the magnet. You can then easily wind the copper wire to create a stator.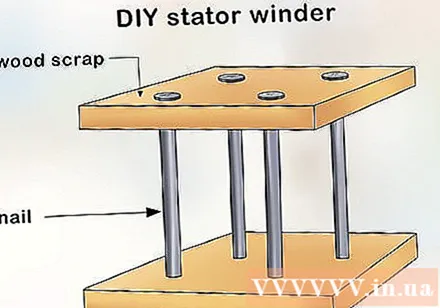
- During the making of the stator you must follow the beginning and the end of the winding. Each roll should be wound in the same direction. It is recommended that you apply a piece of colored electrical tape at the beginning of wrapping each coil.
- To prevent the coil from coming out after wrapping, it's a good idea to bond the whole coil with electrical tape and paint two more layers of epoxy outside. After epoxy coating, allow the stator to dry on the wax paper for the time specified on the paint can label.
Install the top magnet rotor.Be especially cautiousThis is one of the most dangerous parts of a wind turbine structure. Stack four pieces of wood on top of the stator on both sides of the reel, with thick lumber placed underneath and thin wood on top. The top piece of wood should be 2 x 4 in size.
- Hold the top magnet rotor so that the fingers are in the gap between the stacked wood pieces, and slowly place the top rotor on top of the lower rotor. Try to align the top rotor with the pins during installation.
- The magnetic field will hold the rotor on and suck it into the wooden planks placed earlier. You then lower the top rotor on the pegs by sliding each piece of wood out. First, slide out each piece of wood in turn.
- Repeat this process with the lower wooden pieces to bring the top rotor into place. Then you screw the hexagon bolt on the pins to tighten the rotor. Once completed, the upper rotor should rest on the spacers and the pin bar has only a small amount left over.
- You may have to swing the pieces of wood around to remove it from the rotor because the magnetic force is so strong.
Part 4 of 5: Completion of the main structure of the turbine
Remove the turbine structure from the reel. Next you will connect the spindle to the tower. If you keep the turbine structure with the spindle for mounting in the tower, the job will be very difficult. Then you have to reverse the structure to fit into the tower.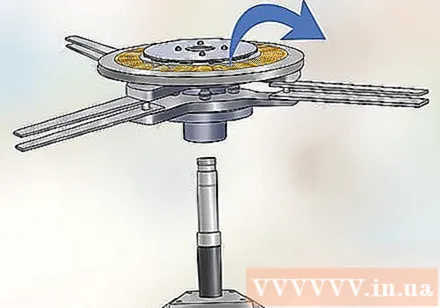
- Lift the structure (including the sprocket, handwheel, magnet rotor, stator and all relevant parts) off the reel in a vertical motion. Then place the turbine tie to another place from the side with the sprocket facing upwards.
Weld the shaft to the tower. Welding the spindle base to the tower if you have a complete set (usually commercially available). However, the tower can be made from a metal plate attached to the top of thick metal pipes. Be sure to use metal pipes thick enough to withstand the wind impact on a turbine.
- The tower must be installed on a solid foundation. You should pour concrete into the tower site for increased stability.
Attach the support for the spindle and stator. This support should fit on the spindle like the collar. You then attach the bracket fixing bolt to the tower. Next, you cut the threaded bar 0.375cm thick into four sections with a length of 11cm. First use the thread locking solution, then use a nut and a flap to connect the threaded segments to the outside of the stand, facing up.
- You should screw the nut to the thread bar to about of the way from the top of the thread. The nuts will allow you to adjust the stator position while the threaded rod holds it in place.
Install the clutch ring on the spindle. Before mounting, you put a lot of normal bearing grease on the clutch ring. After greasing is complete, slide the bearing ring onto the reel all the way to the base of the shaft.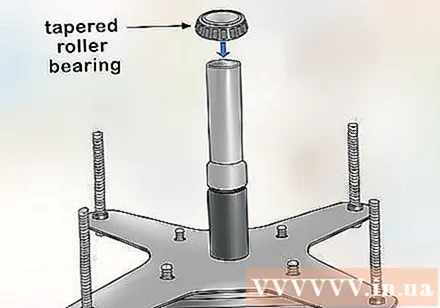
- You can apply grease to the bearing ring with your finger. Have a tissue or a rag ready to wipe your hands after you grease the bearing and install it on the reel.
Mount the main structure of the turbine. Raise the main structure with the sprocket side facing up and place it on the spindle with the clutch bearing ring underneath. The holes for mounting on the stator should match the threaded rods you tightened to the support earlier.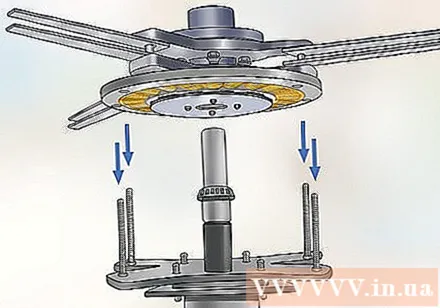
- After placing the structure in place, you will need to add a taper bearing ring to the sprocket cover. Remember to grease conventional bearings on the bearing ring before mounting.
- You must fasten the flower nut on top of the bearing, and this can be easily done by hand.
- If you cannot screw the nut easily, then turn it out until the gap in the nut matches the hole in the reel. Slide a spanner into this hole and use the key leg flexer to lock the flower nut in place.
Tighten the stator and install the grease cover to complete the turbine construction. Use one hexagon nut for each threaded rod to secure the stator on the structure. Then use the two buckles to adjust the stator clamp nut until the stator is directly between the two magnet rotors.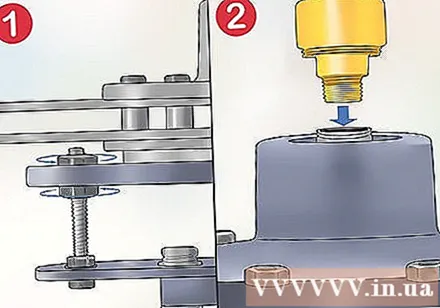
- After the micro stator is finished, all that remains to be done is to add the grease cap to the top of the sprocket, and the turbine structure is complete.
Part 5 of 5: Installation of electrical components of a turbine
Connect the charger controller to the battery or circuit. Connecting the charge controller to the battery before connecting it to a wind turbine prevents over-voltage generation. Hence this will prevent damage to the device.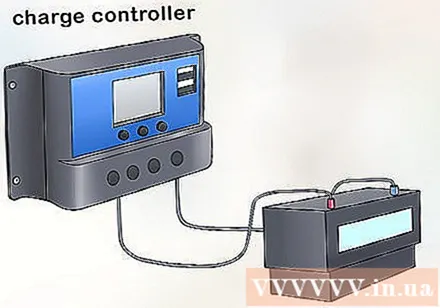
Connect the shielded power cord to the charge controller. This wire transfers electricity from the generator to the charging controller. From there electricity is transferred to the battery or circuit.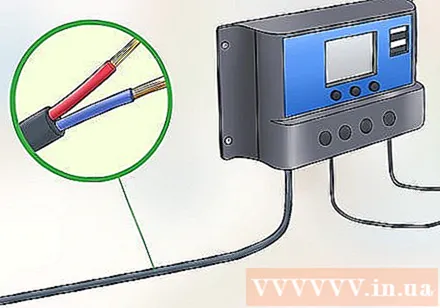
- You should use a power cord model with two identical insulated segments, or use a cord from a portable outlet and cut off the plug if desired.
Pass the wire from the base and go through the tower shaft. Route the power cord from the bottom of the tower up onto the turbine structure. You may need to use a guide wire or a tape measure to help pass the wire through the tower. Then connect the power cord to the generator.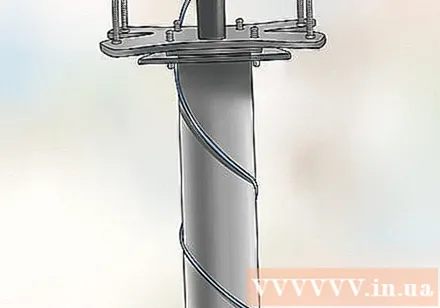
Connect to battery or electrical circuit. After connecting the generator to the charge controller and wiring through the tower pins, you are ready to connect the indoor circuit to the power line from the turbine. Whenever connecting an external power source to a circuit in your home, you should seek assistance from an electrician. In many areas, this requires a professional electrician to handle it. advertisement
Advice
- The charger should be tightly wrapped to avoid moisture in the air, and should be connected to a manometer to monitor the output current.
- Study more about bird migration in your area. If birds migrate to that area, you should not build a turbine.
Warning
- If you plan to sell electricity to the power company remember that they sell electricity to you at the retail price, but will buy back electricity at the wholesale price. You will have to install a synchronous rectifier that matches the AC frequency of the corporate power line, as well as a special converter. Maybe you can't produce enough electricity to recoup your installation, let alone the profits.
What you need
- Wooden pieces 2 x 4
- Bolts, nuts and bolts
- Flower nut
- Charge controller
- Key lock
- DC generator or AC motor (optional)
- Battery maintenance (recommended)
- Conventional bearing grease
- Grease cap (for sprockets)
- Hacksaw
- Gear
- Shielded wires
- Iron floor flange (diameter 2.5cm)
- Iron pipe (diameter 2.5cm)
- Magnet / rotor plate
- Metal pipe (/8"/ width 0.95 cm)
- Nut
- Tube key
- Crank
- Stato
- Stator support
- Taper bearing (2 pieces)
- Thread lock solution
- Threaded bar (/8"/ thickness 0.375 cm)
- Threaded bar (0.635cm thick)
- Barometer (optional)
- Long temple
- Welder
- Wrench (adjustable type)


