Author:
Laura McKinney
Date Of Creation:
6 August 2021
Update Date:
22 June 2024

Content
- Use plywood about 3 mm thick to make tapa. The tapa is the play surface of the instrument, and usually you use a piece of wood about 33 cm x 48 cm for most cajon drums.
- The other sides of the instrument are made of plywood 13 mm thick.

- The size of the wooden piece for the top and bottom of the drum is 33 cm x 33 cm.
- The one at the back is 33 cm x 46 cm.
- The sides should be about 32 cm x 46 cm.
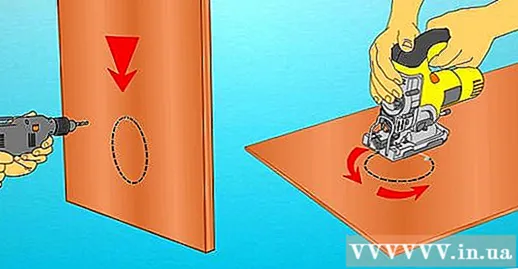
Draw a hole 12 cm in diameter in the back piece of wood. Drill close to the side of the marked sound hole, and start from there to pierce the sound hole with a jigsaw. or circular saw.
- Round and polish the edges for even and smooth edges.

- A snare rope is essentially a wire or wire that is stretched to stretch and fit into an object that makes a click. If you make your own, using an old guitar string, fishing line, or other type of metal string will create the perfect harmony for a homemade cajon drum. To rattle, try using tiny paper clips, lead, or recycled metal materials that can make a click.
Part 2 of 3: Mounting Frames
Attach the drum frame. Starting at the bottom and one of the edges, apply a large amount of the wood glue. Next, paste the other edge and the top to create the drum ribs.- Use a support tool to hold the pieces of wood as you apply the glue and keep them as straight as possible, or cut a piece of wood to fit inside the box and make sure to form a flat corner.
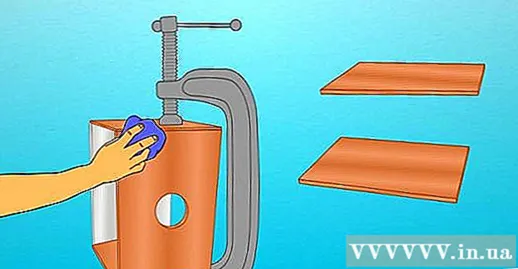
Press down. Large carpenter's wooden clamps are ideal, but strapping will also help tighten them up. Wrap it tightly to apply sufficient pressure on the piece of wood while you wait for the glue to dry. Leave it on for several hours before attaching the back, tap, and snare strap.
- Remove excess glue with a wet cloth and read the instructions for the specific adhesive to understand the pressure required and how long it will take for the adhesive to dry.

Attach the snare strap before applying the tapa. Depending on the material you use as a snare rope, you can have a variety of attachments. Ideally, buy a tuner from an instrument store that can be tuned periodically.- Stretch the snare rope diagonally from the top corner of the edge that will be the tapa, about 8 cm from each corner on the top side and braided edge. Tighten them inside with wood screws, or attach them to the tuner for better sound control.
Apply glue to the tapa and the back piece of wood. Attach the front and rear panels as you did and apply pressure at the same time. Orient the back panel to ensure the sound hole is on the bottom of the instrument, and the snare string is on the top.You might also consider mounting screws to add more rigidity to your instrument. You will be sitting on the drum, so you need to add more stability to the drum. advertisement
Part 3 of 3: Finishing Cajon
Make the legs out of scraps of wood and fasten them to the base. Can use rubber or cork. It's best to find something cushioning to place the frame on, as it will have to support your weight as well. Leaving plywood on the ground can scratch surfaces.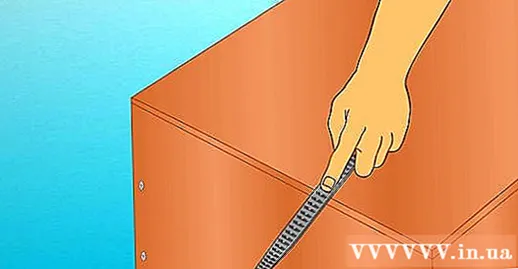
Round the corners at the top for more comfort when sitting up. Use sandpaper and spend less time smoothing the edges and surfaces. Polish your cajon with fine sandpaper, then finish to your liking.
Give it a personal touch. Decorate your instrument with your own style. Finish with a wood paint color for a nice and professional look, or stick on it with Neptune and Polar Bear to give it a wild hippie look. Now enjoy it. advertisement
Warning
- Eyes and ears must be protected when working with machine tools. Wear safety glasses and earplugs or a hat.
What you need
- 12 mm (or 1.2 cm) laminated wood
- 3mm laminated wood (or 0.3 cm)
- Jigsaw
- Clamping and / or strapping machine
- Wood glue
- Screw size 3x20mm or 3.5x20mm
- Electric drill
- Wooden file
- Sandpaper


