Author:
Randy Alexander
Date Of Creation:
23 April 2021
Update Date:
1 July 2024
Content
Nvidia is constantly adjusting the software that basically controls the Nvidia graphics card. A few weeks later the company released a driver update. Install the latest version drivers to play games with optimal performance.
Steps
Method 1 of 3: Self-update
Open the DirectX Diagnostic tool. This is the fastest way to find out your graphics card model. Skip this step if you already know the information.
- Press ⊞ Win+R and type dxdiag.
- Click the Display tab. Look for the "Chip Type" item. This is the graphics card model information.
- Click the System tab. Look for the "Operating System" section to check if the machine is running 32-bit or 64-bit version of Windows.

Visit the Nvidia GeForce website. You can download the latest version of drivers from the GeForce () website.
Click the "Drivers" tab. Most Nvidia cards are "GeForce" cards. Visit the website if your card is a different model.

Choose a graphics card. There are 3 ways to choose the driver:- Automatic Driver Updates - Use the Nvidia GeForce Experience program to manage driver updates. Click here for more details.
- Manual Driver Search - Use the information in Step 1 to choose the appropriate driver. The 4 most recent versions will be displayed.
- Auto-Detect Your GPU - The Nvidia website will use Java microcode to detect the graphics card and render compatible drivers. You need Java installed to run this code. The current microcode has not been updated, so it might crash in some browsers. If using the other 2 methods will be simpler.

Download the latest drivers. Click on the download link for the latest version driver. You should download the latest version unless specifically you need an older version. The latest version will give the best performance.
Run the installer. Run the downloaded installer to update the drivers. The installer will automatically remove the old version and install the update.
- Most users choose the "Express" setting.
- The screen may blink or briefly turn black during the installation process.
Use System Restore if a new driver fails. When driver updates are installed, a system restore point will be created automatically. This restore point allows you to bring the system back to the point in time when the drivers were installed.
- You can refer to the articles on how to use System Restore.
Method 2 of 3: Use GeForce Experience
Download and install the program GeForce Experience. This is Nvidia's program that allows you to manage Nvidia drivers and install games. You can download the installer from the site.
- The installer will scan your system to check for supported hardware. You will see errors during the installation process if you don't have an Nvidia graphics card or use an older product.
- Launch the program after completing the installation.
Allow GeForce Experience to update. When GeForce Experience starts, it will check for available updates.
Click the "Drivers" tab. The available updates will be displayed on this tab. Click the "Check for updates" button if the GeForce Experience does not self-check.
Click the "Download driver" button to download the available updates. Maybe the GeForce Experience has downloaded the file.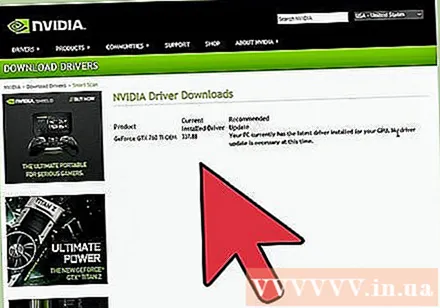
Click on "Express Installation". Advanced users can choose Custom. Most users are satisfied with the quick installation.
- Custom installs allow you to choose which drivers you want to install.
Wait for the drivers to install. GeForce Experience will take care of the installation. The screen will blink or turn off momentarily at the time of installation.
Use System Restore to bring the system back to the time it was not installed if there is an error. Windows will create a system restore point when the Nvidia driver is updated. You can boot in Safe Mode and run a system restore to bring the system back to the point in time when the driver was updated.
- You can refer to the articles on how to use System Restore.
Method 3 of 3: Update Ubuntu drivers
Open the Additional Drivers window. Nvidia drivers do not install automatically when you use Ubuntu. Instead, Ubuntu uses open source but not very powerful drivers. You can install the Nvidia drivers through the Additional Drivers window.
- Start Dash and type "drivers" to open Additional Drivers window.
Wait for the list of available drivers to load. You may have to wait a few minutes.
Select the latest driver from the list. Make sure this is a driver from Nvidia, not "Nouveau". Select the driver to download.
Click the "Apply Changes" button. Nvidia drivers will be installed on the machine.The screen may blink or turn off during the installation process.
Restart the computer. Restart your computer to complete the installation. advertisement


