Author:
John Stephens
Date Of Creation:
24 January 2021
Update Date:
1 July 2024

Content
Typography makes your text or website more unique and allows you to express your creativity and style. So why should you limit yourself to the fonts that come pre-installed on your computer? Make your work unique by downloading and installing typefaces that suit you and your personality. Read on to learn how to install typography on a Windows or Mac computer.
Steps
Method 1 of 4: Install Fonts on Windows 7 and 8 Operating Systems
Find typefaces. You can find typefaces for free or for a fee at many websites online. There are many websites that offer free and open source typefaces that require no registration or installation of any additional programs. Some popular websites are dafont, Google Fonts, Font Squirrel, 1001 Fonts, and fonts.com.
Download the font of your choice. Be sure to download fonts from reputable sites, as font files are usually virus-containing files. Most of the lowercase fonts are downloaded as ZIP archives. Save the file somewhere easy to find, like right on your desktop.
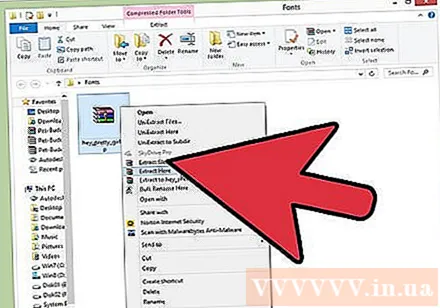
Extract font file. The ZIP archive must contain a font file that can be installed on your computer. Common file formats are .ttf, .ttc, and .otf.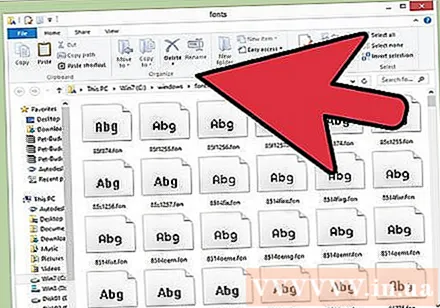
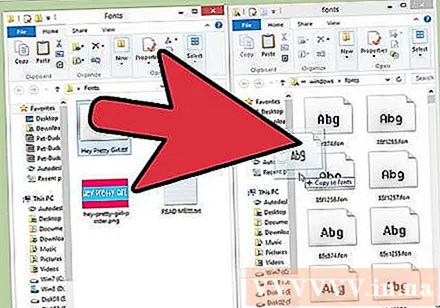
Open drive C according to the address C: Windows Fonts. Using a Windows Explorer window, navigate to the Fonts folder in the Windows folder on your hard drive. You will see a list of font files you have installed.
Drag the new font file into the Fonts folder. Drag and drop the font file into the Font folder and the font will install for you automatically. You can immediately use that typeface the next time you use it.
- You can also install fonts by double-clicking on the font file. The font installation will automatically work for you.
Method 2 of 4: Install Typography on Windows XP and Vista Operating Systems

Find font files online that are compatible with your version of Windows operating system. Verify the file to make sure you didn't download the wrong virus that could harm your computer. Make sure you have downloaded from a trustworthy source with full reviews of some of its users before.
Click "Download" to save the file to your computer. Typically the font file will be downloaded as a ZIP archive, which you will have to unzip after downloading. Just simply double-click on the ZIP archive and then save the font file to a different location on your computer, like on the desktop.
Open the Control Panel. Click Start, then click Control Panel. The menu that appears allows you to customize settings for your computer.
Open the Fonts menu. Click Appearance and Personalization in the Control Panel, and open the Fonts option.
Click the File menu. If you don't see the File menu, press the Alt key, and the menu will now pop up. Select "Install New Font" from the drop-down menu. A Fonts dialog box will appear to help you navigate the installation.
Choose a location for the newly downloaded font file. Make sure you unzip it if the file is in ZIP compressed format, otherwise it won't be able to show up in the file list.
Select "Install" once the correct file has been selected. Follow the instructions from the installation window. You can use that font the next time you visit it.
- If you have problems using the new typeface, try restarting your computer.
Method 3 of 4: Install Fonts on Mac OS
Load the font of your choice. Be sure to download fonts from reputable sites, as font files are usually virus-containing files. Most of the lowercase fonts are downloaded as ZIP archives. Save the file somewhere easy to find, like right on your desktop.
Extract the file. To extract a .zip file, you just need to double click on the file. The .rar file format will need an extractor app, like 7Zip or Winrar.
Double-click the font file. This will open the Font Book for you to preview the font. You can also open Font Book manually from the Applications folder.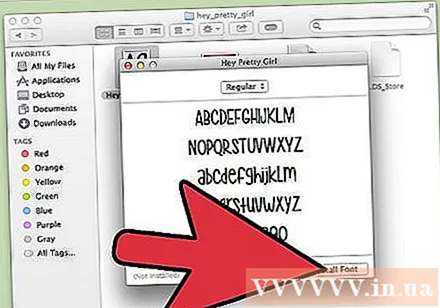
- You can use the menu at the top of the window to see how the typeface appears when you change a variety of styles, like bold or italic.
Tap Install Font. This will add the font of your choice to your list of fonts in other documents and programs. You can also set up fonts by opening Font Book, clicking File, and then selecting Add Font. You can also search for font files on your computer. advertisement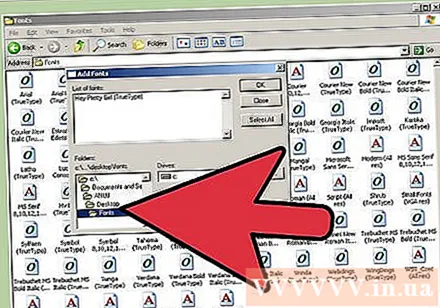
Method 4 of 4: Install Fonts on Ubuntu Operating Systems
Find your favorite typeface from a reputable source. The file extension will be more or less the same as the one on Windows if you install a font in TrueType (.ttf) or OpenType (.otf) format. Extract fonts if they are in archive file format.
Backup to / usr / share / fonts / truetype. Use the file manager (usually Nautilus) with advanced priority to do it, otherwise you won't be able to back up due to file / directory permissions (file / directory).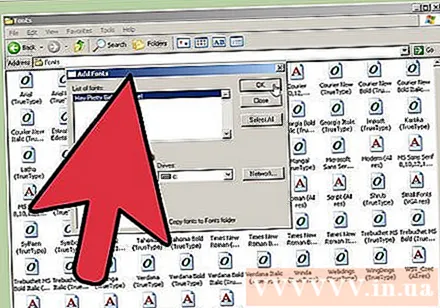
- Instead, if you are familiar with Terminal, you can go for it sudo cp
/ usr / share / fonts / truetype (withis the specific path to the font), or if you back up all the fonts in the directory CD to that directory, use the way sudo cp * / usr / share / fonts / truetype
- Instead, if you are familiar with Terminal, you can go for it sudo cp


