Author:
John Pratt
Date Of Creation:
16 April 2021
Update Date:
1 July 2024
Content
- To step
- Part 1 of 2: Taping fingers with buddy injury
- Part 2 of 2: Avoid potential complications
- Tips
- Warnings
Buddy taping is a useful and simple method for treating sprains, dislocations and fractures in fingers or toes. Buddy taping is commonly used by healthcare professionals such as sports physicians, physiotherapists, chiropractors and trainers, but can also be used at home by someone who has no medical background. When done properly, buddy taping will provide support, protection and will stabilize the joints with the injury.
To step
Part 1 of 2: Taping fingers with buddy injury
 Determine which finger has injured you. Fingers are more susceptible to injury or even fracture than other body parts when, for example, you get them in the door or while participating in contact sports. In most cases it is obvious which finger you got the injury from (namely the finger that hurts the most), but sometimes you need to examine your hand and fingers more closely to determine the exact location and severity of the injury . Signs that may indicate mild to moderate injury include redness, swelling, inflammation, pain in a specific area, bruising, limitation in movement function, and perhaps some misalignment if your finger is dislocated or broken.
 - Buddy taping can be used with almost any finger injury, even some stress fractures (small hairline cracks in the bone), although more serious injuries often require splints, plasters or surgery.
- Minor stress fractures, bone splinters, bruises (bruises) and sprains are considered minor injuries, but fingers that have sustained serious injuries (crushed and bleeding) or complicated fractures (bleeding where the bone has punctured the skin) require immediate medical attention, especially if the injury is including the thumb.
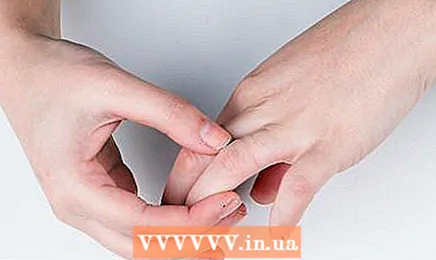
 Decide which fingers to tap. Once you have identified which finger you sustained the injury on, you need to decide which adjacent finger to tap it with. In general, you should tape together fingers that are closest in length. The index and middle fingers are usually taped together during buddy taping. In addition, the ring finger and the little finger go best together. Your thumb cannot be taped to your index finger due to its location and movement options. Injuries to thumbs should therefore usually be splinted or put in a cast when there is a serious sprain or fracture. In addition, it is important that you make sure that the finger acting as a “buddy” is free from injury, as taping two fingers with injury can cause more problems.
 - If you've injured your ring finger, you have the option of taping it to your middle or little finger. Choose the finger that most closely matches your ring finger in terms of length, but for the most stability, your ring finger should be taped to your middle finger.
- Be very careful with taping fingers if you have diabetes, circulatory problems or peripheral arterial disease, as a significant reduction in blood circulation (because the tape is applied too tightly) increases the risk of tissue death (necrosis).
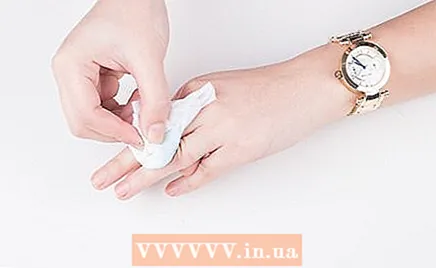 Prepare your fingers for taping. Once you have decided which two fingers to tape together, prepare your fingers for this. Start by washing your hands with soap and water, then clean the two fingers extra with alcohol wipes. The alcohol wipes (with isopropyl alcohol) are not only a good antiseptic, but also help you get rid of any oily or greasy residue that may be preventing the tape from sticking to your skin. Place a hypoallergenic or low-irritant bandage under the tape if you have very sensitive skin.
 - If you don't have alcohol wipes available, soap and water are the next best thing.
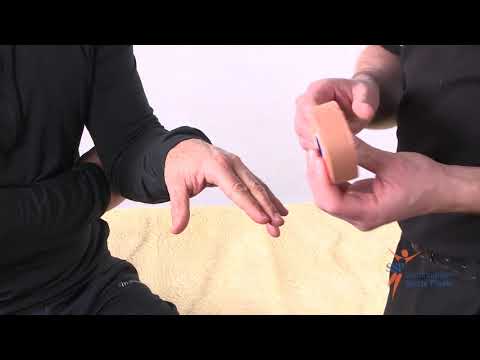
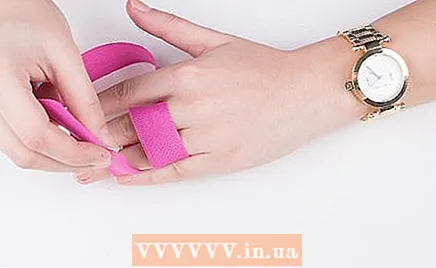
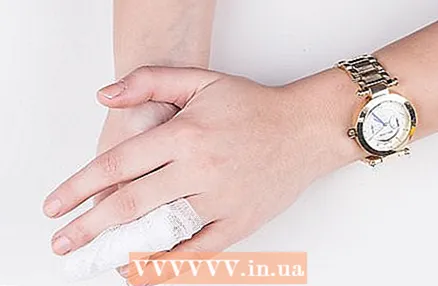
 Tape your fingers together. Once you have cleaned and prepared your fingers, tape your finger with the injury to a finger without injury with non-elastic medical, surgical or sports tape (approximately 1 inch wide). You might want to keep an “eight” pattern while taping for more stability. Be careful not to wrap the tape too tightly around the fingers to avoid creating more swelling and cutting off circulation. The tape must be applied firmly enough so that both fingers can move together. Check that you are not dealing with numbness, throbbing, skin discoloration, or a loss of sensation in one of the fingers after taping the two fingers.
 - Consider placing a thin strip of foam or gauze between your fingers for extra comfort, protection and to prevent your skin from chafing and / or blistering.
- You should be aware that the risk of bacterial infection increases significantly with blisters and scrapes on the surface of the skin.
- Materials you can use for finger taping include non-elastic medical / surgical tape, self-adhesive bandages, painter's tape, small pieces of Velcro, and rubber bandages.
- To provide more support (which is especially good for dislocated fingers) you could use a wooden or metal splint in combination with the tape. Ice cream sticks are also a good option. Just make sure there are no sharp edges on the stick to avoid damaging your skin.
 Consult a physician for an evaluation. If the injury is serious enough to be taped, it is also serious enough to be examined by a doctor. Once your finger is stabilized, you should have a doctor examine the injury extensively. X-rays will likely be taken to determine whether or not there is a serious fracture or other damage.
 - Use buddy taping as a temporary solution until you actually start seeking medical help. This method serves not to act as a substitute for medical assistance.
- If you are in pain, you may want to take an over-the-counter pain reliever medication to relieve the pain. Try acetaminophen or ibuprofen (e.g., Advil).
Part 2 of 2: Avoid potential complications
 Replace the tape regularly. If your fingers were initially taped by your doctor or another healthcare professional, it is likely that he or she used waterproof tape so that you can safely wash your hands and shower at least once. However, as a general guideline, you should change the tape daily, especially if you shower or wash your hands regularly. Wet or damp tape and dressings promote the growth of unwanted bacteria and fungus, which cause an unpleasant odor and increase the risk of skin infection.
 - You should be careful when removing the tape to avoid aggravating the injury or damaging your skin. Use bandage scissors to cut the tape and then slowly remove the tape.
- If the finger with the injury hurts more after re-taping it, remove the tape and start over, but this time make sure you don't apply the tape as tightly. This may also be a sign that it is wise to seek medical advice.
- The finger with the injury, depending on the severity of the injury, may need to be taped with an adjacent finger for up to four weeks in order to heal properly. So you will likely become very adept at re-laying the tape.
 Check yourself for symptoms of an infection. This step is very important. Before re-taping your fingers regularly, check your fingers and the rest of your hand for signs of skin irritation or infection. Abrasions, blisters, and calluses increase the risk of skin infection, so thoroughly clean and dry your fingers before re-taping them. Wash your hands with soap and water.
 - Signs of local infection include swelling, redness, throbbing pain and the presence of pus (exudate), which may have an unpleasant odor.
- It is very important to seek immediate medical attention if you suspect you have a skin infection.
 Be very alert for signs of necrosis. As mentioned above, necrosis involves tissue death due to a shortage of blood and oxygen. An injured finger, especially a dislocated or broken finger, can also cause damage to blood vessels, so take extra care not to cut off circulation while taping the fingers. If you accidentally applied the tape too tightly, you will probably notice a throbbing sensation in your fingers, along with a nasty pain and dark red and blue skin. Most tissue can survive for a few hours (at most) without oxygen, but it is important to keep a close eye on your fingers within the first 30 minutes of taping to make sure blood circulation is normal.
 - Diabetics often have less feeling in their hands (and feet) and more often experience poor blood circulation. Diabetics should avoid buddy taping and be examined by a physician as the risk of infection is significant.
- If necrosis does appear, a bacterial infection can develop fairly quickly. Untreated bacterial infections can lead to tissue death and an amputation may be necessary to prevent further spread of the infection.
- If you have a complicated fracture of your finger (where the bone has pierced the skin), your doctor may prescribe a two-week course of oral antibiotics to ward off a bacterial infection.
 Do not tape fingers with serious injuries. While most finger injuries respond well to buddy taping, this is not the correct method for every injury. For example, if fingers have been severely pinched and crushed or if you are dealing with a complicated fracture involving severe skew and bone fragments puncturing the skin, no amount of tape will help and in such a case buddy taping should not even be considered. For complicated and unstable fractures, you should instead go to an emergency room as soon as possible to receive appropriate medical care (likely invasive surgery). On the other hand, stress fractures (small hairline cracks in the bone) are stable and suitable for taping as a temporary solution before a doctor can examine your finger more closely.
 - Common symptoms of serious injury with a broken finger are: intense sharp pain, swelling, stiffness and bruising due to internal bleeding. You will likely find that your finger is slightly crooked and find it difficult to make a fist or lift something heavy without being in severe pain.
- Broken fingers can be linked to conditions that weaken the bone, such as cancer (bone tumors), local infections, osteoporosis (decalcification) or chronic diabetes.
Tips
- Activities can worsen the finger injury and cause more pain, so it's a good idea to minimize the stress on the hand with the injury until the pain and inflammation disappear.
- Strains and sprains of a finger usually take a week to heal. For small hairline cracks in the bone (stress fractures), the healing process takes two to three weeks and for severe, unstable fractures you should expect a healing process of four to six weeks.
- Most fractures in fingers are caused by machine accidents, falls with an outstretched hand or while playing sports (especially rugby and basketball).
Warnings
- If you suspect you have a fracture, seek the help of a doctor. Buddy taping is a good solution for most forms of finger injury in the short term, but unstable fractures should seek medical attention at all times.


