Content
- To step
- Method 1 of 2: Fix small areas of rot with epoxy
- Method 2 of 2: Place replacement pieces for badly rotted wood
- Tips
- Necessities
- Repair small pieces of rot with epoxy
- Place replacement pieces for badly rotted wood
It is not uncommon to experience rotting in older homes, especially around unsealed areas such as windows. However, if ignored, a rotten window frame can expose your home to further damage, including mold growth, deteriorating insulation, and even crumbling window frames. The good news is that replacing the wood around a window doesn't have to be an expensive or complicated job. Most small spots can simply be scraped out and filled with epoxy. For big rot spots around the windowsill or the edges, remove the entire section and cut a new piece in place. If there is any damage to the window sash itself, it is best to have it repaired by a contractor to make sure it is done properly.
To step
Method 1 of 2: Fix small areas of rot with epoxy
 Scan the wood to determine the extent of the rot. When wood starts to rot, it becomes "punky", which means it takes on a soft, spongy texture. To determine how bad the problem is, go around the entire frame and apply pressure to the wood every 5 to 7.5 cm with your fingertip or with a small tool such as an awl or screwdriver. If you feel it giving, then there is probably rot in that part of the frame.
 - Wood rot is often accompanied by peeling, wrinkled, or discolored paint.
- Make sure to touch the entire surface of each piece, otherwise you could miss a spot.
Tip: it is best to use epoxy when the piece you are repairing is still 80 to 85% intact, or when it would be particularly expensive or difficult to replace the piece with new wood.
 Scrape away small rotten spots with a screwdriver or chisel. Dig the tip of the tool into the bad wood and remove it from the door frame. There will not be too much resistance, because the wood has softened due to the rotting. However, you do need to be careful to avoid damaging the surrounding wood. Continue to hollow out and scrape until all that is left is hard and healthy wood.
 - Take your time and focus on removing as much rotten wood as you can. If you leave something behind, it can easily spread to another part of the frame.
- If it turns out that the rot is bigger than you initially thought, you may not be able to do anything but cut new pieces to replace those that are beyond salvage.
 Mix the epoxy according to the manufacturer's directions. Most epoxies consist of two separate adhesive components that must be combined in equal parts to work effectively. Follow the mixing instructions on the package to make enough epoxy for any spot you discovered during the scan.
 - Make sure to get an epoxy wood filler specifically designed for use on wood surfaces.
- If possible, mix on a surface that the epoxy will not stick to, such as a piece of plexiglass, plastic tarp or freezer bag, or the shiny side of a strip of packing tape.
 Apply the epoxy to the damaged area with a putty knife. Apply enough to fill in the area a bit - the excess can be sanded off later. After filling each spot, run the flat side of the putty knife over the epoxy a few times, as if you were glazing a cake. This will give you a smoother finish that is easy to hide under a few coats of paint.
 - Some two-part epoxy kits are sold with spray guns that allow the filler to be mixed and applied simultaneously. Keep in mind that you will still need to use a putty knife to spread the epoxy, even if you use a gun to apply it.
- It is better to use too much epoxy than too little. Partially filled holes and crevices can cause unsightly dents and pits when the surface is repainted.
- You have about 30 to 60 minutes from when you mix the epoxy until it starts to dry, so do your best to work quickly and efficiently. If you are going to repair multiple windows, make a new batch before starting the next one.
 Let the epoxy cure for at least three to four hours. As it cures, it will gradually expand to further fill in the damaged area. It then hardens and creates a strong and watertight seal that keeps unwanted moisture out much better than new wood or paint alone.
 - You may need to let the freshly applied epoxy sit for up to 24 hours in particularly cool or humid weather.
- Do not treat the epoxy in any way while it is curing. With that, you could warp it and wipe out all your hard work.
 Sand the dried epoxy flush with the surrounding wood. Start with an 80-grit sandpaper to sand away the excess filler, then move to a 120-grit sandpaper to tackle the fine details. Move the sandpaper in tight and smooth circles over the epoxy to ensure a flawless finish.The goal is to shape it to the outline of the part of the window you are repairing.
 - Wear a face mask and goggles to protect yourself from dust and make sure to vacuum up the loose residue afterwards.
- By the time you're done, the only indication that the spot has been patched is the difference in color between the wood and the epoxy.
 Touch up the patch with two or three coats of exterior paint. For full coverage and even color, apply at least two coats of paint to the epoxy and surrounding wood surface. Allow the surface to dry between coats for the recommended time. When you're happy with the way your window looks, let the paint dry for at least 24 hours before making any further changes to it.
 - An angled paintbrush works best for painting narrow trim, trim and other small and detailed elements.
Method 2 of 2: Place replacement pieces for badly rotted wood
 Inspect the entire window to see how bad it is. Work along all four edges of the frame and press down on the wood with a finger or a small hand tool. Look for areas that feel soft or spongy. These spots are often accompanied by visible signs of rotting, such as flaking, splintering, and peeling or discolored paint.
 - In places with multiple planks or small pieces, note the exact point where the normal and healthy wood turns into putrefaction. By keeping intact wood as much as possible, you save on both the labor required and the total budget for the job.
 Cut or pry out the entire rotten part. Loosen the affected edges and frames with a pry bar, then pull them out by hand. If you come across a piece of wood that you can't get free, get a cutting tool that you can maneuver in tight spaces, such as a reciprocating saw or jigsaw. Make a series of shallow cross cuts in the rotten wood, stopping just at the healthy wood below. Push the wood out with a pry bar after making the notches.
 - An awl, putty knife, or similar tool can also be useful for scraping wood pulp from joints and cracks.
- Work carefully to avoid unnecessary damage to the nearby side layers or sheet materials.
- Once you have removed the window sash, unhook the balances from the inside of the frame.
Tip: if your window construction is particularly complicated, it may be a good idea to take a picture of the window before starting the dismantling process. That way you have a reliable reference that shows you how everything should fit together again.
 Measure all pieces you remove individually. Use a ruler or tape measure to determine the length, width, and thickness of each element you pull out of the window. Record the measurements on a separate sheet of paper and label them appropriately. The replacement materials must match these dimensions as closely as possible.
 - Annotating features such as mitered corners or attachment points can help you recreate them later.
 Seal any cracks in the exposed sheeting below. Visible gaps around the edges of the window need to be addressed before you can proceed with installing the replacement parts. Seal small and medium-sized cracks with caulk or tape, and use expandable foam insulation cans to close larger gaps. In case of water damage to the surrounding plating, you can also choose to apply flexible sealing tape to prevent even more moisture from penetrating.
 - You are more likely to encounter cracks and holes in the siding, which is the case with many older homes.
- It is important to seal any opening you can reach. A small crack can quickly grow large.
 Cut new wood to fit the rotten areas. Use the measurements you took earlier to cut the replacement wood to identical dimensions. Make sure to make clean and neat cuts so you can easily slide the new piece into place without making any further adjustments. Don't forget to miter the ends of trim at a 45 degree angle.
 - Shop around for wood with a similar thickness and grain pattern to that of the original window parts.
- If you are unsure about the type of wood used in the construction of your home, take a photo or sample of a healthy and undamaged part of the window to the hardware store to have it examined by a professional.
- With a miter box or a triangle ruler you can quickly and with extreme precision align several cuts at angles of 90 and 45 degrees.
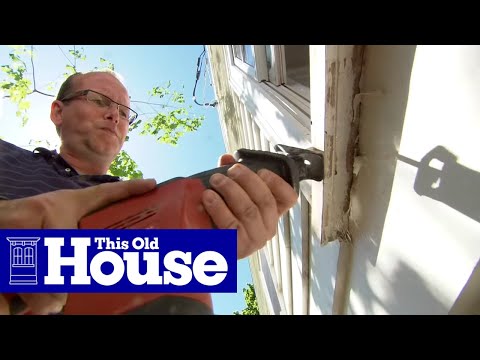
 Install the new pieces with galvanized nails. Home furnishing experts usually recommend using steel nails to secure the window trim. Hit a nail in the top and bottom corners of each piece and do the same in the center. Repeat this process for each individual element you install.
 - On particularly large windows, you will need to place the nails 40 cm apart in pairs to ensure that the new parts stay in place.
- If necessary, fill recessed nail holes with wood putty to make them flush with the surface of the wood.
 Paint the new parts as needed. Apply two or three coats of exterior paint in a color that matches the surrounding intact elements. Allow each coat to dry for the manufacturer's recommended time before starting the next coat and allow the top coat to dry for 24 hours. Apply at least two coats to unfinished wood for full coverage.
 - If you are redecorating an older house and you have no way of finding out the exact color of the paint used, try to match it as closely as possible. A set of paint samples or a color matching app can help you with the comparison.
- Another option is to repaint all window frames. A brand new paint job guarantees that you will not have to deal with color differences. And if the existing paint is fading, it is probably time to repaint anyway.
Tips
- Make it a habit to do regular maintenance on your exterior windows, such as sealants, rags, and repainting. This keeps them looking good for longer and working better, and you avoid the need for more radical repairs.
- The window sash, or the sliding portion of the window that contains the glass, is much more difficult to replace because it consists of many pieces that need to be specially measured and cut. If you notice deterioration around any part of the window, contact a qualified repair specialist and have him or her assess the severity of the situation.
Necessities
Repair small pieces of rot with epoxy
- Awl, screwdriver, or chisel
- Epoxy wood filler
- Putty knife
- Sandpaper grit 80
- Sandpaper grit 120
- Exterior paint
- Angled finishing brush
- Face mask and safety glasses
- Vacuum cleaner
Place replacement pieces for badly rotted wood
- Crowbar
- Ruler or tape measure
- Paper and pencil
- Replacement wood
- Circular saw
- Miter box or triangle ruler
- Galvanized steel nails
- Exterior paint
- Angled finishing brush
- Saber saw or jigsaw (optional)
- Awl, screwdriver, or chisel (optional)
- Kit, expandable foam insulation, or flexible sealing tape (optional)
- Wood putty (optional)


